Purpose
This blog will focus on basic setup of Smart Data Access (SDA) and then outline some problems that customers have encountered. Some of the issues outlined in the troubleshooting section come directly from incidents that were created.
There is already a lot of information on Smart Data Access which this blog does not aim to replace. Throughout the blog, I will reference links to other documentation that can cover the topics in more detail.
What is Smart Data Access (SDA)?
SDA allows customers to access data virtually from remote sources such as Hadoop, Oracle, Teradata, SQL Server, and more. Once a remote
connection to a data source is done we can virtually connect to the tables and query against is or use in data models as if it were data that resides in a SAP
HANA database.
This allows it so customers do not have to migrate or copy their data from other databases into a SAP HANA database.
How to Setup SDA?
Smart Data Access was introduced in SAP HANA SP6, so if you intend on using SDA be on at least this revision.
Prior to connecting to a remote database you will need to configure an ODBC connection from the server to the remote database. For
assistance on how to install the Database drivers on how to install the database drivers for SAP HANA Smart Data Access please refer to SAP note
1868702 and refer to the SAP HANA Learning Academy videos
https://www.youtube.com/watch?v=BomjFbJ25vo&index=16&list=PLkzo92owKnVx_X9Qp-jonm3FCmo41Fkzm
Changes to SDA?
For information on what upgrades to SDA has occurred with each revision of SAP HANA please feel free to review the following
SP6 -> SP 7 delta
http://www.saphana.com/servlet/JiveServlet/previewBody/4296-102-7-9005/HANA_SPS07_NEW_SDA.pdf
SP7 -> SP 8 delta
http://www.saphana.com/docs/DOC-4681
What Remote Sources Are Supported (As of SP8)?
Hadoop
Teradata
SAP HANA
Oracle 12c
Sybase ASE
Sybase IQ
DB2 (SP8)
Microsoft SQL Server 2012
Apache Spark (SP8)
** Please note that you could connect to other databases via ODBC, but please note that we cannot guarantee that it will work. **
How To Add a Remote Source
Once you have configured your ODBC files to the external data source of your choosing you can setup a connection to that source in
Studio by doing the following (we are using Oracle in our example)
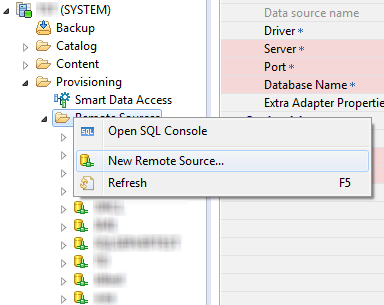
1. Expand your system -> Provisioning
2. Right click on the Remote Sources folder and select New Remote Source…
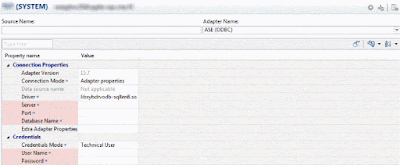
3. The main window pane will request you to enter in the connection information
4. Click on the Adapter Name drop down select the appropriate adapter (for this example we will select Oracle). The main window pane will request
you to enter in the connection information
- ASE – Adaptive Service Enterprise: version 15.7 ESD#4
- Teradata – version 13 and 14
- IQ – Version 15.4 ESD#3 and 16.0
- HANA – HANA revision 60 and up
- HADOOP – HDP 1.3 support added SP7
- Generic ODBC – This to connect to other databases that support ODBC protocol, however we do not guarantee that it will work
- Oracle – Oracle 12c support added in SP7
- MSSQL – Microsoft SQL Server ver11 support added in SP7
- Netezza – Netezza version 7 added in SP8
- DB2– DB2 UDB version 10.1 added in SP8
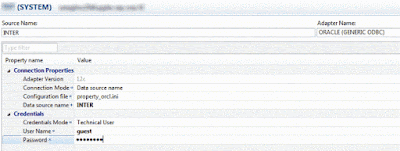
5. Fill in connection properties and credentials
6. Press the execute button to save this connection
** As an alternative, you can create a remote source through SQL using the following command: CREATE REMOTE SOURCE <Name>
ADAPTER "odbc" CONFIGURATION FILE 'property_orcl.ini' CONFIGURATION 'DSN=<DSNNAME>' WITH CREDENTIAL TYPE 'PASSWORD' USING 'user=<USERNAME>;password=<Password>';
7. Press the Test Connection button to verify the connection to the source is successful
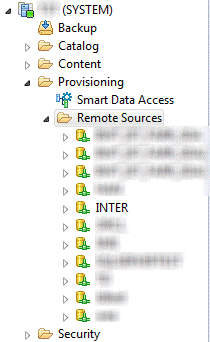
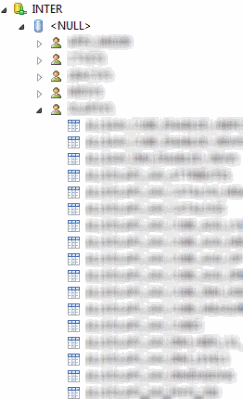
8. Under the Remote Source you will now see your connection
How To Access The Virtual Tables
1. After adding your New Remote Source, expand it to see the users and the tables
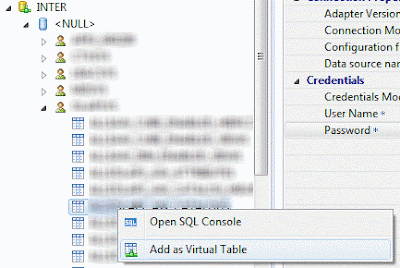
2. Right click on the table you would like to access and select ‘Add as Virtual Table’
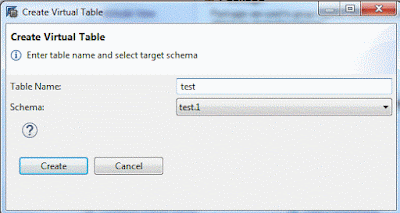
3. You will then choose the alias name and the schema you would like to add this virtual table
4. After hitting create you will get a confirmation message
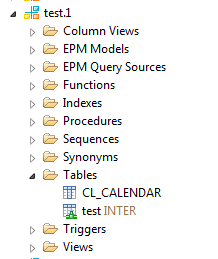
5. Now you can check the schema you have chosen
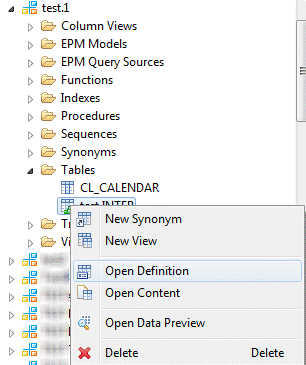
6. If you select ‘Open Definition’
7. You will see under the ‘Type’ it says ‘Virtual’
Source: scn.sap.com

