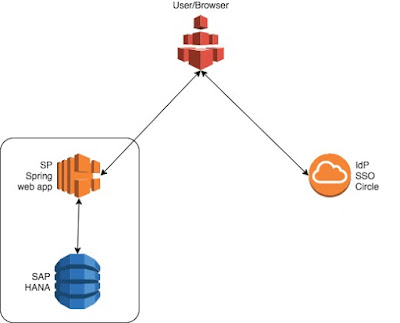
SAP HANA provides users the ability to authenticate using a valid, trusted SAML assertion token. Recently, I was asked to demonstrate this ability to authenticate with a trusted SAML token from a Spring Security web application. So, I laid out a scenario as shown in the figure below.
As you can see in the figure, the Spring web application is the Service Provider (SP) while SSO Circle is the Identity Provider (IdP). The user connects to the web application and, on first login, is redirected to the Identity Provider to be authenticated. Upon successful authentication, the Spring web application receives a valid SAML assertion token.
The web application can then use the valid token to login to the SAP HANA database. An added benefit is that the database will also know the name of the external user for authorization purposes. In this blog post, I will describe the configuration steps that were needed to make this scenario work.
Step 0: Pre-requirements
In my scenario, I used the following software components:
0.1 SAP HANA v2 SP00 database. This worked with HANA v1 SP12 as well.
0.2 A valid SSO Circle user account available at https://idp.ssocircle.com/sso
Please go to SSO Circle and create a new user. Take note of your user name and email address.
0.3 Spring Security SAML sample web application. I downloaded the sample web application from the following link. Before you deploy this web application to your Tomcat container, please see the step that requires you to make a few edits first.
Step 1: Configure SAML provider in SAP HANA
In order for SAP HANA to trust the SAML assertion sent by the identity provider, you will need to first set up the SAML Identity Provider using the XS Admin utility.
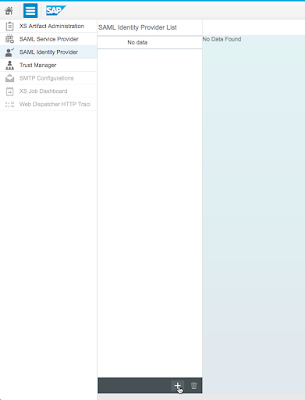
1.1 Login to the XS Admin utility at http://host:8000/sap/xs/admin. Click on the XS Administration Tools icon next to the SAP logo and then click on SAML Identity Provider. Then, click on the plus sign to add a new identity provider.
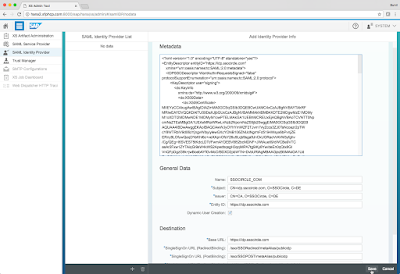
1.2 Download the Identity Provider metadata for SSO Circle from the URL https://idp.ssocircle.com/idp-meta.xml. Copy and paste the contents of this file into the Metadata text box and press the TAB key. The required fields will be automatically filled out. I simply changed the provider name to SSOCIRCLE_COM.
1.3 Create a database user with an external identity tied to your SSO Circle user id. You can accomplish this by running the following SQL statements:
CREATE USER SUNIL_WADHWA WITH IDENTITY 'sunil.wadhwa' FOR SAML PROVIDER SSOCIRCLE_COM;
ALTER USER SUNIL_WADHWA SET PARAMETER EMAIL ADDRESS = 'sunil.wadhwa@gmail.com';
By default, SSO Circle specifies an email address in the Subject field of the SAML assertion token, therefore it is important for you to associate an email address with the user as shown above.
Step 2: Configure the Spring Security SAML web application
Although the Spring Security SAML sample web application comes with out of the box support for SSO Circle, it needs to be modified to connect to the HANA database. The sample was not meant to connect to a database, so we will need to modify a few things in order for it to serve our purpose.
Download the sample code and set it up in your favorite IDE and favorite build tool.
2.1 Add the SAP HANA JDBC driver to your war file. You will need to include the SAP HANA jdbc driver (ngdbc.jar) since you are going to connect to the HANA database. I just added the jar file directly to the src/main/webapp/WEB-INF/lib folder. When you build the war file, it should include the driver.
$ jar tvf spring-security-saml2-sample.war WEB-INF/lib/ngdbc.jar
921231 Tue Oct 25 14:07:16 MDT 2016 WEB-INF/lib/ngdbc.jar
2.2 Fix the webSSOprofileConsumer bean. There is a nasty issue where the SAML assertion token gets stripped down if you don’t set this property. In order to instruct Spring SAML to keep the assertion in the original form (keep its DOM) set property releaseDOM to false on bean WebSSOProfileConsumerImpl.
Update the bean configuration file src/main/webapp/WEB-INF/securityContext.xml file as shown here:
<!-- SAML 2.0 WebSSO Assertion Consumer -->
<bean id="webSSOprofileConsumer" class="org.springframework.security.saml.websso.WebSSOProfileConsumerImpl">
<property name="releaseDOM" value="false" />
</bean>
2.3 Create a Java class to connect to the database and run get current user query:
package com.sap.startupfocus.demo;
import java.sql.*;
import org.opensaml.xml.util.XMLHelper;
import org.springframework.security.core.Authentication;
import org.springframework.security.core.context.SecurityContextHolder;
import org.springframework.security.saml.SAMLCredential;
import org.springframework.security.saml.util.SAMLUtil;
public class DatabaseConnector {
public static void getUserInfo() throws Exception {
/* Get assertion string */
Authentication authentication = SecurityContextHolder.getContext().getAuthentication();
SAMLCredential credential = (SAMLCredential) authentication.getCredentials();
String assertionString = XMLHelper.nodeToString(SAMLUtil.marshallMessage(credential.getAuthenticationAssertion()));
/* Connect to database with blank user name and assertion string as password */
Class.forName("com.sap.db.jdbc.Driver");
Connection c = DriverManager.getConnection(dbUrl, "", assertionString);
System.out.println("Connected to " + dbUrl);
/* Get current user query */
Statement stmt = c.createStatement();
ResultSet rs = stmt.executeQuery("select CURRENT_USER from DUMMY");
if (rs.next()) {
String currentUser = rs.getString(1);
System.out.println("Current User = " + currentUser);
}
}
private static String dbUrl = "jdbc:sap://dbhost:30015/";
}
2.4 Create a hook in the index.jsp web page to call the getUserInfo() static method. Edit the file src/main/webapp/index.jsp and add the call at the location shown below:
<%@ page import="com.sap.startupfocus.demo.DatabaseConnector" %>
<%
Authentication authentication = SecurityContextHolder.getContext().getAuthentication();
SAMLCredential credential = (SAMLCredential) authentication.getCredentials();
pageContext.setAttribute("authentication", authentication);
pageContext.setAttribute("credential", credential);
pageContext.setAttribute("assertion", XMLHelper.nodeToString(SAMLUtil.marshallMessage(credential.getAuthenticationAssertion())));
========> DatabaseConnector.getUserInfo();
%>
Step 3: Deploy and test!
So, that should be it. Deploy the war file to your favorite Java container, and open up the web page for your sample application. It should redirect you to SSO Circle to log in and then you should receive the following page:
Also, if you look at the log files you should see the message that the connection was successful and the current user should be SUNIL_WADHWA!
Connected to jdbc:sap://dbhost:30015/
Current User = SUNIL_WADHWA


