Quantcast
Channel: SAP HANA Central
Viewing all 711 articles
Browse latest View live

HANA Express Edition on an UBUNTU 16.04 LXC Container

$
0
0
I’m assuming you have a working Ubuntu 16.04 Server or Desktop installation, and you have the installation files by hand.
What we’ll do is:

  • Install required packages, 
  • create a network bridge, 
  • do some LXC config stuff, 
  • create a LXC container and 
  • install HANA Express Edition in that container. 

What we’ll get is:

  • A Hana Express Edition working in a Linux Contianer, 
  • all advantages of an isolated Virtual Machine, 
  • a much smaller VM memory footprint, 
  • and near bare metal speed.

Installing required Packages


$ sudo apt-get install lxc lxc-templates wget bridge-utils

Creating a Network Bridge


Before we create the network bridge we have to gather few information about our System.

We have to identify the nameserver, get information on the default gateway and at least make us familiar with our primary network interface.

$ sudo cat /etc/resolv.conf

# Dynamic resolv.conf(5) file for glibc resolver(3) generated by resolvconf(8)
# DO NOT EDIT THIS FILE BY HAND -- YOUR CHANGES WILL BE OVERWRITTEN
nameserver 192.168.1.1

The nameserver on my system is the machine with the IP address 192.168.1.1.

$ sudo route

Kernel IP routing table
Destination Gateway Genmask Flags Metric Ref Use Iface
default 192.168.1.1 0.0.0.0 UG 0 0 0 enp2s0
192.168.1.0 * 255.255.255.0 U 0 0 0 enp2s0

The default gateway on my system is the machine with the IP address 192.168.1.1.

$ sudo ifconfig

enp2s0 Link encap:Ethernet HWaddr d8:50:e6:51:af:aa
 inet addr:192.168.1.236 Bcast:192.168.1.255 Mask:255.255.255.0
 inet6 addr: fe80::216:3eff:fe4c:1d79/64 Scope:Link
 UP BROADCAST RUNNING MULTICAST MTU:1500 Metric:1
 RX packets:49 errors:0 dropped:0 overruns:0 frame:0
 TX packets:13 errors:0 dropped:0 overruns:0 carrier:0
 collisions:0 txqueuelen:1000
 RX bytes:12962 (12.9 KB) TX bytes:1478 (1.4 KB)

lo Link encap:Local Loopback
 inet addr:127.0.0.1 Mask:255.0.0.0
 inet6 addr: ::1/128 Scope:Host
 UP LOOPBACK RUNNING MTU:65536 Metric:1
 RX packets:0 errors:0 dropped:0 overruns:0 frame:0
 TX packets:0 errors:0 dropped:0 overruns:0 carrier:0
 collisions:0 txqueuelen:1
 RX bytes:0 (0.0 B) TX bytes:0 (0.0 B)

My primary network interface is enp2s0 with the IP address 192.168.1.236 and a subnet mask of 255.255.255.0. Now let’s create a network bridge by editing the file /etc/network/interfaces.

$ sudo nano /etc/network/interfaces

# This file describes the network interfaces available on your system
# and how to activate them. For more information, see interfaces(5).

source /etc/network/interfaces.d/*

# The loopback network interface
auto lo
iface lo inet loopback

# The primary network interface
auto enp2s0
iface enp2s0 inet manual

# bridge for VMs
auto brlan
iface brlan inet static
 address 192.168.1.10
 netmask 255.255.255.0
 gateway 192.168.1.1
 bridge_ports enp2s0
 bridge_stp off
 bridge_fd 9
 dns-nameservers 192.168.1.1

In the file /etc/network/interfaces we have changed the settings for the primary network interface to ‘manual’, which means bring up the interface and do nothing else. We’ve created a new ‘virtual’ interface named ‘brlan’ which is our network bridge. The settings address and netmask(subnet mask) have been show in the output ‘sudo ifconfig’ we did earlier. Settings for gateway was given to us by the output of ‘sudo route’. And finally the dns-nameservers attribute as obtained by the command ‘sudo cat /etc/resolv.conf’.

Fire up the bridge


$ sudo service networking restart

If your on ssh you will loose the connection to the machine in that step, reconnect using the new IP address 192.168.1.10. We should check the result first.

$ sudo ifconfig

brlan Link encap:Ethernet HWaddr d8:50:e6:51:af:aa
 inet addr:192.168.1.10 Bcast:192.168.1.255 Mask:255.255.255.0
 inet6 addr: fe80::da50:e6ff:fe51:afaa/64 Scope:Link
 UP BROADCAST RUNNING MULTICAST MTU:1500 Metric:1
 RX packets:3167230 errors:0 dropped:2509 overruns:0 frame:0
 TX packets:1203222 errors:0 dropped:0 overruns:0 carrier:0
 collisions:0 txqueuelen:1000
 RX bytes:1696031356 (1.6 GB) TX bytes:17641075957 (17.6 GB)

enp2s0 Link encap:Ethernet HWaddr d8:50:e6:51:af:aa
 inet6 addr: fe80::da50:e6ff:fe51:afaa/64 Scope:Link
 UP BROADCAST RUNNING MULTICAST MTU:1500 Metric:1
 RX packets:119725842 errors:0 dropped:759 overruns:0 frame:0
 TX packets:365393544 errors:0 dropped:0 overruns:0 carrier:0
 collisions:0 txqueuelen:1000
 RX bytes:88894128127 (88.8 GB) TX bytes:506161071665 (506.1 GB)

lo Link encap:Local Loopback
 inet addr:127.0.0.1 Mask:255.0.0.0
 inet6 addr: ::1/128 Scope:Host
 UP LOOPBACK RUNNING MTU:65536 Metric:1
 RX packets:566 errors:0 dropped:0 overruns:0 frame:0
 TX packets:566 errors:0 dropped:0 overruns:0 carrier:0
 collisions:0 txqueuelen:1
 RX bytes:56292 (56.2 KB) TX bytes:56292 (56.2 KB)

You should get output that looks something like this. Congrats to those that made it that far, you have an operational network bridge.

Configuring LXC


Edit the file /etc/default/lxc-net and set ‘USE_LXC_BRIDGE’ to ‘false’.

sudo nano /etc/default/lxc-net

# This file is auto-generated by lxc.postinst if it does not
# exist. Customizations will not be overridden.
# Leave USE_LXC_BRIDGE as "true" if you want to use lxcbr0 for your
# containers. Set to "false" if you'll use virbr0 or another existing
# bridge, or mavlan to your host's NIC.
USE_LXC_BRIDGE="false"

Edit the file /etc/lxc/default.conf and make LXC use our previously created bridge ‘brlan’.

$ sudo nano /etc/lxc/default.conf

lxc.network.type = veth
lxc.network.link = brlan
lxc.network.flags = up
lxc.network.hwaddr = 00:16:3e:xx:xx:xx

Here is a good point in time to reboot the machine.

$ sudo reboot

Creating the LXC container


It’s time to set up our hanaexpress2 LXC container.

$ sudo lxc-create -n hanaexpress2 -t ubuntu

Checking cache download in /var/cache/lxc/xenial/rootfs-amd64 ...
Installing packages in template: apt-transport-https,ssh,vim,language-pack-en
Downloading ubuntu xenial minimal ...
I: Retrieving InRelease
I: Checking Release signature
I: Valid Release signature (key id 790BC7277767219C42C86F933B4FE6ACC0B21F32)
I: Retrieving Packages
.
.
.

This command will create the container and install a minimal Ubuntu into it. This can take some time because all packages are downloaded. After that has completed – start your hanaexpress2 host and jump into it. Be warned: You’ll be root user if you enter the container like that.

$ sudo lxc-start -n hanaexpress2
$ sudo lxc-attach -n hanaexpress2

root@hanaexpress2:/#

If you have an dhcp enabled router on your network you will already have an IP address. Otherwise you have to configure it in the file ‘/etc/network/interfaces’, just consult the Ubuntu Server Guide.

root@hanaexpress2:/# ifconfig

eth0 Link encap:Ethernet HWaddr 00:16:3e:aa:98:15
 inet addr:192.168.1.237 Bcast:192.168.1.255 Mask:255.255.255.0
 inet6 addr: fe80::216:3eff:feaa:9815/64 Scope:Link
 UP BROADCAST RUNNING MULTICAST MTU:1500 Metric:1
 RX packets:1284 errors:0 dropped:0 overruns:0 frame:0
 TX packets:43 errors:0 dropped:0 overruns:0 carrier:0
 collisions:0 txqueuelen:1000
 RX bytes:232489 (232.4 KB) TX bytes:8483 (8.4 KB)

lo Link encap:Local Loopback
 inet addr:127.0.0.1 Mask:255.0.0.0
 inet6 addr: ::1/128 Scope:Host
 UP LOOPBACK RUNNING MTU:65536 Metric:1
 RX packets:0 errors:0 dropped:0 overruns:0 frame:0
 TX packets:0 errors:0 dropped:0 overruns:0 carrier:0
 collisions:0 txqueuelen:1
 RX bytes:0 (0.0 B) TX bytes:0 (0.0 B)

Another thing to do is to set up the correct timezone for your machine.

root@hanaexpress2:/# dpkg-reconfigure tzdata

IP address provided by router, timezone set – let’s install Hana Express !

Installing HANA Express


First of all install dependencies of the installer.

root@hanaexpress2:/# apt-get install uuid-runtime wget openssl libpam-cracklib libltdl7 libaio1 unzip libnuma1 csh curl openjdk-8-jre-headless

Reading package lists... Done
Building dependency tree
Reading state information... Done
The following additional packages will be installed:
 ca-certificates ca-certificates-java cracklib-runtime dbus fontconfig-config fonts-dejavu-core java-common
 libavahi-client3 libavahi-common-data libavahi-common3 libcap-ng0 libcrack2 libcups2 libdbus-1-3 libfontconfig1
 libfreetype6 libjpeg-turbo8 libjpeg8 liblcms2-2 libnspr4 libnss3 libnss3-nssdb libpcsclite1 libx11-6 libx11-data
 libxau6 libxcb1 libxdmcp6 libxext6 libxi6 libxrender1 libxtst6 wamerican x11-common
Suggested packages:
 dbus-user-session | dbus-x11 default-jre cups-common liblcms2-utils pcscd openjdk-8-jre-jamvm libnss-mdns
 fonts-dejavu-extra fonts-ipafont-gothic fonts-ipafont-mincho ttf-wqy-microhei | ttf-wqy-zenhei fonts-indic zip
The following NEW packages will be installed:
 ca-certificates ca-certificates-java cracklib-runtime csh curl dbus fontconfig-config fonts-dejavu-core
 java-common libaio1 libavahi-client3 libavahi-common-data libavahi-common3 libcap-ng0 libcrack2 libcups2
 libdbus-1-3 libfontconfig1 libfreetype6 libjpeg-turbo8 libjpeg8 liblcms2-2 libltdl7 libnspr4 libnss3
 libnss3-nssdb libnuma1 libpam-cracklib libpcsclite1 libx11-6 libx11-data libxau6 libxcb1 libxdmcp6 libxext6
 libxi6 libxrender1 libxtst6 openjdk-8-jre-headless openssl unzip uuid-runtime wamerican wget x11-common
0 upgraded, 45 newly installed, 0 to remove and 0 not upgraded.
Need to get 33.5 MB of archives.
After this operation, 121 MB of additional disk space will be used.
Do you want to continue? [Y/n]

Now jump out of the container, we have to copy the installation files to it.

root@hanaexpress2:/# exit

$ cd /home/halderm
$ sudo cp -v hx* /var/lib/lxc/hanaexpress2/rootfs/opt/

'hxe.tgz' -> '/var/lib/lxc/hanaexpress2/rootfs/opt/hxe.tgz'
'hxexsa.tgz' -> '/var/lib/lxc/hanaexpress2/rootfs/opt/hxexsa.tgz'

After we’d copy the files to the filesystem of our hanaexpress2 host, we’re going to jump back into the container and extract them there. As you can see above we’d copy them to the ‘/opt’ directory of our hanaexpress2 host. Please use the ‘/opt’ directory or any other user accessible directory to avoid any permission issues of the installer.

$ sudo lxc-attach -n hanaexpress2

root@hanaexpress2:/# cd /opt
root@hanaexpress2:/opt# tar xzf hxe.tgz
root@hanaexpress2:/opt# tar xzf hxexsa.tgz
root@hanaexpress2:/opt# chmod -R 777 setup_hxe.sh HANA_EXPRESS_20

Let the games begin

root@hanaexpress2:/opt# ./setup_hxe.sh

Enter HANA, express edition installer root directory:
 Hint: <extracted_path>/HANA_EXPRESS_20
HANA, express edition installer root directory [/opt/HANA_EXPRESS_20]:
Enter component to install:
 server - HANA server + Application Function Library
 all - HANA server, Application Function Library, Extended Services + apps (XSA)
Component [all]:
Enter local host name [hanaexpress2]:
Enter SAP HANA system ID [HXE]:
Enter HANA instance number [90]:
Enter master password:
Confirm "master" password:

##############################################################################
Summary before execution
##############################################################################
HANA, express edition installer : /opt/HANA_EXPRESS_20
 Component(s) to install : HANA server, Application Function Library, and Extended Services + apps (XSA)
 Host name : hanaexpress2
 HANA system ID : HXE
 HANA instance number : 90
 Master password : ********

Proceed with installation? (Y/N) :

Paddling Upstream: How to find all HANA views that use a particular table/column

$
0
0

Requirement:


Find all HANA views that use a particular table/column.

If a field is dropped/modified from a table, identify the upstream model impacts.

Problem Faced:


Our team’s analytics was based on tables from multiple source systems.

There were instances where fields were being dropped from source tables as a part of continuous changes.

These were affecting the HANA models built on top of those tables and there was no direct way to find out which models will be affected if fields from tables were dropped/modified.

This activity had to be done manually, the effort required might depend on how many models/sub models needed checking.

Current Scenario:


There is no table in HANA which will give this info.

Solution Approach:


The approach is to look for “specific” tags in the repository XML to find if a table/field is used in a model.

SAP HANA Tutorials, SAP HANA Materials, SAP HANA Guide, SAP HANA Certifications

The field is identified irrespective of whether it is propagated to the top most node.

The repository XML is stored in CDATA field of “_SYS_REPO”.”ACTIVE_OBJECT” table.

Prerequisites:


Select access to table “_SYS_REPO”.”ACTIVE_OBJECT”

Solution:


This is automated through a procedure.

The steps to create the procedure and associated tables are below.

Run the below code snippet to create the tables and the procedure.

CREATE COLUMN TABLE "FI_INPUT" ("NUM" INTEGER CS_INT PRIMARY KEY,
"SCHEMA" NVARCHAR(40),
"TABLE" NVARCHAR(40),
"FIELD" NVARCHAR(100)) UNLOAD PRIORITY 5 AUTO MERGE 
;
ALTER TABLE "FI_INPUT" ADD ("FIELD_QUERY" NVARCHAR(200) GENERATED ALWAYS AS '%source="' || UPPER("FIELD") || '"%') 
;
ALTER TABLE "FI_INPUT" ADD ("TABLE_QUERY" NVARCHAR(200) GENERATED ALWAYS AS '%<input node="#' || UPPER("TABLE") || '%') 
;
CREATE COLUMN TABLE "FI_OUTPUT" ( "TABLE" NVARCHAR(40) CS_STRING,
"FIELD" NVARCHAR(100) CS_STRING,
"PACKAGE" NVARCHAR(300) CS_STRING,
"OBJECT_NAME" NVARCHAR(300) CS_STRING ) 
;
CREATE COLUMN TABLE "FI_TEMP" ( "ID" INT CS_INT,
"PACKAGE" NVARCHAR(300) CS_STRING,
"OBJ_NAME" NVARCHAR(300) CS_STRING,
"CDATA" NCLOB MEMORY THRESHOLD 1000 ) 
;

CREATE PROCEDURE FIELD_DEPENDENCY (IN PACKAGE_NAME NVARCHAR(100)) LANGUAGE SQLSCRIPT AS 
BEGIN DECLARE I INTEGER
;
DECLARE GEN_QUERY NVARCHAR(1000)
;
DECLARE COUNTER INTEGER
;
DECLARE C1 INTEGER
;
DECLARE PK NVARCHAR(100)
;
PK := ''''||PACKAGE_NAME||'%'''
;
---Find out Existence of table/field in HANA Schemas
T1 = SELECT
TABLE,
FIELD,
CASE WHEN COALESCE(POSITION,
0) = 0 
THEN 'WRONG FIELD/TABLE' 
ELSE 'YES' 
END AS "FIELD_VALIDITY" 
FROM FI_INPUT 
LEFT OUTER JOIN TABLE_COLUMNS ON TABLE = TABLE_NAME 
AND FIELD = COLUMN_NAME 
AND SCHEMA = SCHEMA_NAME
;

SELECT COUNT(*) INTO C1  FROM :T1 
WHERE FIELD_VALIDITY = 'WRONG FIELD/TABLE';

IF C1 > 0 
THEN SELECT
FROM :T1 
WHERE FIELD_VALIDITY = 'WRONG FIELD/TABLE' 
;

ELSE DELETE 
FROM FI_OUTPUT
;
DELETE 
FROM FI_TEMP
;
SELECT
COUNT(*) 
INTO COUNTER 
FROM FI_INPUT
;
FOR I IN 1..:COUNTER DO GEN_QUERY = 'INSERT INTO FI_TEMP (SELECT ' ||:I|| ',PACKAGE_ID,OBJECT_NAME ,"CDATA" FROM "_SYS_REPO"."ACTIVE_OBJECT" 
WHERE ("PACKAGE_ID" LIKE '||:PK||') 
AND (CDATA LIKE (SELECT FIELD_QUERY FROM FI_INPUT WHERE NUM = '||:I||') AND CDATA LIKE (SELECT TABLE_QUERY FROM FI_INPUT WHERE NUM = '||:I||') ))'
;
EXEC (:GEN_QUERY)
;

END FOR
;
INSERT 
INTO FI_OUTPUT (SELECT
TABLE,
FIELD,
PACKAGE,
OBJ_NAME 
FROM FI_INPUT 
INNER JOIN FI_TEMP ON ID = NUM)
;
SELECT
FROM FI_OUTPUT
;

END 
IF
;

END 
;

The Procedure and the below tables will be created once the snippet is run.

SAP HANA Tutorials, SAP HANA Materials, SAP HANA Guide, SAP HANA Certifications

SAP HANA Tutorials, SAP HANA Materials, SAP HANA Guide, SAP HANA Certifications

Running the Procedure:


The FI_INPUT table needs to be populated with the fields to be identified.

Insert values for the first 4 fields, the last two fields are auto generated, incorporating the XML tag info mentioned earlier.

INSERT INTO "FI_INPUT" VALUES(1,'SCHEMA_NAME','TABLE_NAME','FIELD_NAME');

The procedure only runs for valid Table/fields and will keep displaying the erroneous table/field in the output until corrected.

The procedure takes a package name as input, If a root package is specified then all models under the root/sub-packages will  be searched.

CALL "FIELD_DEPENDENCY"('PackageName');

Example:

INSERT INTO FI_INPUT VALUES(1,'ECC','VBRP','NETWR');
INSERT INTO FI_INPUT VALUES(2,'ECC','VBRK','VBELN');
INSERT INTO FI_INPUT VALUES(3,'ECC','VBRK','ABCD');--THIS IS FOR A TEST

SAP HANA Tutorials, SAP HANA Materials, SAP HANA Guide, SAP HANA Certifications
The procedure won’t run until the invalid entries are corrected.

SAP HANA Tutorials, SAP HANA Materials, SAP HANA Guide, SAP HANA Certifications
Once the correction is made the Procedure can be run to get the output.

SAP HANA Tutorials, SAP HANA Materials, SAP HANA Guide, SAP HANA Certifications

These fields are being used in the below models.

SAP HANA Tutorials, SAP HANA Materials, SAP HANA Guide, SAP HANA Certifications

SAP HANA Tutorials, SAP HANA Materials, SAP HANA Guide, SAP HANA Certifications

SAP HANA Tutorials, SAP HANA Materials, SAP HANA Guide, SAP HANA Certifications

HANA Rules Framework (HRF)

$
0
0

HANA Rules Framework (HRF)


SAP HANA Rules Framework provides tools that enable application developers to build solutions with automated decisions and rules management services, implementers and administrators to set up a project/customer system, and business users to manage and automate business decisions and rules based on their organizations’ data.

In daily business, strategic plans and mission critical tasks are implemented by a countless number of operational decisions, either manually or automated by business applications. These days – an organization’s agility in decision-making becomes a critical need to keep up with dynamic changes in the market.

SAP HANA Rules Framework is already integrated with many SAP solutions and it enables their end users to enter business logic easily in different business processes (see some samples below).

HRF Main Objectives are:
  • To seize the opportunity of Big Data by helping developers to easily build automated decisioning solutions and\or solutions that require business rules management capabilities
  • To unleash the power of SAP HANA by turning real time data into intelligent decisions and actions
  • To empower business users to control, influence and personalize decisions/rules in highly dynamic scenarios

HRF Main Benefits are:


Rapid Application Development | Simple tools to quickly develop auto-decisioning applications

  • Built-in editors in SAP HANA studio that allow easy modeling of the required resources for SAP HANA rules framework
  • An easy to implement and configurable SAPUI5 control that exposes the framework’s capabilities to the business users and implementers

Business User Empowerment | Give control to the business user

  • Simple, natural, and intuitive business condition language (Rule Expression Language)
SAP HANA Tutorials and Materials, SAP HANA Guide, SAP HANA Certifications
  • Simple and intuitive reusable UI5 control that supports text rules and decision tables

SAP HANA Tutorials and Materials, SAP HANA Guide, SAP HANA Certifications

  • Simple and intuitive web application that enables business users to manage their own rules

SAP HANA Tutorials and Materials, SAP HANA Guide, SAP HANA Certifications

Scalability and Performance | HRF as a native SAP HANA solution leverages all the capabilities and advantages of the SAP HANA platform, therefore it enables the fastest execution of analytical rules. Analytical or historical rules are rules that depended heavily on database records (for example – a daily risk calculation of millions of accounts based on their history).

How to configure transports of XS Classic native applications

$
0
0
I recently needed to configure the transports of Delivery Units between a SAP HANA, express edition, (HXE)  instance in Amazon Web Services and one of my tenant databases in another HXE instance in Google Cloud Platform.

My destination HXE instance (some kind of QA environment) was originally a server-only to which I added the XS classic tools as explained in this how-to guide . The source instance plays the Dev environment in this scenario.  I wanted to transport from Dev into QA without manually exporting and importing Delivery Units.

In order to configure the transports and access the ALM tools you will need the following roles in the source/Dev system:
  • sap.hana.xs.lm.roles::Administrator
  • hana.xs.admin.roles::HTTPDestAdministrator
  • hana.xs.admin.roles::RuntimeConfAdministrator
Also, if your destination system is a tenant DB, make sure XS is properly configured to be accessed with your fully qualified domain name (FQDN)
  • ALTER SYSTEM ALTER CONFIGURATION (‘xsengine.ini’, ‘database’, ‘<tenant_DB_name>‘) SET (‘public_urls’, ‘http_url’) = ‘http://<virtual_hostname>:80<instance>‘ WITH RECONFIGURE;
  • ALTER SYSTEM ALTER CONFIGURATION (‘xsengine.ini’, ‘database’, ‘<tenant_DB_name>) SET (‘public_urls’, ‘https_url’) = ‘https://<virtual_hostname>:43<instance>‘ WITH RECONFIGURE;
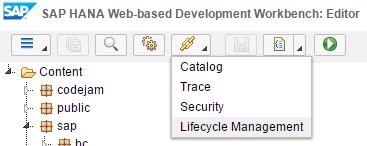
In your Dev/source system, go into http://<<host>>:80xx/sap/hana/xs/lm/   (where xx is the instance number) or use the access to the “Lifecycle Management” that you will find either in the Web Based Development Workbench  (in SAP HANA Studio, right click on the system and you will see lifecycle Management -> Application Lifecycle Management -> Home):

SAP HANA Tutorials and Materials, SAP HANA Certifications, SAP HANA Guide

Then go into the Systems tile, as you will need to add the destination System:

SAP HANA Tutorials and Materials, SAP HANA Certifications, SAP HANA Guide

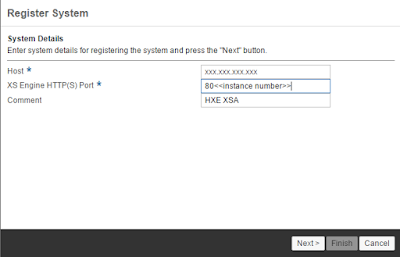
You will find the local system already there and that’s OK, you now need to register the destination system:

SAP HANA Tutorials and Materials, SAP HANA Certifications, SAP HANA Guide

My instance is 00. If your instance is 90, your XS port should be 8090.

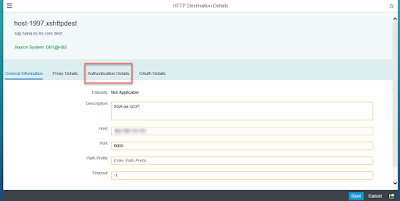
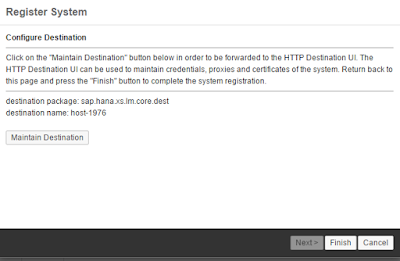
Click on Next and then on Edit, check the Host and into the Authentication Details:

SAP HANA Tutorials and Materials, SAP HANA Certifications, SAP HANA Guide

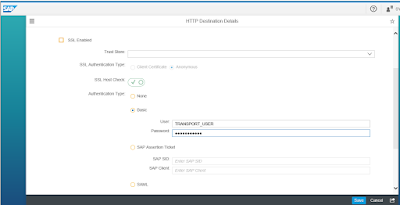
And add the user name and password for your QA system. Click on Save.

SAP HANA Tutorials and Materials, SAP HANA Certifications, SAP HANA Guide

When you click on Finish, the system will try to connect to it’s counterpart.

SAP HANA Tutorials and Materials, SAP HANA Certifications, SAP HANA Guide

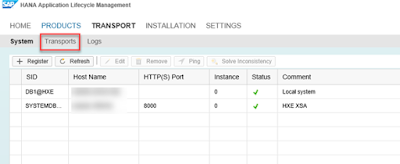
If there are no errors, you will see the System has been registered successfully. Go into Transports to create a transport route:

SAP HANA Tutorials and Materials, SAP HANA Certifications, SAP HANA Guide

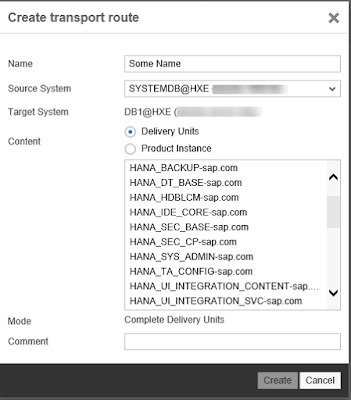
You can choose the Delivery Unit that you want to transport now, together with the destination system if you have configured more than one:

SAP HANA Tutorials and Materials, SAP HANA Certifications, SAP HANA Guide

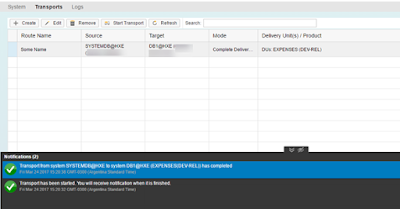
Click on Create and then on Start the transport. Once the transport is finished, you will see the results at the bottom:

SAP HANA Tutorials and Materials, SAP HANA Certifications, SAP HANA Guide

I will continue to share my migration journey in later blogs and publishing them as @LuciaBlick on Twitter or as myself on Linked In, so follow me if you’re also interested in how to make your SAP HANA Express instances grow up!

SQL Clients and SAP HANA 2.0

$
0
0
So recently I’ve been playing around a lot with our “Server Only” version of the SAP HANA, express edition (HXE). Now with that server only version I am mainly focused on just using more of the Database features than anything else. Trying SQL and working with the PAL libraries.

With our activities and ability to quickly load HXE into the Google Cloud Platform I also thought how else could I speed of some of my time. I mean I am only working with SQL on some of these things so could I use the JDBC driver and find a tool that would do nicely for it?

I’ve now tried a good half a dozen or so and decided that the current one I will play with the next few weeks would be DBeaver.

SAP HANA Tutorials and Materials, SAP HANA Guide, SAP HANA Certifications

This of course is by no means the “only” choice it’s just one of them, and frankly one of MANY!

Couple of things I liked about this one was how quickly I was able to connect to my server as the system already identified SAP databases.

SAP HANA Tutorials and Materials, SAP HANA Guide, SAP HANA Certifications

In addition it already had the option to pick my class location for my existing JDBC driver from my “SAP HANA Client” installed (option when you download HXE).

SAP HANA Tutorials and Materials, SAP HANA Guide, SAP HANA Certifications

After giving the location of my jar file via the “Add File” option I was then able to tell it to “Find Classes” and be ready to go.

SAP HANA Tutorials and Materials, SAP HANA Guide, SAP HANA Certifications

Then it was a matter of putting in my connection details.

SAP HANA Tutorials and Materials, SAP HANA Guide, SAP HANA Certifications

Test the connection.

SAP HANA Tutorials and Materials, SAP HANA Guide, SAP HANA Certifications

Save it and then view some of my schemas.

SAP HANA Tutorials and Materials, SAP HANA Guide, SAP HANA Certifications

All in all extremely fast and easy and a perfect one to play with and try out to begin with.

The First Predictive BSM Solution for SAP HANA

$
0
0
SAP has reviewed and qualified Centerity Monitor as suitable for use in SAP solution environments

Technology cooperation between SAP Co-Innovation Labs and Centerity brings holistic Business Service Monitoring (BSM) capabilities to the entire SAP environment including SAP ERP, SAP Infrastructure, and SAP HANA. Centerity Monitor has been tested by SAP Labs and this post describes that testing process and SAP’s conclusions.

SAP HANA – More Options! More Demands!


SAP has recently introduced the SAP Business Suite, BW, and other SAP solutions on HANA DB platform. This introduction highlighted the critical needs of SAP clients and integrators for SAP HANA comprehensive monitoring capabilities with the ability to comply with customers’ business services management standards. Business Service Monitoring (BSM) is one of the essential tools that allows IT and Business Units to create a holistic approach to complex enterprise services aligning expectations to deliver and required levels of service availability and performance for both external and internal customers (SLA/OLA). SAP Co-Innovation Labs in Israel moved to full SAP HANA integration due to the evolving complexity of service topology involving multiple, hybrid components such as Hardware, OS, Networking, System, Applications and more.

Centerity Monitor – The first predictive BSM for SAP HANA


Centerity’s BSM solution was chosen for this integration over several other vendors due to the fact that Centerity is an established player in this domain and already has “out of the box” monitoring capabilities to SAP Systems (e.g., CCMS-based monitoring). Centerity was challenged by SAP to demonstrate the rapid implementation capabilities of its BSM solution within the existing service environment of SAP Co-Innovation Labs Israel and the ability to integrate HANA KPIs into its monitoring solution. While modern IT monitoring solutions provide various features, the focus of this SAP Co-Innovation Labs integration was the enablement of full BSM stack monitoring for a HANA-based environment.

Centerity in-depth Integration into SAP environment Layers:

  • Application – ERP is monitored through CCMS service (existing tool).
  • Database – The driver was designed and developed by Centerity and SAP labs with complete customization to SAP HANA tables.
  • HANA Processes-Monitoring based on OS level – Centerity validates that HANA and ERP processes running normally.
  • Additional Services were monitored on top of the application and DB service layers.

HANA DB Customized Monitoring Service Pack:

  • Centerity Monitor was integrated with SAP HANA DB by using a highly customizable special driver on Unix-ODBC and Perl DBD/DBI. 
  • The CSP allows for the transfer of full DB Server Connect Parameters & Credentials and SQL queries as an argument with return values and running statuses. 
  • The query results were parsed and converted into performance values generating reports and alerts through management service. 
  • Additional logic was added to support different types of output.

SAP PDMS 1.0 FP02 On-premise edition 1.0 (Installation – Pt.1)

$
0
0
SAP Predictive Maintenance and Service, on-premise edition supports customers with a unified solution for operators looking to identify issues in large fleets of machines as well as to improve after-sales services and optimize service planning for individual machines.

The following image gives you an overview of what business users see when they work with the asset health control center, to get further detailed information about an asset health status, business users can go to the asset health fact sheet:

SAP HANA Tutorials and Materials, SAP HANA Guide, SAP HANA Certifications

In the first part of my documentation (pt.1), I’ll explain and show in detail how to proceed with the mandatory landscape and component setup of the SAP Predictive Maintenance and Service solution.

In the second part (pt.2) I will explain and show how to install and configure a Raspberry PI with GroovePI to generate sensor data and store them in SQL Server

In the last part (pt.3) I will explain how to configure the applications (Thin Model Service, DSS and Insight Provider)

For my setup I’ll use my own lab on VMware vSphere 6.0 to virtualize all my server and a Raspberry PI 3 with GroovePI for sensor device.

I’ll will create a new environment by using vm template explain in my previous documentation.

In order execution


As mentioned previously, SAP Predictive Maintenance and Service require two mandatory component and one add-on within Hana, to be installed:
  • XSA 1.0 including the standard application for administration (XS Monitoring) and job scheduling (XS Services)
  • Hana Rules Framework 1.0
  • R 3.2.3 and Rserve 1.7.3

Important: SAP PDMS1.0 FP02 is not supported on a SAP Hana database that use MDC.

Once the landscape is installed, the SAP Predictive Maintenance and Service software needs to be deployed. The deployment consist of the below activities:
  • Download the PDMS software
  • Create the PDMS user space in XSA
  • Download or create the extension file for component installation
  • Create PDMS technical user for application
  • Create the schemas required for the installation
  • Install Product Instance 1
  • Create role collection and assign to user
  • Install all remaining Product Instance

When the SAP Predictive Maintenance and Service software is installed the next step is to perform the setup for data science service, which consist of:
  • Install the R package required to work with data science service on RServe

Testing url and services
  • Test PDMS urls.
  • Test the installation of Data Science Service

Guide used
  • Installation of SAP Predictive Maintenance and Service, on-premise edition 1.0 FP02
  • SAP HANA Administration Guide SP12
  • SAP HANA R Integration Guide

Note used
  • 2283623 – SAP Predictive Maintenance and Service, on-premise edition 1.0 FP02
  • 2297816 – SAP HANA Smart Data Integration SPS 02 Rev 02
  • 2185029 – SAP HANA and R compatibility and support


High-Level Architecture overview


SAP HANA Tutorials and Materials, SAP HANA Guide, SAP HANA Certifications

From a high level architecture point of view I’ll deploy 3 vms all registered in my internal DNS
vmhana01 – Master Hana single mode
vmscience – R Server
vmsql2012 – SQL Server 2012
Raspberry PI with GroovePI 

Detail Architecture


SAP HANA Tutorials and Materials, SAP HANA Guide, SAP HANA Certifications

All the environment will be running on SLES 12 SP1, except for SQL server which will sit on Windows 2012 R2 server, the diagram above provide an overview of the components/software interaction.

SAP HANA 1.0 SP12 (Including: XSA, Hana Rules Framework 1.0 )
In the context of SAP PDMS, XSA needs to be install on top of Hana in order to deploy the PDMS application, on Hana itself the HRF 1.0 add-on needs to be install since it is mandatory to run Insight provider.

R 3.2.5 and Rserve 1.7.3
SAP has tested the SAP HANA integration with R version 2.15 only, this component is mandatory for data science service

Raspberry PI with GroovePI (optional)
As an optional component in my scenario, I’ll use my physical Raspberry PI 3 model B with a GroovePI component in order to data from various sensor such as: temperature and humidity, and light.

Microsoft Server 2012 R2 with SDI agent installed on the server (optional)
For my document I will deploy a MS SQL server in order to store my sensor data, the SDI 2.0 agent will be installed on the same server and connect to Hana to retrieve the data

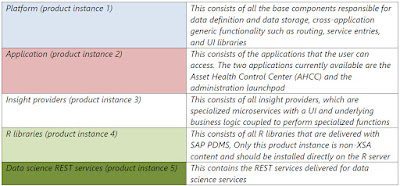
SAP PDMS Product Instance


In SAP PDMS, product instance consist of different subsequent part of landscape deployment such as:

SAP HANA Tutorials and Materials, SAP HANA Guide, SAP HANA Certifications

The picture below illustrate the all the product install listed above.

SAP HANA Tutorials and Materials, SAP HANA Guide, SAP HANA Certifications

SAP PDMS mandatory component


XSA 1.0 including the standard application for administration

As mentioned earlier, SAP PDMS needs specific mandatory components to be able to be deploy and run, the first piece of the puzzle consist to install XSA on my Hana instance with XS monitoring and XS service tool.

I start to download the component and store it, from “support package and patch”

SAP HANA Tutorials and Materials, SAP HANA Guide, SAP HANA Certifications

Download the components from the list

SAP HANA Tutorials and Materials, SAP HANA Guide, SAP HANA Certifications
path level 32 or 34

SAP HANA Tutorials and Materials, SAP HANA Guide, SAP HANA Certifications
SP02

SAP HANA Tutorials and Materials, SAP HANA Guide, SAP HANA Certifications
SP02

Once completed, from the resident hdblcm folder as root, I run the installation of XSA combine with the 2 application

SAP HANA Tutorials and Materials, SAP HANA Guide, SAP HANA Certifications

SAP HANA Tutorials and Materials, SAP HANA Guide, SAP HANA Certifications

During the installation process pay attention to the XS Controller API url

SAP HANA Tutorials and Materials, SAP HANA Guide, SAP HANA Certifications

Once installed, I’ll access the API URL endpoint first and then log into XSA

SAP HANA Tutorials and Materials, SAP HANA Guide, SAP HANA Certifications

And finally run the “xs apps” command just to see which application is running

SAP HANA Tutorials and Materials, SAP HANA Guide, SAP HANA Certifications

This done I can go to the next phase with installation of the Hana Rules Framework 1.0

Hana Rules Framework 1.0


I start the download from “Installation & upgrade” path

SAP HANA Tutorials and Materials, SAP HANA Guide, SAP HANA Certifications

SAP HANA Tutorials and Materials, SAP HANA Guide, SAP HANA Certifications

Once downloaded I run the installation from the downloaded folder by “hdbalm”

SAP HANA Tutorials and Materials, SAP HANA Guide, SAP HANA Certifications

The install done, I can move forward with the next component to be installed

R 3.2.5 and Rserve 1.7.3 installation


For my setup my R and Rserve will be install on a SLES 11.3 VM that I have already prepared, the necessary latest package to install the software are installed on the server:
  • xorg-x11-devel
  • gcc
  • gcc-fortran
  • readline-devel
  • Java

From the cran website I download the version 3.2.5 of R because the 3.3.x has not been tested yet

SAP HANA Tutorials and Materials, SAP HANA Guide, SAP HANA Certifications

And Rserve 1.7.3

SAP HANA Tutorials and Materials, SAP HANA Guide, SAP HANA Certifications

My download ready I decompress the R package and compile it

SAP HANA Tutorials and Materials, SAP HANA Guide, SAP HANA Certifications

SAP HANA Tutorials and Materials, SAP HANA Guide, SAP HANA Certifications

SAP HANA Tutorials and Materials, SAP HANA Guide, SAP HANA Certifications

Run the following command to install R

SAP HANA Tutorials and Materials, SAP HANA Guide, SAP HANA Certifications

Once done check in the “/usr/local/bin” directory

SAP HANA Tutorials and Materials, SAP HANA Guide, SAP HANA Certifications

R now installed I will install and configure Rserve, from the “/usr/local/bin” directory I execute R and run the Rserve package

SAP HANA Tutorials and Materials, SAP HANA Guide, SAP HANA Certifications

Now done I configure Rserve by creating the Rserv.conf file

SAP HANA Tutorials and Materials, SAP HANA Guide, SAP HANA Certifications

And I finally start Rserve in order to access it from Hana, from the “/usr/local/lib64/R/bin” folder

SAP HANA Tutorials and Materials, SAP HANA Guide, SAP HANA Certifications

Rserve is up now so I’m going to configure Hana so I can connect to it, from the “indexserver.ini -> calcengine” I will add 3 parameter:
  • cer_rserve_addresses –> location where the server is running
  • cer_timeout –> Connection timeout in seconds
  • cer_rserve_maxsendsize –> Maximum size of a result transferred from R to SAP HANA, in kilobyte

SAP HANA Tutorials and Materials, SAP HANA Guide, SAP HANA Certifications

The baseline for R is done I will then install the dependent R package on RServe, I will download the package “dplyr , magrittr , survival , data.table , emdis” and installed them manually.

SAP HANA Tutorials and Materials, SAP HANA Guide, SAP HANA Certifications

Note: Some dependency may exist for package install which will prevent you to install the necessary if not install, make sure to install them first.

Here the list of package dependency at the time I build the documentation by package
  • Dplyr (‘assertthat’, ‘R6’, ‘Rcpp’, ‘tibble’, ‘magrittr’, ‘lazyeval’, ‘DBI’, ‘BH’)

Once installed run the package install in the order as below
  1. setwd(“/media/R/R_indep_pack”)    –> this line set R for the package location
  2. install.packages(“magrittr_1.5.tar.gz”, repos = NULL, type=”source”)
  3. install.packages(“dplyr_0.5.0.tar.gz”, repos = NULL, type=”source”)
  4. install.packages(“survival_2.40-1.tar.gz”, repos = NULL, type=”source”)
  5. install.packages(“data.table_1.10.4.tar.gz”, repos = NULL, type=”source”)
  6. install.packages(“emdist_0.3-1.tar.gz”, repos = NULL, type=”source”)

SAP HANA Tutorials and Materials, SAP HANA Guide, SAP HANA Certifications

All mandatory component are installed and ready for SAP PDMS, I can proceed with main component installation.

SAP PDMS installation


To begging I will start to download the necessary software to run the installation.

SAP HANA Tutorials and Materials, SAP HANA Guide, SAP HANA Certifications

Now from XSA I will create the user space pdms-op and switch into it, this can be done from command or the XSA admin page. I will use the command line.
This user space is necessary to run the installation

SAP HANA Tutorials and Materials, SAP HANA Guide, SAP HANA Certifications

Now done I will download all the extension files which contain details of the user-provided service from the note 2283623.

SAP HANA Tutorials and Materials, SAP HANA Guide, SAP HANA Certifications

You can either create them but I will recommend you to use a YAML validator

SAP HANA Tutorials and Materials, SAP HANA Guide, SAP HANA Certifications

After all .mtaext are downloaded we I need to edit the necessary input in the “pdms-router.mtaext” which contain all the application setting such as: hana hostname, port, technical user to use, password and URLs.

Note: since I’m not using any CRM or ERP to connect to my PDMS system I will not configure any url in the “ahcc.mtaext” file.

SAP HANA Tutorials and Materials, SAP HANA Guide, SAP HANA Certifications

From the file “pdms-router.mtaext” technical user are listed in order to works with the applications:

SAP HANA Tutorials and Materials, SAP HANA Guide, SAP HANA Certifications

I run the following SQL command to create all of them

SAP HANA Tutorials and Materials, SAP HANA Guide, SAP HANA Certifications

The next phase is now to create the relevant schema required for the installation of each application

SAP HANA Tutorials and Materials, SAP HANA Guide, SAP HANA Certifications

Now done, I can run the PDMS application installation, I’ll install the “Product Instance 1” first by running following xs command from the from the folder where the PDMS zip file reside

“xs install SAPPDMSONPR02P_3-71002247.ZIP -i 1 -e pdms-router.mtaext,ahcc.mtaext,derived-signals.mtaext,work-activity.mtaext”

Note: Make sure you are in the user space “pdms-op” before to run the install

SAP HANA Tutorials and Materials, SAP HANA Guide, SAP HANA Certifications

In case error happen during the deployment of any apps, you can check the error by executing the following command “ xs logs <app> –last 1000″

SAP HANA Tutorials and Materials, SAP HANA Guide, SAP HANA Certifications

Once the Instance 1 is installed I check the running apps

SAP HANA Tutorials and Materials, SAP HANA Guide, SAP HANA Certifications

I will now from the role builder create role collection, assign to necessary role template and grant them to the user

SAP HANA Tutorials and Materials, SAP HANA Guide, SAP HANA Certifications

SAP HANA Tutorials and Materials, SAP HANA Guide, SAP HANA Certifications

I create the following role collection associate with the template below

SAP HANA Tutorials and Materials, SAP HANA Guide, SAP HANA Certifications

SAP HANA Tutorials and Materials, SAP HANA Guide, SAP HANA Certifications

Finally once all my role are created, from the Hana webide/security I will provide the role create and additional privilege to the necessary user such as below.

SAP HANA Tutorials and Materials, SAP HANA Guide, SAP HANA Certifications

SAP HANA Tutorials and Materials, SAP HANA Guide, SAP HANA Certifications

SAP HANA Tutorials and Materials, SAP HANA Guide, SAP HANA Certifications

SAP HANA Tutorials and Materials, SAP HANA Guide, SAP HANA Certifications

Once done for all the user I install the remain Product Instance by issuing the following command

“xs install SAPPDMSONPR02P_3-71002247.ZIP -e pdms-router.mtaext,ahcc.mtaext,derived-signals.mtaext,work-activity.mtaext -o ALLOW_SC_SAME_VERSION”

SAP HANA Tutorials and Materials, SAP HANA Guide, SAP HANA Certifications

Data Science Service on RServe


The main software component for PDMS are now fully installed, I will install the R Packages for DSS on Rerve.

I start to decompress the PDMS the zip archive in a separate folder

SAP HANA Tutorials and Materials, SAP HANA Guide, SAP HANA Certifications

From this folder I locate the XSACPDMSDSRLIB02_0.ZIP and decompressed it too

SAP HANA Tutorials and Materials, SAP HANA Guide, SAP HANA Certifications

SAP HANA Tutorials and Materials, SAP HANA Guide, SAP HANA Certifications

Once done for the R server, I will load this package into it

SAP HANA Tutorials and Materials, SAP HANA Guide, SAP HANA Certifications

The last package “com.sap.pdms.datascience.tar.gz” required dependency package to be installed “reshape2”,” plyr”,” stringr”,” stringi”

SAP HANA Tutorials and Materials, SAP HANA Guide, SAP HANA Certifications

SAP HANA Tutorials and Materials, SAP HANA Guide, SAP HANA Certifications

Testing services and URLs


Now the all mandatory component for PDMS are installed and up and running I will test different url to make sure I can access them and also check the DSS (Data Science Service) installation.

SAP HANA Tutorials and Materials, SAP HANA Guide, SAP HANA Certifications

The first url I will test is the AHCC, which is the url use by the user who access the Asset Health Fact Sheet application

SAP HANA Tutorials and Materials, SAP HANA Guide, SAP HANA Certifications

The next url I will test now is the Launchpad, basically this url is the configuration url role based on different user

PDMS_APP_USER

SAP HANA Tutorials and Materials, SAP HANA Guide, SAP HANA Certifications

PDMS_TECH_USER

SAP HANA Tutorials and Materials, SAP HANA Guide, SAP HANA Certifications

PDMS_DS_ADMIN

SAP HANA Tutorials and Materials, SAP HANA Guide, SAP HANA Certifications

And finally I will test the rest call for DSS in order to make sure that my service working fine, the url should return all package installed and validated the version

SAP HANA Tutorials and Materials, SAP HANA Guide, SAP HANA Certifications

I have tested all the necessary url and no error return, the following diagram expose the communication channels and interfaces

SAP HANA Tutorials and Materials, SAP HANA Guide, SAP HANA Certifications

SAP PDMS 1.0 FP02 On-premise edition 1.0 (Configuration – Pt.2)

$
0
0
In the first part of my documentation (pt.1), I have explained and showed in detail how to proceed  with the mandatory landscape and component setup of the SAP Predictive Maintenance and Service solution.
In this second part (pt.2) I will explain and show how to configure the applications regarding:
  • Thing Model Service
  • Data Science Service
  • Insight Provider (Map, Asset Explorer, Components, Key Figures)

What is the Thing Model Service?


Before you can start configuring all other software components of SAP PDMS we need to configure IoT application services first, which consist of:

Configure the Configuration Services
  • The configuration services are used to manage the configuration of the Thing model in the form of packages. A package is a logical group of meta-data objects like thingTypes, propertySetTypes, properties and so on.
Configure Thing Services
  • The Thing services allow you to create, update, and delete things that are instances of the thing types modeled using the configuration services

What is the Data Science Service?


The DSS mainly contain 3 services for specific use case:

SAP HANA Tutorials and Materials, SAP HANA Certifications, SAP HANA Guide

What are the Insight Providers?


Insight Providers are micro-services that provide analytical or predictive functionalities.
Typically, three tier XSA application with UI layer (UI5, JavaScript), Service layer (node.js, java) and Persistence layer (HANA using HDI)
Insight Providers consume the data from PDMS data model using HANA views.

SAP HANA Tutorials and Materials, SAP HANA Certifications, SAP HANA Guide

Thing Model Service Configuration


You configure the thing model services using REST APIs. The SAP HANA REST API includes a file API that enables you to browse and manipulate files and directories via HTTP.

The File API included in the SAP HANA REST API uses the basic HTTP methods GET, PUT, and POST to send requests, and JSON is used as the default representation format

For my future need I will show below the composition of the package that will define and configure for next documentation.

SAP HANA Tutorials and Materials, SAP HANA Certifications, SAP HANA Guide

The package needs to be define e creating .json code, once the code is generated I recommend you to validate it with a json validator

SAP HANA Tutorials and Materials, SAP HANA Certifications, SAP HANA Guide

Once the code is validated, we need to use the REST Post method in order to load it in Hana, since I’m using Mozilla I have download the RESTClient add-on in order to perform it.
Once opened, I use the POST method, copy my Hana Rest url and copy the code into the Body, if all is right you should have a return code 201

SAP HANA Tutorials and Materials, SAP HANA Certifications, SAP HANA Guide

To validate the creation of the package I will use a GET method on the package ID (‘core.evaq’) and check the response body

SAP HANA Tutorials and Materials, SAP HANA Certifications, SAP HANA Guide

My configuration service completed I will now create the thing services; I will proceed the same way I did for the configuration service

SAP HANA Tutorials and Materials, SAP HANA Certifications, SAP HANA Guide

The thing url is not the same

SAP HANA Tutorials and Materials, SAP HANA Certifications, SAP HANA Guide

When create I can check ID by using the GET method, this is useful when we have several things in the configuration

SAP HANA Tutorials and Materials, SAP HANA Certifications, SAP HANA Guide

Note: you can check all the model configuration setup and definition from all the views “com.sap.pdms.smd:META.xxxx” in the SAP_PMDS_DATA schema.

The based configuration is now done; I can proceed further with the next step by configuring Data Science Services.

Configuration of Data Science Service


As an alternative to REST APIs configuration, we can configure DSS y using UIs, we need to run the configuration with the “datascience” user.
Select “Manage Data Science services” and select the app Model, Training and Scoring

SAP HANA Tutorials and Materials, SAP HANA Certifications, SAP HANA Guide

Each of the field needs to be filled up according the package created earlier in order to match property and table field.
Note that I will use the PCA use case algorithm

SAP HANA Tutorials and Materials, SAP HANA Certifications, SAP HANA Guide

Let’s have a look at the detail:

SAP HANA Tutorials and Materials, SAP HANA Certifications, SAP HANA Guide

For the field below:
Table for training and scoring: This is the name of the data fusion view in SAP HANA used for training, this view is executed whenever a model is trained,
and is additionally filtered by a time frame defined in the model training call for the Training View.

SAP HANA Tutorials and Materials, SAP HANA Certifications, SAP HANA Guide

The view and table for the above picture should be created before to filled up, here is my table and view creation below

SAP HANA Tutorials and Materials, SAP HANA Certifications, SAP HANA Guide

Property Set Type ID: this field is the where you define the propertySetTypeID you want to configure the model for.

SAP HANA Tutorials and Materials, SAP HANA Certifications, SAP HANA Guide

In my case those ID are

SAP HANA Tutorials and Materials, SAP HANA Certifications, SAP HANA Guide

Data Science Service: this field is pre-configured, such as the namespace “com.sap.pdms.datascience” in case only standard algorithm are available, and the algorithm available

SAP HANA Tutorials and Materials, SAP HANA Certifications, SAP HANA Guide

Model – Generic Data : those field contain the name of the columns to be used as input to the model

SAP HANA Tutorials and Materials, SAP HANA Certifications, SAP HANA Guide

HyperParameters : Parameters are specific to the model you want to configure, since i’m running data science service PAC algorithm the following field are mandatory “group.by” and “sort.by”

SAP HANA Tutorials and Materials, SAP HANA Certifications, SAP HANA Guide

Here is my model once created

SAP HANA Tutorials and Materials, SAP HANA Certifications, SAP HANA Guide

After my model is created, two new title appear “Train” and “Score”, from here you can define the time frame of the training and check the scoring status in the Scoring Data section of the scored model. Once schedule the train job can be checked from the Job Log URL

SAP HANA Tutorials and Materials, SAP HANA Certifications, SAP HANA Guide

Configuration Insight Providers


The configuration of Insight Provider can be process by the web interface by use the PDMS_TECH_USER

SAP HANA Tutorials and Materials, SAP HANA Certifications, SAP HANA Guide

But before to configure any of info provider, I need to create to 2 specific fusion view
  • One fusion view to define the parent-child relationship between the assets and components used for key figures
  • Another fusion view to define the readings used for key figures
I will use the following script to create my views

SAP HANA Tutorials and Materials, SAP HANA Certifications, SAP HANA Guide

Note: As you can see in my picture I have highlighted SAP_PDMS_DATA schema, several users created during the installation of PDMS are type “Restricted”.

In order to run the different necessary script which required to have some authorization on the different schema, you will need to grant the necessary role to the user which create the Key Figures

SAP HANA Tutorials and Materials, SAP HANA Certifications, SAP HANA Guide

Once the view created I will need to create a store procedure.

SAP HANA Tutorials and Materials, SAP HANA Certifications, SAP HANA Guide

Now done, I can create my key figures from the ui

SAP HANA Tutorials and Materials, SAP HANA Certifications, SAP HANA Guide

Once created I add it to the key figure set

SAP HANA Tutorials and Materials, SAP HANA Certifications, SAP HANA Guide

SAP HANA Tutorials and Materials, SAP HANA Certifications, SAP HANA Guide

Now from the AHCC i can add the new KPI from the Insight Provider Catalog

SAP HANA Tutorials and Materials, SAP HANA Certifications, SAP HANA Guide

I can see my created KPI

SAP HANA Tutorials and Materials, SAP HANA Certifications, SAP HANA Guide

Once added
Note: for my documentation, since I do not have any data yet injected data into my PdMS environment, I’ll then use a custom procedure which calculates a random double value between 0 and 100

SAP HANA Tutorials and Materials, SAP HANA Certifications, SAP HANA Guide

SAP HANA Tutorials and Materials, SAP HANA Certifications, SAP HANA Guide

My KPI configuration done, I will start now take care of the configuration of the different InsightProviders needed for my documentation

Let’s start with the Asset Explorer

SAP HANA Tutorials and Materials, SAP HANA Certifications, SAP HANA Guide

All the point of configuration is based the model created, the first attribute to configure in order be expose for the AHCC is the filter

SAP HANA Tutorials and Materials, SAP HANA Certifications, SAP HANA Guide

The second point is the Asset List

SAP HANA Tutorials and Materials, SAP HANA Certifications, SAP HANA Guide

And final my Component List

SAP HANA Tutorials and Materials, SAP HANA Certifications, SAP HANA Guide

Now completed, I will add now Asset Explorer from the AHCC Insight Provider Catalog

SAP HANA Tutorials and Materials, SAP HANA Certifications, SAP HANA Guide

SAP HANA Tutorials and Materials, SAP HANA Certifications, SAP HANA Guide

The next one I will configure is the “Component”

SAP HANA Tutorials and Materials, SAP HANA Certifications, SAP HANA Guide

And add it form AHCC

SAP HANA Tutorials and Materials, SAP HANA Certifications, SAP HANA Guide

I continue with the Map

SAP HANA Tutorials and Materials, SAP HANA Certifications, SAP HANA Guide

For MAP the only 3 following providers is supported:
  • OpenStreetMap
  • Esri
  • Noki Here
For my documentation, I will use OpenStreetMap, thus the parameter highlighted are mandatory.
The url in “Layer Url” is http://{s}.tile.openstreetmap.org/{z}/{x}/{y}.png and “Mandatory” check box must be checked

SAP HANA Tutorials and Materials, SAP HANA Certifications, SAP HANA Guide

From “Layer Option” the attribution must contain the copyright of the map provider, in case of of OpenStreetMap I use “&copy; <a href=\”http://osm.org/copyright\”>OpenStreetMap</a> contributors”

SAP HANA Tutorials and Materials, SAP HANA Certifications, SAP HANA Guide

SAP HANA Tutorials and Materials, SAP HANA Certifications, SAP HANA Guide

Once done with my config, I add the MAP Insight Provider from AHCC.

Multi-container database mode is the new default

$
0
0
Multi-tenancy features, also known as “multiple database containers” or MDC have been available in SAP HANA for several years already. With the new SAP HANA 2.0 SPS 01 release, all systems now run in multi-container database mode. All new systems are installed in multi-container database mode, and existing single-container systems are converted during the upgrade to SAP HANA 2.0 SPS 01.

Advantages of multi-container database mode


Systems running in multi-container database mode can very easily be extended by adding new tenant databases. Being able to run and manage multiple tenant databases in one system helps you to lower capital expenditure, simplify database management, or for example build multi-tenant cloud applications.

SAP HANA Tutorials and Materials, SAP HANA Guide, SAP HANA Certifictions

All the databases in a multi-container system share the same installation of database system software, the same computing resources, and the same system administration. However, each database is self-contained and fully isolated with its own:
  • Set of database users
  • Database catalog
  • Repository
  • Persistence
  • Backups
  • Traces and logs
  • Workload management

This means, for example, that users in the system database have no access to content in the tenant databases, and vice versa. And of course users from one tenant database have no access to content  in another tenant database. However, it is possible for example for cross-application reporting scenarios to enable cross-database SELECT queries. Cross-database access needs to be explicitly configured and is not possible by default.

From the administration perspective, there is a distinction between tasks performed at system level and those performed at database level. Database clients, such as the SAP HANA Cockpit, connect to specific databases.

Because all systems now run in multi-container mode by default, it is much easier to leverage multi-tenancy concepts to further strengthen security in your landscape, for example for
  • Stronger protection of application data through isolation in dedicated tenant databases
  • Enhanced segregation of duties with separate management of system and tenant databases and separate networks for administration and application access
  • Hardening of tenant databases by restricting exposed functionality and configuration options, and fine-tuning security settings like TLS/SSL per tenant

In multi-container database mode, you have fine-granular control over your workload. You can manage and control the memory usage, concurrency and CPU consumption of your system by configuring limits for individual tenant databases, and by binding specific processes to logical CPU cores.

Automatic conversion to multi-container database mode during upgrade


During the upgrade to SAP HANA 2.0 SPS 01, existing single-container systems are automatically converted to multi-container database mode, resulting in a system with one system database and one tenant database. The new tenant inherits the name, content and configuration (e.g. port) of the former single-container system. Database size will stay roughly the same.

The upgrade is quick and no user data is changed or migrated. The SYSTEM user of the original single-container system will be assigned to the tenant database with the same password. You must set the password of the SYSTEM user of the new system database during the upgrade or installation process.

SAP HANA Tutorials and Materials, SAP HANA Guide, SAP HANA Certifictions

Do I have to change my applications after the conversion?


No. The default tenant database uses the same connection parameters and runs on the same ports as the single-container system and is also accessible through the same URLs. Existing applications do not need to be changed, the conversion is transparent for applications.

Adjusting the operations concept after the conversion


If you are moving from a single-container system to a multi-container system, you will see a few differences from an administration point of view. This means that you need to review your operations concept in order to account for the the new system database.

The system database stores and maintains the system topology and is responsible for overall system administration tasks. For example, software updates are executed on the system level. Also, some tenant-level administration tasks can optionally be executed from the system database, so you might want to think about removing some critical administration tasks with impact on hardware resources from the sphere of influence of tenant administrators, for example backup.

For security operations, you need to decide which additional administration users you would like to introduce in the system database. There are some other security-related configurations that you should review, for example your firewall settings (the system database has its own port), or your certificate configuration for TLS/SSL (the system database might need additional certificates).

The system database also needs to be backed up and integrated into your backup schedule in addition to the tenant database (which keeps the original backup settings during conversion from a single-container system). If you have created snapshot-based backups in your single-container system using an external backup tool, note that although snapshots can be created natively on tenant databases the tool vendors might have to makes some adjustments. Please get in touch with your tool provider for further details.

S/4HANA OP FIORI Apps: How to configure FIORI Apps?

$
0
0
At times, users come across many issues like system alias, services activation, server errors while testing Fiori apps in S/4HANA OP landscape. The issues are generally due to incomplete configuration.

Based on my learning, I am listing down the steps one can follow to setup Fiori apps in S/4HANA OP Landscape.

As OData services exists in gateway system, all the settings listed below are applicable to Gateway system.

Steps:


1.User Creation:

Create user with same name in backend system (where data exists) and gateway system (ODATA’s are available) via self-service. It’s good to maintain same password for user in backend and gateway system, as this will avoid unnecessary pop-ups asking for password.

2. Assigning business role:

Assign the required business roles for FIORI app to the user created above (Transaction: SU01, Tab: Roles). In case you do not have information on roles.

In Fiori apps library, search for an app –> Implementation Information –> Configuration. Here, you can check the business roles and ODATA services needed to test an app.

3. RFC creation:

Create a Type 3 RFC (ABAP connection) connecting to backend system with logon setting as current user or you can enter the user credentials from step (1)

SAP HANA Tutorials and Materials, SAP HANA Certifications, SAP HANA Guide

4. Mapping RFC to SAP System Alias:

Once RFC is created, it should be mapped to SAP System Alias in SPRO. (Path: SPRO –> SAP NetWeaver –> SAP Gateway –> OData Channel –> Configuration –> Connection Settings –> SAP Gateway to SAP System –> Manage SAP System Aliases)

Enter RFC created in step (3) in field ‘RFC Destination’, ‘Software Version’ as Default, and meaningful text in ‘SAP System Alias’ and Save it.

SAP HANA Tutorials and Materials, SAP HANA Certifications, SAP HANA Guide

The Fiori apps does not load in Launchpad unless a system alias is added to it. At times, users just create a type 3 RFC and if try to assign the same, then RFC is not available. Hence, this setting is important!

Till now I explained about user creation in both backend and gateway system, assigning business roles to gateway, creating RFC and how to map it to SAP system alias.

5. Next step is to Activate Services.

To activate a service, go to transaction /N/IWFND/MAINT_SERVICE.

Find the service relevant for your app (you can check the service details in Fiori apps library as mentioned in step (2)) via Find…. Select the service and ensure that status of ODATA is green that signifies service is active.

SAP HANA Tutorials and Materials, SAP HANA Certifications, SAP HANA Guide

If ODATA is not active, you can activate it by clicking on Manage ICF Node –> Activate.

SAP HANA Tutorials and Materials, SAP HANA Certifications, SAP HANA Guide

6.Assigning SAP System Alias to OData Service:

Click on ‘Add System Alias’ –> New Entries.

SAP HANA Tutorials and Materials, SAP HANA Certifications, SAP HANA Guide

In new entries window, enter sap system alias created in step (4) in field ‘SAP System Alias’ and hit Enter. Other fields are populated automatically. Save changes.


You can repeat step (5) and step (6) for all OData services relevant for your application.

The above-mentioned steps are mandatory for Fiori apps setup in S/4HANA OP landscape. Once completed you can check the apps in Fiori Launchpad.

Troubleshooting:


Issue 1: Apps does not load in Fiori Launchpad

Resolution: Try to clear the cache via hard reload. This option is only available in Chrome browser. Do F12 –> Hold ‘Refresh’ icon and select option ‘Empty Cache and Hard Reload’

Issue 2: Not able to find services in transaction /n/iwnfnd/maint_service

Resolution: You encounter this issue if services are not available in transaction. Resolution is to add the services and activate it as mentioned in above steps.

To Add a Service:

a. Click on ‘Add Service’ in same transaction.

SAP HANA Tutorials and Materials, SAP HANA Certifications, SAP HANA Guide

b. Enter the ‘System Alias’ or directly enter service details in ‘External Service Name’ and click on ‘Get Services’

SAP HANA Tutorials and Materials, SAP HANA Certifications, SAP HANA Guide

c. Select the service and click on button ‘Add Selected Services’

SAP HANA Tutorials and Materials, SAP HANA Certifications, SAP HANA Guide

In ‘Add Service’ pop-up, maintain package as Local Object and ICF node as ‘Standard’

SAP HANA Tutorials and Materials, SAP HANA Certifications, SAP HANA Guide

Click on continue. A success message appears that service was created and its metadata is loaded. Now you can find the added service in /iwfnd/maint_service.

Issue 3: No System Alias found for Service ‘ZPPH_MRP_CTRLR_SRV_0001’

Resolution: Such type of error can be checked in console. You can open browser console by F12.

All errors related to gateway can be seen in transaction /IWFND/ERROR_LOG

The error mentioned signifies that system alias is not maintained for specified service. To resolve the error, please assign SAP system alias to the service in transaction /iwfnd/maint_service as mentioned in step (5)&(6)

Issue 4: Any errors starting with RFC Error*

Resolution: These errors could be due to RFC issues. You should check RFC details like users, password in logon in SM59

LEARN WITH US : S/4HANA Analytics!!

$
0
0

What it is?


S/4 HANA stands for Simple 4th Generation Business suite solutions from SAP which will run on SAP HANA. SAP HANA is one of the preferred product among the companies seeking for an optimized enterprise solution because the product has come a long way from its previous predecessors which had its transaction processing and analytical processing in different platforms, that meant more time on data output and decision making.

It is very well known as The Next Generation Business Suite and it is greatest innovation since R3 and ERP from the SAP world. It unites the software and people to build businesses to run on real-time, networked and in simple way. It has got built-in analytics for hybrid transactional and analytical applications.

What does it do?


SAP HANA Tutorials and Materials, SAP HANA Certifications, SAP HANA Guide

SAP S/4 HANA provides enhanced analytical capabilities due to the architecture based on SAP HANA. Now SAP Hana is all about Insight and immediate action on LIVE data, nullifying the process of batch processing and ETL. Some of the best features with S/4 Hana analytics are cross system online reports, a built in BI system, Smart business, analytical applications and many more. Real-time reporting on data is available from the one single SAP S/4HANA component, which aid you to get many other tools for analytical purposes by creating quick queries.


How does real-time data and historical data work together?


SAP S/4 HANA Analytics + SAP Business Warehouse

Now let us have a closer look from the data perspective!

When a BW system is running on an SAP HANA database, the BW data is stored in a special schema known as the BW-managed schema and is exposed via InfoProviders (e.g. DataStore Objects, Info Objects, etc.). In other (remote) SAP HANA schemas, data can be stored in SAP HANA tables and accessed via HANA views which are based e.g. on Core Data Services (CDS) technology.

SAP HANA Tutorials and Materials, SAP HANA Certifications, SAP HANA Guide

You can make data available from any SAP HANA database schema of your choice in BW. You can also make BW data (data from the BW-managed schema in the SAP HANA database) available in a different SAP HANA schema. To do so you can use virtual access methods such as Open ODS Views (using HANA Smart Data Access for remote scenarios) and data replication methods like SAP LT Replication Server.

S/4 Hana analytics just uses the concept of Instant Insight to action by using its’ built in analytics for hybrid transactional and analytical processes. One of the applications that work on this principle is SAP Smart business cockpits which use advanced analytics enabling the business user to see instant real time data to solve any business situations. They are individualized, more accurate, and more collaborative and can be operated form anywhere, anytime.


The process of combining the real time data and multi sourced data with S/4 HANA analytics and SAP Business Warehouse respectively has helped the company provide a hybrid solution which is a strategic move. S/4 for HANA analytics complements SAP BW (powered by SAP HANA) helping in better services and decision making for the organizations.

Source: sap.com

SAP HANA Express: Exposing Predictive Analytics through oData

$
0
0
The prerequisites for your SAP HANA instance:

  • A tenant DB, which you can create with the following command.

CREATE DATABASE DB1 SYSTEM USER PASSWORD Initial1;

alter system start database DB1;

  • While we are abiding by better practices, it’s a good idea to create a Developer user instead of using the SYSTEM user for development.
  • A user with the proper permissions to execute the PAL functions and DROP/CREATE ANY in a schema (different from the AFL schema, please). The following is a sample list of roles taking into account what this blog needs, but you need to restrict permissions depending on your needs (you will also need CATALOG READ and the proper package privileges):


SAP HANA Tutorials and Materials, SAP HANA Certifications, SAP HANA Guide
  • The tenant DB needs to be reachable from the outside if you want to call the oData service from a Google Script. This may imply overriding host resolution and getting a Fully Qualified Domain Name (of course, configuring your hosts file in the meantime).
  • XS tooling is installed as explained here
  • You have installed SAP HANA Studio or the add-on for eclipse
  • You have connected to your tenant database


The fun part


You are now ready for some classic extended applications. This kind of project includes the descriptors that handle log in and leverage the WHAT IS XS

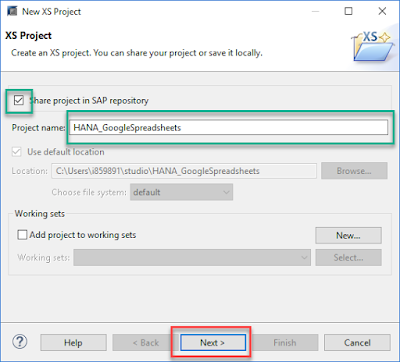
Go into File -> New -> XS Project

SAP HANA Tutorials and Materials, SAP HANA Certifications, SAP HANA Guide

Add a Name for the Project, keep the “Share project in SAP repository” flag on and click on “Next”.

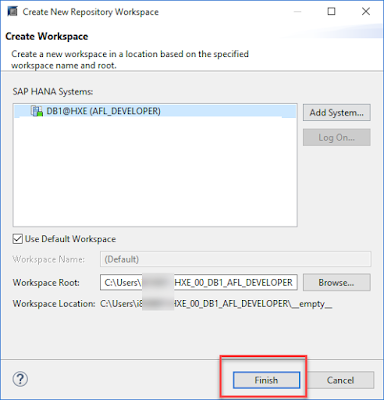
Click on **Add Workspace**

SAP HANA Tutorials and Materials, SAP HANA Certifications, SAP HANA Guide

Click on the System you are logged into:

SAP HANA Tutorials and Materials, SAP HANA Certifications, SAP HANA Guide

Add a name for the repository package and click on Next.

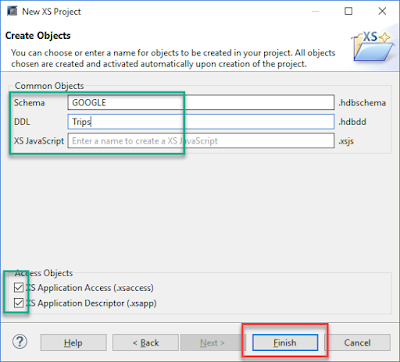
Add a name to the `Schema`, a name for the `.hdbdd` file (this is where you will create your tables)

SAP HANA Tutorials and Materials, SAP HANA Certifications, SAP HANA Guide

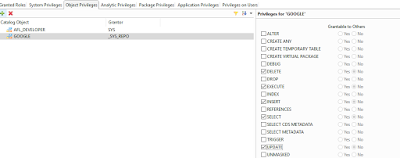
Go into the security menu, look for your user ID and grant yourself with the necessary access to the schema:
  • Create ANY
  • Create temporary table
  • Delete
  • Drop
  • Execute
  • Insert
  • select

SAP HANA Tutorials and Materials, SAP HANA Certifications, SAP HANA Guide

before you continue with development, I would advise you go into the “Repositories” tab, right click on your newly-created package and click on Check out and Import Projects.

Create Development Objects


You can now see the artifacts the XS Project wizard has created for you. Double click on the Trips.hdbdd

SAP HANA Tutorials and Materials, SAP HANA Certifications, SAP HANA Guide

And copy the following code:

namespace HANAGoogleSheets;

@Schema : 'GOOGLE'
context Trips

{
type tString : String(3);
type sString :  String(20);
type mString : String (50);
type lString :  String(150);

/* An Entity becomes a table*/
entity Employee {
            key id : Integer;
            firstName : mString;
            lastName : mString;
            username : sString;
            homeCountry : mString;
      };
      
    entity Trip {
    key id : Integer;
    fromDate : LocalDate; //2016-01-02 
    toDate : LocalDate;
    destination : mString;
    description : lString;
    approver : Association to Employee on approver.username = traveller;
    traveller : sString;
    approver_uname : sString;

    };
    
//The Predictive Analytic Library does not currently support the decimal data type. The decimal needs to be  "Double" (BinaryFloat in CDS)
// or can be converted later using the following entries in the signature table:
//(-2, '_SYS_AFL', 'CAST_DECIMAL_TO_DOUBLE', 'INOUT');
//(-1, '_SYS_AFL', 'CREATE_TABLE_TYPES', 'INOUT');  
  
entity Expenses {
key id : Integer;
key tripid : Integer;
expenseType : sString;
amount : BinaryFloat;
currency : tString;
trip : Association to Trip on trip.id = tripid;

};

define view ExpensesView as SELECT from Expenses{
Expenses.id as ExpenseId,
trip.id as TripId,
trip.toDate as tripDate,
trip.traveller as employee,
trip.approver_uname as approver,
trip.destination as destination,
Expenses.expenseType as eType,
Expenses.amount as amount

};
entity periodConversion {
 key periodId : String(2);
 month : String(2);
 year : String(4);
}
};

Click on the Green arrow on the top bar to Activate the artifacts.

SAP HANA Tutorials and Materials, SAP HANA Certifications, SAP HANA Guide

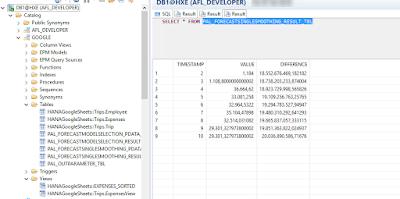
If you go into the Systems tab and into Catalog, you will see that the Entities have become tables and the joins have become Views. This is Core Data Services providing a simpler way of creating database artifacts.  Moving forward, if you need to alter or move the objects you can do it from this file.

In case you are wondering, the “periodConversion” table contains a translation from periods such as “2017-02” into integers, as the predictive procedure expects an integer and a double.

I used the M_TIME_DIMENSION table to perform the translation between the transaction date and the period. This table can be populated by going the SAP HANA Modeler perspective and go into Help-> Quick view. You can start the wizard from the “Generate Time Data” option.

It’s Forecast Time!


The tool for this is as simple as the SQL command. I strongly recommend you save the SQL file this time if, like me, you generally don’t save them.

The following script uses a view) to join the transactional data from the expenses and the M_TIME_DIMENSION table.

It also outputs an integer as the month and a double as the total value for that month. The assumption in this case is that the periods correspond to a single year. Otherwise, you would need a different table for mapping:

The code in the “.hdbview” file is the following:

schema="GOOGLE";

query = "SELECT  TO_INT(TIMES.\"MONTH_INT\") as \"TIMESTAMP\", SUM(\"amount\") as \"VALUE\" from \"GoogleSheets::Trips.ExpensesView\" as EXPENSES join \"_SYS_BI\".\"M_TIME_DIMENSION\" as TIMES on EXPENSES.\"tripDate\" = TIMES.\"DATE_SQL\" group by TIMES.\"MONTH_INT\" order by \"TIMESTAMP\";  ";

depends_on_table=["HANAGoogleSheets::Trips.ExpensesView"];

 And this is the SQL that will call the wrapper to build your Predictive Analytic procedure:

/*PAL Selection, training and forecast*/

set schema "GOOGLE";

DROP TYPE PAL_FORECASTMODELSELECTION_DATA_T;

CREATE TYPE PAL_FORECASTMODELSELECTION_DATA_T AS TABLE ("TIMESTAMP" INT, "VALUE" DOUBLE);

DROP TYPE PAL_CONTROL_T;

CREATE TYPE PAL_CONTROL_T AS TABLE ("NAME" VARCHAR(100), "INTARGS" INT, "DOUBLEARGS" DOUBLE, "STRINGARGS" VARCHAR(100));

DROP TYPE PAL_OUTPARAMETER_T;

CREATE TYPE PAL_OUTPARAMETER_T AS TABLE ("NAME" VARCHAR(100), "VALUE" VARCHAR(100));

DROP TYPE PAL_FORECASTMODELSELECTION_FORECAST_T;

CREATE TYPE PAL_FORECASTMODELSELECTION_FORECAST_T AS TABLE ("TIMESTAMP" INT, "VALUE" DOUBLE, "DIFFERENCE" DOUBLE);

/*Signature table

1st position: Input table type

2nd position: Control table

3rd position: Output Parameter table type

4th position: Results*/


DROP TABLE PAL_FORECASTMODELSELECTION_PDATA_TBL;

CREATE COLUMN TABLE PAL_FORECASTMODELSELECTION_PDATA_TBL("POSITION" INT, "SCHEMA_NAME" NVARCHAR(256), "TYPE_NAME" NVARCHAR(256), "PARAMETER_TYPE" VARCHAR(7));

INSERT INTO PAL_FORECASTMODELSELECTION_PDATA_TBL VALUES (1,'GOOGLE', 'PAL_FORECASTMODELSELECTION_DATA_T','IN');

INSERT INTO PAL_FORECASTMODELSELECTION_PDATA_TBL VALUES(2,'GOOGLE', 'PAL_CONTROL_T','IN');

INSERT INTO PAL_FORECASTMODELSELECTION_PDATA_TBL VALUES(3,'GOOGLE', 'PAL_OUTPARAMETER_T','OUT');

INSERT INTO PAL_FORECASTMODELSELECTION_PDATA_TBL VALUES(4,'GOOGLE', 'PAL_FORECASTMODELSELECTION_FORECAST_T','OUT');

/* Call the wrapper procedure to generate the predictive procedure, named "PALFORECASTSMOOTHING_PROC" in this example

CALL SYS.AFLLANG_WRAPPER_PROCEDURE_CREATE (‘<area_name>’, ‘<function_name>’, ‘<schema_name>’, '<procedure_name>', <signature_table>);

<area_name>:  Always set to AFLPAL.

<function_name>: A PAL built-in function name.

<schema_name>: A name of the schema that you want to create.

<procedure_name>: A name for the PAL procedure. This can be anything you want.

<signature_table>: A user-defined table variable. The table contains records to describe the position, schema name, table type name, and parameter type, as defined below:

*/

CALL SYS.AFLLANG_WRAPPER_PROCEDURE_DROP('GOOGLE', 'PALFORECASTSMOOTHING_PROC');

CALL SYS.AFLLANG_WRAPPER_PROCEDURE_CREATE('AFLPAL', 'FORECASTSMOOTHING', 'GOOGLE', 'PALFORECASTSMOOTHING_PROC',PAL_FORECASTMODELSELECTION_PDATA_TBL);

/*Create the temporary Control table

Each row contains only one parameter value, either integer, double or string.

This configuration tells the wrapper that we will be training the model based on 90% of the data and that we want the forecast to start after the seventh period

*/

DROP TABLE #PAL_CONTROL_TBL;

CREATE LOCAL TEMPORARY COLUMN TABLE #PAL_CONTROL_TBL ("NAME" VARCHAR(100), "INTARGS" INT, "DOUBLEARGS" DOUBLE,"STRINGARGS" VARCHAR(100));

INSERT INTO #PAL_CONTROL_TBL VALUES ('FORECAST_MODEL_NAME', NULL, NULL,'TESM');

INSERT INTO #PAL_CONTROL_TBL VALUES ('THREAD_NUMBER',8, NULL, NULL);

INSERT INTO #PAL_CONTROL_TBL VALUES ('ALPHA', NULL,0.4, NULL);

INSERT INTO #PAL_CONTROL_TBL VALUES ('BETA', NULL,0.4, NULL);

INSERT INTO #PAL_CONTROL_TBL VALUES ('GAMMA', NULL,0.4, NULL);

INSERT INTO #PAL_CONTROL_TBL VALUES ('CYCLE',2, NULL, NULL);

INSERT INTO #PAL_CONTROL_TBL VALUES ('FORECAST_NUM',3, NULL, NULL);

INSERT INTO #PAL_CONTROL_TBL VALUES ('SEASONAL',0, NULL, NULL);

INSERT INTO #PAL_CONTROL_TBL VALUES ('INITIAL_METHOD',1, NULL, NULL);

INSERT INTO #PAL_CONTROL_TBL VALUES ('MAX_ITERATION',300, NULL, NULL);

INSERT INTO #PAL_CONTROL_TBL VALUES ('TRAINING_RATIO',NULL, 0.90, NULL);

INSERT INTO #PAL_CONTROL_TBL VALUES ('STARTTIME',7,NULL, NULL);

DROP TABLE PAL_OUTPARAMETER_TBL;

CREATE COLUMN TABLE PAL_OUTPARAMETER_TBL LIKE PAL_OUTPARAMETER_T;

DROP TABLE PAL_FORECASTMODELSELECTION_RESULT_TBL;

CREATE COLUMN TABLE PAL_FORECASTMODELSELECTION_RESULT_TBL LIKE PAL_FORECASTMODELSELECTION_FORECAST_T;

CALL GOOGLE.PALFORECASTSMOOTHING_PROC( "GOOGLE"."HANAGoogleSheets::EXPENSES_SORTED", "#PAL_CONTROL_TBL", PAL_OUTPARAMETER_TBL, PAL_FORECASTMODELSELECTION_RESULT_TBL) WITH OVERVIEW;


SELECT * FROM PAL_OUTPARAMETER_TBL;

SELECT * FROM PAL_FORECASTMODELSELECTION_RESULT_TBL;

What sorcery are those many dots and colons?? You will see that, for example, the view I created as the input for data is referenced in the code as “GOOGLE”.”HANAGoogleSheets::EXPENSES_SORTED”. “GOOGLE” stands for the schema (the same name as in the .hdbschema file). “HANAGoogleSheets” is the package as you see it in the `Repositories` tab. If this Package had been included in an existing package as a subpackage, you would need to use the full path separated by dots, e.g., rootPackage.secondlevelpackage.thisPackage.

Execute the script and you will see the results from the procedure:

SAP HANA Tutorials and Materials, SAP HANA Certifications, SAP HANA Guide

Ta-da! Your forecast is now in table PAL_FORECASTMODELSELECTION_RESULT_TBL.

I created a calculation view to join the actual and forecast values and let HANA handle the joins and aggregations of the many transaction records we are expecting, which is what she does like a champ and in microseconds.

SAP HANA Tutorials and Materials, SAP HANA Certifications, SAP HANA Guide

Resulting in:

SAP HANA Tutorials and Materials, SAP HANA Certifications, SAP HANA Guide

You may choose to create a calculation view, a CDS view or even publish the results table itself.

Exposing the oData service through an anonymous connection


I created an anonymous oData service that will not request credentials from a user, and will use an internal user (and the roles assigned to it) instead. The steps are fairly simple.

You will need to create an SQL Connection Configuration file we will use to enable execution without requesting login details from the user:

SAP HANA Tutorials and Materials, SAP HANA Certifications, SAP HANA Guide

You now need to configure the connection from your XS Administration tool, which you can probably find in a link like this one: https://your-host:4300/sap/hana/xs/admin/

SAP HANA Tutorials and Materials, SAP HANA Certifications, SAP HANA Guide

After saving, you should see a green message indicating that the SQLCC artifact is enabled for runtime application usage.

The only missing step is to make sure the following lines are as follows in your .xsaccess file:

     "anonymous_connection" : "<<YourRootPackage>>::anonymous",
     
     "exposed" : true,
     
     "authentication" : null

What is really changing with SAP HANA 2.0 SPS 01?

$
0
0
This new release includes enhancements for database management, data management, analytical intelligence and application development.

This release also includes another important change which will have a greater influence on the landscape configuration and sizing of SAP HANA and will definitely encourage people to become more creative and flexible with the technical architecture.

Starting with SAP HANA 2.0 SPS 01, multitenant database containers (MDC) will be the only operational mode for SAP HANA systems. This means that if you upgrade to SAP HANA 2.0 SPS 01, you will no longer be able to run a single-container HANA system.

It basically consists of a system database and one or more tenant databases. System database is used for overall system administration activities and tenant databases are self-contained and completely isolated in terms of persistence layer, database catalog, repository, backups and logs.

SAP HANA Tutorirals and Materials, SAP HANA Certifications, SAP HANA Guide

Figure 1: High Level SAP HANA MDC Architecture

With this release, SAP is positioning MDC as a standard architecture for new HANA systems and therefore each new SAP HANA 2.0 SPS 01 installation will be in multi-container mode with one tenant database by default. If you upgrade from previous releases, the database of a single-container system will be converted into a system database and a tenant database and a new user (SYSTEM) will created in the system database (SYSTEMDB).The database superuser (SYSTEM) of the single-container system becomes the SYSTEM user of the tenant database. It is also possible to perform a near-zero downtime (NZD) update of a single-container system to SAP HANA 2.0 SPS 01 in a system replication landscape. If your databases are already running in MDC, there will not be any changes in terms of architecture.

Your existing single-container system will be converted to a multi-system database provides centralized administration tasks including create, drop, start, stop tenant databases and perform backup/recovery, monitoring, system replication activities for all tenant databases; it needs to be backed up and integrated into your backup and monitoring schedule.

After the upgrade, you need to review below settings from technical point of view and reconfigure if necessary:
  • Database configuration: After the upgrade, database parameters become database specific and stored with the tenant database.
  • Users: All users of the single-container system are now present in the tenant database. It would be better to check and verify them before handing the system over to business.
  • Ports: Tenant database will keep the existing port numbers of the original single-container system: 3NN03 for internal communication, 3NN15 for SQL access, and 3NN08 for HTTP. System database will have the following port numbers: 3NN01 for internal communication, 3NN13 for SQL access, and 3NN14 for HTTP (via XS).
  • XS advanced runtime: If you have XS advanced runtime installed, a separate xsengine process is created and the internal Web Dispatcher of the SAP HANA system routes by default to the single tenant.

Unpivot Data In HANA Using a Graphical Calculation View

$
0
0
UNPIVOT data is a common requirement especially when we try to covert MS SQL query into SAP HANA data model. I ran into one such requirement, we had ETL data from MS SQL server to SAP HANA Enterprise and while converting one MS SQL model into HANA model I came across a Select query in MS SQL server where they were using UNPIVOT in Select statement.

I am using a simple example to explain how we can UNPIVOT data in HANA using Graphical Calculation View.

Here is the requirement:

Initial Data Set in HANA:

SAP HANA Tutorials and Materials, SAP HANA Certifications, SAP HANA Guide

Output: UNPIVOT Data Set:

SAP HANA Tutorials and Materials, SAP HANA Certifications, SAP HANA Guide

Pre-Requisite

Table in HANA, for this example I have created a student table in HANA:

SAP HANA Tutorials and Materials, SAP HANA Certifications, SAP HANA Guide

Process

Create a graphical calculation view. For this use case I have created a Dimension type Graphical Calculation view:

SAP HANA Tutorials and Materials, SAP HANA Certifications, SAP HANA Guide

Add 3 projection nodes and add Student table to each of these projections. In this example we need to UNPIVOT 3 columns (ENGLISH, PHYSICS, MATHS) hence I have used 3 projection nodes, however if you have 2 columns to UNPIVOT then you need to use 2 projection nodes, in short Projection nodes = No. of columns you want to UNPIVOT.

SAP HANA Tutorials and Materials, SAP HANA Certifications, SAP HANA Guide

Add a Union Node and connect all three projections to Union Node.

SAP HANA Tutorials and Materials, SAP HANA Certifications, SAP HANA Guide

Now in mapping section of UNION node do the following:
  • Click on Auto Map by Name

SAP HANA Tutorials and Materials, SAP HANA Certifications, SAP HANA Guide

  • Remove all the Target fields except STUDENT_ID


SAP HANA Tutorials and Materials, SAP HANA Certifications, SAP HANA Guide

Create two new Target columns Subject and Marks

SAP HANA Tutorials and Materials, SAP HANA Certifications, SAP HANA Guide

SAP HANA Tutorials and Materials, SAP HANA Certifications, SAP HANA Guide

SAP HANA Tutorials and Materials, SAP HANA Certifications, SAP HANA Guide

In this step we will convert Column names ENGLISH, MATHS, and PHYSICS into column value.

Click on Manage Mapping of SUBJECT field and add constant values ‘English’, ‘Maths’, ‘Physics’ corresponding to three projection nodes. In MS SQL, UNPIVOT statement automatically converts Column header into Column values however in HANA we need to create constant values to achieve the same functionality.

SAP HANA Tutorials and Materials, SAP HANA Certifications, SAP HANA Guide

SAP HANA Tutorials and Materials, SAP HANA Certifications, SAP HANA Guide

Now we need to map marks/data of ENGLISH, MATHS and PHYSICS to newly created Marks target field.

SAP HANA Tutorials and Materials, SAP HANA Certifications, SAP HANA Guide

Once UNION node mapping is done, connect UNION node to Projection node, add fields to output and activate the view:

SAP HANA Tutorials and Materials, SAP HANA Certifications, SAP HANA Guide

Here is the output of the View

SAP HANA Tutorials and Materials, SAP HANA Certifications, SAP HANA Guide

Using Data Management Strategies to Simplify the Move to S/4HANA

$
0
0
When it comes to considering the move to S/4HANA, many companies are concerned by the short-term pain points that accompany the transition – even though the future benefits are so clear. While SAP provides many tools and support to make the transition as seamless as possible, many companies prefer to delay the transition and wait and see what the future holds. But “wait and see” is not a very viable business strategy.

Organizations must look for ways to simplify the move to S/4HANA and increase the ROI. The same strategies are applicable when migrating BW and/or Business Suite systems from any legacy database to SAP HANA.


SAP HANA Tutorials and Materials, SAP HANA Certifications, SAP HANA Guide

Data management strategies can help simplify several factors:

1. Reduce the Total Cost of Ownership (TCO) for the S/4HANA based landscape using information management technology

2. Provide efficient access to historic information for business users

3. Minimize risk by enforcing compliance with internal and/or external retention requirements

Reduce Total Cost of Ownership


The TCO of S/4HANA is strongly correlated to the volume of data maintained in the system. While the compression and data aging available with the SAP HANA platform enables organizations to store more data than in traditional databases, data aging is only available for limited objects. Therefore, organizations must think about how to control data volume if they want to control costs.

When you move to a new SAP system, you should only move the information that will be required in the new system. Archive and purge any information that is no longer used and has reached its end of life, and archive/move information that is used less frequently into long-term (archive) storage.

Efficient Access


Much of the appeal of data aging in S/4HANA is that it provides users with efficient access to older data from within the same database. Data owners can therefore access the data they want whenever they need it and do not require special training or support. However, the cost of providing this access on SAP HANA is quite high, especially for systems with large data volumes.

If efficient access is what is required, data archiving can provide users with access to data at a fraction of the cost of what it would be on the SAP HANA platform. In the era of in-memory systems, data that is accessed infrequently, such as data that is only retained for audit requirements or that is accessed for occasional reporting queries, can be easily moved to less expensive archive storage without sacrificing ease of access for users. In addition to the savings associated with moving to a less costly database, it also enables organizations to leverage existing investments in repositories.

When data archiving is used in combination with add-on solutions such as the PBS archive modules which provide seamless access to archived data, the speed and ease of accessing archived data from an ArchiveLink certified repository is as fast as accessing data in online systems. The speed and efficiency of access to archived data has been proven by many of the largest companies running SAP systems over many years.

A multi-tiered approach to data management, that incorporates data archiving with data aging will enable companies to have efficient access to data while also aligning the true cost of storing data with the value of the data to the business.

Ensure Information Compliance


Compliance is increasingly a concern for businesses that run SAP systems. Every business, regardless of industry, is subject to fiscal, legal, and other regulations. While many understand how to comply with these regulations when it comes to paper documents, organizations are also obligated to retain the online information in SAP systems in accordance with the same regulations.

The occasion of moving to a new system such as S/4HANA provides a perfect opportunity to review existing systems. Before converting systems, ensure that the online information in the existing source system complies with applicable regulations and if it does not, plan to bring that information into compliance. Businesses should ensure that:
  • Information is protected from modification and premature destruction
  • Information is retained as long as necessary, but not longer
  • Retention and purging of information follows a controlled process, as defined in your corporate records retention policy

Data archiving can play an important role in the process because it enables organizations to freeze data to prevent future modification. Also, data cannot be changed after it is archived which is an important proof of compliance for many fiscal and legal retention requirements.

While it is difficult to assign a hard cost to compliance, the global increase in regulations and the impact of being found non-compliant cannot be ignored. Even with data aging in S/4HANA, archiving will continue to play an important role in information compliance.

New in SAP HANA, express edition: Streaming Analytics

$
0
0
SAP HANA smart data streaming (SDS) is HANA’s high speed real-time streaming analytics engine.  It lets you easily build and deploy streaming data models (a.k.a. projects) that process and analyze incoming messages as fast as they arrive, allowing you to react in real-time to what’s going on. Use it to generate alerts or initiate an immediate response. With the Internet of Things (IoT), common uses include analyzing incoming sensor data from smart devices – particularly when there is a need to react in real-time to a new opportunity – or in anticipation of a problem.

Use Cases


Streaming Analytics can be applied in a wide variety of use cases – wherever there is fast moving data and value from understanding and acting on it as soon as things happen. Common use cases include:
  • Predictive maintenance, predictive quality: detect indications of impending failure in take to take preventative action
  • Marketing: customized offers in real-time, reacting to customer activity
  • Fraud/threat detection/prevention: detect and flag patterns of events that indicate possible fraud or an active threat
  • Location monitoring: detect when equipment/assets are not where they are supposed to be

Streaming data models


Streaming data models define the operations to apply to incoming messages and are contained in streaming projects that run on the SDS server. These models are defined in a SQL-like language that we call CCL (continuous computation language) – it’s really just SQL with some extensions for processing live streams. The big difference though, is that this SQL doesn’t execute against the HANA database, but gets compiled into a set of “continuous queries” that run in the SDS dataflow engine.

Here’s a simple example of a streaming data model that smooths out some sensor data by computing a five minute moving average:

CREATE INPUT STREAM DeviceIn
SCHEMA (Id string, Value integer);

CREATE OUTPUT WINDOW MvAvg
PRIMARY KEY DEDUCED
AS SELECT
   DeviceIn.Id AS Id ,
   avg(DeviceIn.Value) AS AvgValue
FROM DeviceIn KEEP 5 MINUTES
GROUP BY DeviceIn.Id ;

You can see that it looks pretty much like standard SQL, except that instead of creating Tables we are creating streams and windows. With windows, we can define a retention policy – in this example KEEP 5 MINUTES.  And with a moving average we’re just getting started. Filtering events is as simple as a WHERE clause. You can join events streams to HANA tables to combine live events with reference data or historical data. You can also join events to each other. You can match/correlate events, watch for patterns or trends. Anyway – you get the idea.

Capturing streaming data in the HANA database


Any of the data can be captured in the HANA database – and by capturing derived data, rather than raw data – you can reduce the amount of data being captured. You can sample the data or only store data when it changes.

If I wanted to store my moving average from the example above in a HANA table called MV_AVG, I would simply attach a HANA output adapter to the window above by adding this statement to my project:

ATTACH OUTPUT ADAPTER HANA_Output1
TYPE hana_out TO MvAvg
PROPERTIES
   service = 'hdb1',
   sourceSchema = 'MY_SCHEMA',
   table = 'MV_AVG';

Connecting to data sources


SDS includes an integrated web service that can expose a REST interface for all input streams. High frequency publishers can use WebSockets for greater efficiency.

SDS also includes a range of pre-built adapters including Kafka, JMS, file loaders and others. An adapter toolkit (Java) makes it easy to build custom adapters.

Using Real-time output


In addition to the ability to capture output from streaming projects in HANA database tables, real-time output can also be streamed to applications, dashboards, published onto a Kafka for JMS message queue, sent as email or stored in Hadoop.

Machine Learning for Predictive Analytics on Streams


SDS includes two machine learning algorithms – a decision tree algorithm and a clustering algorithm – as well as the ability to import decision tree models built using the PAL algorithms in HANA. These are particularly useful for predictive use cases, enabling you to take action based on leading indicators or detecting unusual situations.

High speed, Scalable


The SDS dataflow engine is designed to be highly scalable with support for both scale-up and scale-out, proving the ability to process millions of messages per second (with sufficient CPU capacity) and delivering results within milliseconds of message arrival.

Design time tools


Design time tools for building and testing streaming projects are available as a plugin for Eclipse and are also available in SAP Web IDE for SAP HANA. Both include a syntax aware CCL editor plus testing tools including a stream viewer, record/playback and manual input tools. The Eclipse plugin also includes a visual drag-and-drop style model builder.

Try it Out


If you’re interested in taking it for a test spin, the easiest way to get started is to follow this hands-on tutorial that takes you through the steps of building a simple IoT project to monitor sensor data from freezer units.

How to send data from Apache NIFI to HANA

$
0
0
NIFI is a great apache web based tool, for routing and transformation of data. Kind of an ETL tool. In my scenario, I am trying to fetch tweets from the Tweeter API, and after that, I wanted to save them to hadoop, but also, filter them and save them to HANA for doing Sentiment Analysis

My first idea was to save them to hadoop, and then fetch them to HANA, but after discovering NIFI, it was obvious that the best solution was to fetch the tweet, then format the json file, and then insert it on HANA.

Why nifi? the answer is simple, it is very intuitive and simple to use. Also very simple to install, and it is already integrated with twitter, hadoop, and JDBC. So it was the obvious choose for my idea.-

Of course you can use this, for using most of the SQL processors that NIFI has, but in this example, we’ll show how to insert a json file into HANA

The first thing that we need to do, after we get the tweet, is to create the processor ConvertJSONtoSQL.

Here, in configuration, the first option will be to create a JDBC Connection Pool we will say “create new service”

SAP HANA Tutorials and Materials, SAP HANA Certifications, SAP HANA Guide

Here, we will select DBCPConnectionPool and click on create

Once we’ve done this, we’ll click on the arrow next to the DBCPConnectionPool to create the actual connection

SAP HANA Tutorials and Materials, SAP HANA Certifications, SAP HANA Guide

In save changes, click yes, and in the next screen, click on the edit icon, on the far right.


Next you will have to complete the properties. And don’t forget to name it as you wish.

SAP HANA Tutorials and Materials, SAP HANA Certifications, SAP HANA Guide
Where <SERVER> is the name of the HANA Server

<nr> is the number of the HANA instance

For example, if the name of the server is hanaServer and the instance number is 00 the connection url will be “jdbc:sap://hanaServer:30015”

In Database Driver Location, the path to the driver must be accessible for the NIFI user, so remember to either copy the driver to the NIFI folder, or make the NIFI user accessible to it.

In my case, I copied the ngdbc.jar to the /nifi/lib, where /nifi was my installation dir, and change the owner of the file to the nifi user.

The driver (ngdbc.jar) is installed as part of the SAP HANA client installation and is located at:

  • C:\Program Files\sap\hdbclient\on Microsoft Windows platforms
  • /usr/sap/hdbclient/on Linux and UNIX platforms

Then Database user and password, will be the credentials for HANA.

The rest you can leave it as it is.-

All the information regarding the JDBC driver for HANA is located here: Connect to SAP HANA via JDBC

In the end, the connection must be enabled, like this:

SAP HANA Tutorials and Materials, SAP HANA Certifications, SAP HANA Guide

SAP HANA Tutorials and Materials, SAP HANA Certifications, SAP HANA Guide
Once we created the connection, we are ready to format the JSON and send it to our database.

In my case, I’m sending part of retrieved tweets, into the DB. So first, I will just take the parts of the Twitter that I’m interested with the processor JoltTransformJSON , and I’ll put the following specification, in the properties:

[{"operation" : "shift",
 "spec":{
   "created_at":"created_date",
   "id":"tweet_id",
   "text":"tweet",
   "user":{
     "id":"user_id"
   }
 }
 }]

Then, I’ll send the tweets to the processor ConvertJSONtoSQL that we created.

SAP HANA Tutorials and Materials, SAP HANA Certifications, SAP HANA Guide

Before we can do that, we must ensure that we have the correct table created on HANA, in my Case here it is:

SAP HANA Tutorials and Materials, SAP HANA Certifications, SAP HANA Guide

You can see how every field transformed in the JoltTransformJSON processor is in the table.

Now we can configure our ConverJSONToSQL

SAP HANA Tutorials and Materials, SAP HANA Certifications, SAP HANA Guide

Basically we are saying that it’s an insert in the previous JDBC that we created, into the table TWEETSFILTRADOS and in the schema TWDATA (sorry for the spanish table name, filtrados means Filtered)

The rest, we can leave it as it is.

Finally, we have to create a PutSQL processor to make the insert.

In my case I’m also saving my tweets to hadoop, but apart from that, it should look like this in the end:

SAP HANA Tutorials and Materials, SAP HANA Certifications, SAP HANA Guide

And now, our table is being filled:

SAP HANA Tutorials and Materials, SAP HANA Certifications, SAP HANA Guide

Another way to do this, could be also with Odata, which I haven’t tried yet. So far this is working fine, but perhaps in the future, This could be also done with Odata, and Rest services.

Fiori Launchpad in SAP HANA 2.0 SP01

$
0
0
SAP Fiori launchpad is the strategic single point of entry for SAP business applications and analytics. It offers a role-based, personalized and real-time access for end users.

If you are not familiar with Fiori UX and Fiori Launchpad you can find more information here.

SAP HANA Tutorials and Materials, SAP HANA Guide, SAP HANA Certifications

Starting from SAP HANA 2.0 SP01, you can aggregate Fiori applications running on this version with Fiori Launchpad and provide the end user with the Fiori Experience.

The Fiori launchpad capabilities include:
  1. Role based access
  2. Personalization
  3. Theming and Branding
  4. Translation

You can now start with creating your Fiori Launchpad site by using SAP Web IDE and add additional applications to it.

SAP HANA Tutorials and Materials, SAP HANA Guide, SAP HANA Certifications

So, how to get started?

After you have the applications ready, you can create a new “Multi Target Application Project”. After the project is created you can select New and “SAP Fiori Launchpad Site Modules”. This will open a wizard that will guide you through the creation of a Fiori Launchpad Site that contains the applications you would like to include. Build the project to create an mtar file containing the out of the box content of the site. You can than deploy the mtar file by using the “xs deploy” command. During the deployment, you will receive the URL for the site. This URL can be send to the end users to access the Fiori Launchpad Site with all the applications.

The end user receiving the Fiori Launchpad Site will benefit from the capabilities of branding, translations and personalization.

Here is a movie created by our developers that shows step by step how to create a Fiori Launchpad site on SAP HANA 2.0 SP01.


Choosing the right HANA Database Architecture

$
0
0
I have realized that especially after the recent release of “more advanced” S/4 HANA products, the SAP community is now more focused on cloud, on premise or hybrid deployment options and it seems to me that the actual underlying SAP HANA database architecture is usually overlooked even though it is the core of the entire implementation. In case you end up with wrong HANA database architecture, it would be really hard to have a proper high-availability and disaster recovery setup in your landscape no matter where you deployed it – cloud or on premise. And remember, when it comes to architecting SAP HANA, there are 3 key elements must be considered carefully; scalability, effectiveness and fault tolerance. In this article, I aim to provide detailed information regarding the current available SAP HANA database architecture and deployment options.

There are six database deployment scenarios; three of them are perfectly fine for production use, other two options come with some restrictions in production and last one is available for non-production systems only.

1. Dedicated Deployment: This is the classical and most common scenario. Usually preferred for optimal (read: high) performance. As you can see from the below figure, there is one SAP system with one database schema created in one HANA DB running on one SAP HANA appliance.

SAP HANA Tutorials and Materials, SAP HANA Certifications, SAP HANA Guide

Figure 1: SAP HANA Dedicated Database Deployment Scenario

2. Physical Server Partitioning: In this scenario, there is one storage and one HANA server which is physically split into fractions. Two separate operating systems installed on separate hardware partitions and hosting two separate HANA databases each have its own database schemas dedicated for respective SAP systems. There should not be any performance problems as long as you have a correct SAP HANA sizing specific for this purpose.

SAP HANA Tutorials and Materials, SAP HANA Certifications, SAP HANA Guide

Figure 2: SAP HANA Physical Server Partitioning

3. MDC (Multitenant Database Containers): I previously released an article about MDC concept. Basically, there is one HANA database (and one system database container for administration purposes) and multiple tenant database containers can be spread on several hardware.

SAP HANA Tutorials and Materials, SAP HANA Certifications, SAP HANA Guide

Figure 3: SAP HANA MDC Deployment

4. MCOD (Multiple Components in One Database): The concept of having multiple applications in one database was available to SAP customers for more than 10 years, of course not with SAP HANA database back in then, but the technology was already there. This is basically multiple SAP systems/applications running on one SAP HANA database under different database schemas. Note that there are some restrictions in production usage especially when combining applications on SAP HANA on a single database explained in note 1661202 (white list of applications / scenarios) and 1826100 (white list relevant when running SAP Business Suite on SAP HANA). These restrictions do not apply if each application is deployed on its own tenant database, but do apply to deployments inside a given tenant database.

SAP HANA Tutorials and Materials, SAP HANA Certifications, SAP HANA Guide

Figure 4: SAP HANA MCOD Deployment

5. Virtualized Deployment: Since SAP HANA SPS 05, SAP has been supporting virtualization on the HANA appliances. This scenario is based on VMware virtualization technology where separate OS images installed on one hardware, and each image is containing one HANA database hosting one database schema for each SAP system. Note that there are some restrictions to the hypervisor (including logical partitions).

SAP HANA Tutorials and Materials, SAP HANA Certifications, SAP HANA Guide

Figure 5: SAP HANA Virtualized Database Deployment

6. MCOS (Multiple Components in One System): MCOS scenario allows you to have multiple SAP HANA databases on one SAP HANA appliance, e.g. SAP DEV and Test systems on one hardware. Production support for this scenario is restricted to SPS09 or higher due to the availability of some resource management parameters. SAP also does support running multiple SAP HANA DBMSs (SIDs) on a single production SAP HANA hardware installation. This is restricted to single host / scale-up scenarios only. I personally don’t recommend this scenario because it requires significant attention to various detailed tasks related to system administration and performance management. Since MCD is available, it would be a much better option in terms of supportability and scalability. 

SAP HANA Tutorials and Materials, SAP HANA Certifications, SAP HANA Guide

Figure 6: SAP HANA MCOS Deployment

Which one I should choose?

For production environments, I would consider options 1 (Dedicated Deployment) and 3 (MDC) depending on a few factors including the existing infrastructure setup and capability, availability and performance requirements of the business, database sizes and structure, HA or DR setup requirements (if any), and overall SAP landscape size. The reason I favour MDC over Physical Server Partitioning is because it can achieve almost everything Physical Server Partitioning do, and comes with great flexibility in terms of supportability, scalability and re-architecture when needed.

Enterprise Readiness with SAP HANA – Host Auto-failover, System Replication, Storage Replication

$
0
0
Continuing on from the earlier blog on Backup & Recovery that we covered last year, we will focus on the Building phase for data centers as we continue this topic in 2017. This segment will focus on what happens inside the data center, and specificically the high availability capabilities and options by SAP HANA, which can be deployed according to the IT managers’ landscape requirements. Of particular focus would be the System Replication feature, which will be explained in detail.

High Availability within Data Centers


SAP HANA comes with three different high availability and disaster recovery deployment modes that can be used:
  1. Host auto-failover
  2. System replication
  3. Storage replication

1. Host auto-failover


This method is appropriate for systems within a single data center. Host auto-failover focuses on replacing failed parts of a system, such as hosts or nodes, with a standby server. In this method, the main memory of the standby system is not preloaded with data from SAP HANA. When failure occurs, this configuration option selects one or more hosts, which are currently running as a standby, for immediate takeover (see Figure 3). This configuration can also scale out to a larger configuration with multiple hosts.

This feature will be managed by the name service in SAP HANA within a scale-out cluster, and multiple standbys can be executed with this feature. A regular check is run by the name service on each cluster member to determine if each node is still active. When a failure is detected, SAP HANA initiates a fully automated takeover by the standby hardware. Multiple takeovers can also be executed using multiple standby servers.

Figure 1. Host auto-failover

SAP HANA Tutorials and Materials, SAP HANA Certifications, SAP HANA Guide

2. System Replication


For enterprises with multiple data centers, system replication could be another recommended approach to ensure fast takeovers and minimum performance ramp-up in the event of system failure. With system replication, both data and log content are transferred using the SAP HANA database kernel. SAP HANA is also responsible for the replication process of data and logs, replication the information immediately after executed transactions. In the case of a transaction, both sites (primary and secondary) must acknowledge the commit to finish the transaction.

The below shows an example of system replication which is optimized for performance. An initial data load is performed first on the secondary system, to ensure both systems reflect the same data with one another. From there, two setup options can be used: the continous log replay setup, which is available since the SPS11 release of SAP HANA, or the delta data shipping setup option.

To maximize throughput efficiency and takeover performance, a “hot standby” continuous log replay setup can be used. Upon the initial data load on the secondary system, the log is then transferred in a steady stream from the primary to the secondary server, where it is further replayed (redo) in the secondary SAP HANA system. This feature reduces takeover times as well as network traffic.

Figure 2. System Replication

SAP HANA Tutorials and Materials, SAP HANA Certifications, SAP HANA Guide

Difference of footprint between Delta Data shipping and continuous log replay

In the delta data shipping setup, the operation on the secondary server is only active as a shadow of the primary server. Data and log streams in this case are only taken for local storage.

In the continuous log-replay setup, the operation on the secondary server has a higher footprint. This is because additional resources are needed on the shadow production instance to run a continuous replay of the logs from the primary server. As a result, the non-production instance in this case is smaller as compared to the delta-data shipping setup.

Multiple options for System Replication

To put it all together, the table below shows the four options available with SAP HANA system replication as well as their differences. It also shows the different configurations that can be modified to run nonproduction workloads, and further optimize the use of hardware assets.

Table 1. system replication options
SAP HANA Tutorials and Materials, SAP HANA Certifications, SAP HANA Guide

3. Storage Replication


Storage replication lastly, is useful for single or multiple data centers. This feature provisions a whole system on a replaced or alternative set of disks or storage system. Because of the remote management of this replication mode, it does not support preloading of data into the main memory of SAP HANA. More will be covered on storage replication in the next chapter in running our data center.

Balancing between the HA/DR Options

The above three options should be balanced according to requirements between the need for cost and performance. The two key metrics that can help guide decision making are the recovery-point objectives as well as recovery-time objective. To provide a rough guide, the table below helps compare product options according to these priorities.

Table 2. Balancing High Availability and Disaster Recovery Options

SAP HANA Tutorials and Materials, SAP HANA Certifications, SAP HANA Guide

Moving forward to System Replication Active/Active 

SAP also offers high availability solutions in which transactions run on the primary server and analytics can run on the standby server. This feature helps maximize hardware assets and processing performance, and is one of the latest releases from SAP in 2016. For more about this feature, see the other blog on, “Active/Active System Replication.”
Viewing all 711 articles
Browse latest View live


<script src="https://jsc.adskeeper.com/r/s/rssing.com.1596347.js" async> </script>