Quantcast
Channel: SAP HANA Central
Viewing all 711 articles
Browse latest View live

Enterprise Readiness with SAP HANA – Storage & System Replication between data centers

$
0
0
Having covered the Build phase in our last blog on system replication within the data center, we will now cover in this blog the phase on running the data center. The run phase focuses on helping IT managers to operate and execute the data center readiness stages of disaster recovery, monitoring and administration, as well as security and auditing. In this blog, we will focus specifically on the storage and system replication technologies currently available for the IT manager.

Storage & System Replication


For large enterprises running multiple data centers, SAP HANA has two disaster recovery features: storage replication and system replication. These are based on the current offerings SAP HANA already has at the node level, which we covered in the previous blog. The table below provides a brief overview between the two offerings and their implications.
Table 1: Disaster recovery options between data centers, with distance in perspective

SAP HANA Tutorials and Materials, SAP HANA Certifications, SAP HANA Guide

Storage Replication


To start off, there are currently different storage replication solutions provided by several SAP partners, which mirrors data between data centers. Customers can proactively engage their dedicated hardware partners responsible for these storage replication solutions, to find out more about the existing options available that can be leveraged in their data centers. Storage data is mirrored between the persistent storage of the first and second data centers. The replicated data includes both data and log volumes.

The below example provides a closeup of how the configuration works in a data center setting. In data center 2, the production instance of SAP HANA is inactive. The mirroring in this case would occur one level below. This type of configuration would help increase the efficient use of hardware assets, by using the hardware infrastructure to also support quality assurance and development activities. To ensure that there is no impact on the mirroring process, the nonproduction usage in this case would use an area of persistent storage that is separate from the actively used production disk.

Figure 1. Storage Replication between Data Centers

SAP HANA Tutorials and Materials, SAP HANA Certifications, SAP HANA Guide

System Replication – Optimized for Cost


Aside from the storage replication option above, system replication is another option that can be leveraged and configured for disaster recovery scenarios. It can also be further optimized for cost or performance, depending on the needs of the business department. In the below closeup example, this configuration could be setup to help lower the TCO by maximizing the usage of hardware assets in the secondary data center for quality assurance and development.

In this configuration, production is active on the secondary cluster, but only at a minimal to take both data and log streams into local storage. Data is not preloaded. As such, the active non-production instances used by Development and Quality-Assurance will have “more room” to run in memory. The disk arrays of the instances in this setup would be separated from each other, so as not to impact performance.

Figure 2. System Replication optimized for costs

SAP HANA Tutorials and Materials, SAP HANA Certifications, SAP HANA Guide

System Replication – Optimized for Performance


For the Performance optimized setup, the IT assets are used solely only for a takeover to ensure as minimum impact to the performance as possible. This can be a preferred option for enterprises with mission critical workloads and extremely short recovery time objectives. Data is also preloaded in this case.

In this configuration, the secondary instance will manage the replication process. As the instance appears active only from a database-kernel point of view, from the client view the secondary server cannot be actively accessed. The introduction of the continuous log replay feature in SAP HANA SPS11 takes the system replication feature a step further by removing the need to transfer the delta data. Only the log information is transferred via the SAP HANA database kernel, and this feature helps to minimize traffic on the connecting network, while further reducing takeover times.

Figure 3. System Replication optimized for Performance

SAP HANA Tutorials and Materials, SAP HANA Certifications, SAP HANA Guide

System Replication – Summary


To put it all together, the table below provides a summary of the differences between the available disaster recovery options, which are based on the system replication methods focusing on the node level, as highlighted in the previous blog.

Table 2. Comparison between different system replication options

SAP HANA Tutorials and Materials, SAP HANA Certifications, SAP HANA Guide

Monitoring and Administration in the Data Centers


Aside from choosing the replication methods, there are also various options and tools available for IT managers to specifically manage their SAP HANA landscape within the data center. Below are some of the tools that an IT manager can consider to manage their SAP HANA data center landscape:
  • SAP HANA cockpit: To monitor and administer the SAP HANA, the SAP HANA cockpit is a platform-independent tool to help administer, monitor and manage the SAP HANA implementation. With this application, IT managers can monitor databases, navigate between different actions and handle central configuration tasks.
  • SAP Solution Manager: The SAP Solution Manager offers a holistic monitoring option for SAP HANA and its environments. This tool is also used by SAP support personnel to assist in early problem analysis.
  • SAP Landscape Management: The SAP Landscape Management software allows IT managers to orchestrate SAP HANA. It interacts with SAP Solution Manager and also incorporates SAP HANA cockpit tiles. This integration supports enhanced orchestration and automated functions. SAP Landscape Management offers features from basic operation to larger and more complex SAP solution landscapes, such as database and application system copies or automated zero downtime updates on shadow systems with SAP HANA replication features.

Single sign on with Spring Security SAML and SAP HANA

$
0
0
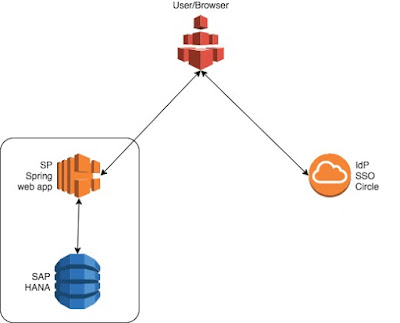
SAP HANA provides users the ability to authenticate using a valid, trusted SAML assertion token. Recently, I was asked to demonstrate this ability to authenticate with a trusted SAML token from a Spring Security web application. So, I laid out a scenario as shown in the figure below.

SAP HANA Tutorials and Materials, SAP HANA Guide, SAP HANA Certifications

As you can see in the figure, the Spring web application is the Service Provider (SP) while SSO Circle is the Identity Provider (IdP). The user connects to the web application and, on first login, is redirected to the Identity Provider to be authenticated. Upon successful authentication, the Spring web application receives a valid SAML assertion token.

The web application can then use the valid token to login to the SAP HANA database. An added benefit is that the database will also know the name of the external user for authorization purposes. In this blog post, I will describe the configuration steps that were needed to make this scenario work.

Step 0: Pre-requirements


In my scenario, I used the following software components:

0.1 SAP HANA v2 SP00 database. This worked with HANA v1 SP12 as well.

0.2 A valid SSO Circle user account available at https://idp.ssocircle.com/sso

Please go to SSO Circle and create a new user. Take note of your user name and email address.

0.3 Spring Security SAML sample web application. I downloaded the sample web application from the following link. Before you deploy this web application to your Tomcat container, please see the step that requires you to make a few edits first.

Step 1: Configure SAML provider in SAP HANA


In order for SAP HANA to trust the SAML assertion sent by the identity provider, you will need to first set up the SAML Identity Provider using the XS Admin utility.

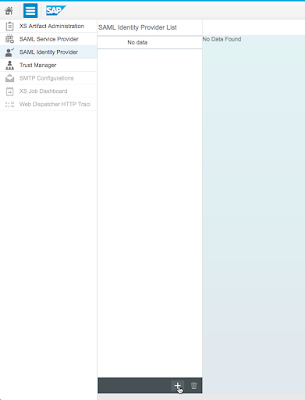
1.1 Login to the XS Admin utility at http://host:8000/sap/xs/admin. Click on the XS Administration Tools icon next to the SAP logo and then click on SAML Identity Provider. Then, click on the plus sign to add a new identity provider.

SAP HANA Tutorials and Materials, SAP HANA Guide, SAP HANA Certifications

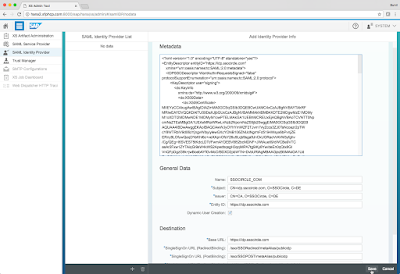
1.2 Download the Identity Provider metadata for SSO Circle from the URL https://idp.ssocircle.com/idp-meta.xml. Copy and paste the contents of this file into the Metadata text box and press the TAB key. The required fields will be automatically filled out. I simply changed the provider name to SSOCIRCLE_COM.

SAP HANA Tutorials and Materials, SAP HANA Guide, SAP HANA Certifications

1.3 Create a database user with an external identity tied to your SSO Circle user id. You can accomplish this by running the following SQL statements:

CREATE USER SUNIL_WADHWA WITH IDENTITY 'sunil.wadhwa' FOR SAML PROVIDER SSOCIRCLE_COM;

ALTER USER SUNIL_WADHWA SET PARAMETER EMAIL ADDRESS = 'sunil.wadhwa@gmail.com';

By default, SSO Circle specifies an email address in the Subject field of the SAML assertion token, therefore it is important for you to associate an email address with the user as shown above.

Step 2: Configure the Spring Security SAML web application


Although the Spring Security SAML sample web application comes with out of the box support for SSO Circle, it needs to be modified to connect to the HANA database. The sample was not meant to connect to a database, so we will need to modify a few things in order for it to serve our purpose.

Download the sample code and set it up in your favorite IDE and favorite build tool.

2.1 Add the SAP HANA JDBC driver to your war file. You will need to include the SAP HANA jdbc driver (ngdbc.jar) since you are going to connect to the HANA database. I just added the jar file directly to the src/main/webapp/WEB-INF/lib folder. When you build the war file, it should include the driver.

$ jar tvf spring-security-saml2-sample.war WEB-INF/lib/ngdbc.jar
921231 Tue Oct 25 14:07:16 MDT 2016 WEB-INF/lib/ngdbc.jar

2.2 Fix the webSSOprofileConsumer bean. There is a nasty issue where the SAML assertion token gets stripped down if you don’t set this property. In order to instruct Spring SAML to keep the assertion in the original form (keep its DOM) set property releaseDOM to false on bean WebSSOProfileConsumerImpl.

Update the bean configuration file src/main/webapp/WEB-INF/securityContext.xml file as shown here:

    <!-- SAML 2.0 WebSSO Assertion Consumer -->
    <bean id="webSSOprofileConsumer" class="org.springframework.security.saml.websso.WebSSOProfileConsumerImpl">
    <property name="releaseDOM" value="false" />
    </bean>

2.3 Create a Java class to connect to the database and run get current user query:

package com.sap.startupfocus.demo;

import java.sql.*;
import org.opensaml.xml.util.XMLHelper;
import org.springframework.security.core.Authentication;
import org.springframework.security.core.context.SecurityContextHolder;
import org.springframework.security.saml.SAMLCredential;
import org.springframework.security.saml.util.SAMLUtil;

public class DatabaseConnector {
    public static void getUserInfo() throws Exception {
    /* Get assertion string */
        Authentication authentication = SecurityContextHolder.getContext().getAuthentication();
        SAMLCredential credential = (SAMLCredential) authentication.getCredentials();
    String assertionString = XMLHelper.nodeToString(SAMLUtil.marshallMessage(credential.getAuthenticationAssertion()));

    /* Connect to database with blank user name and assertion string as password */
    Class.forName("com.sap.db.jdbc.Driver");
Connection c = DriverManager.getConnection(dbUrl, "", assertionString);
System.out.println("Connected to " + dbUrl);

/* Get current user query */
        Statement stmt = c.createStatement();
        ResultSet rs = stmt.executeQuery("select CURRENT_USER from DUMMY");
        if (rs.next()) {
            String currentUser = rs.getString(1);
            System.out.println("Current User = " + currentUser);
        }
    }

    private static String dbUrl = "jdbc:sap://dbhost:30015/";
}

2.4 Create a hook in the index.jsp web page to call the getUserInfo() static method. Edit the file src/main/webapp/index.jsp and add the call at the location shown below:

<%@ page import="com.sap.startupfocus.demo.DatabaseConnector" %>

    <%
          Authentication authentication = SecurityContextHolder.getContext().getAuthentication();
          SAMLCredential credential = (SAMLCredential) authentication.getCredentials();
          pageContext.setAttribute("authentication", authentication);
          pageContext.setAttribute("credential", credential);
          pageContext.setAttribute("assertion", XMLHelper.nodeToString(SAMLUtil.marshallMessage(credential.getAuthenticationAssertion())));
========> DatabaseConnector.getUserInfo();
    %>

Step 3: Deploy and test!


So, that should be it. Deploy the war file to your favorite Java container, and open up the web page for your sample application. It should redirect you to SSO Circle to log in and then you should receive the following page:

SAP HANA Tutorials and Materials, SAP HANA Guide, SAP HANA Certifications

Also, if you look at the log files you should see the message that the connection was successful and the current user should be SUNIL_WADHWA!

Connected to jdbc:sap://dbhost:30015/
Current User = SUNIL_WADHWA

A short overview of the SAP HANA Performance Management Tools in SAP HANA 2.0 SPS00

$
0
0

SAP HANA capture and replay


Testing application workload can be a huge effort for users, developers and consultants alike. Also, things do not get easier on a large scale, especially for moving from one revision or SPS of SAP HANA to another.

Initially released with SAP HANA1 SPS12, SAP HANA capture and replay offers semi-automated support for integrated testing in the context of SAP HANA., the goal being to simplify the manual effort needed for creating tests and performing a more accurate replays than what is possible with other approaches.

SAP HANA Tutorials and Materials, SAP HANA, SAP HANA Certifications, SAP HANA Guide

The process is simple:
  1. Generate workload on the source database and record it using the new tool (1). For initializing a consistent test system, SAP recommends to use a full database backup of the source system.
  2. Use the tool to pre-process the workload and prepare it for replay on your desired SAP HANA test system (2).
  3. Trigger the replay (3) and use the replay report to analyze query runtime or number of rows in result sets between the capture and the replay (4).
The use cases are diverse:
  • Evaluate potential regressions and improvements across SAP HANA revisions, O/S software updates, firmware changes, hardware changes, etc.
  • Evaluate impact of changed information model implementations, system landscape setups, table distributions, index changes, partition changes, etc.
There are several new features available with SAP HANA2 SPS00:
  • Option for fully transaction-consistent replay
  • Option for result-based comparison
  • New capture configuration features
  • Replay to replay comparison
  • New load graph visualization
  • New XSA-based application in SAP HANA Cockpit

SAP HANA workload analyzer


Analyzing performance issues in SAP HANA can be a very complex and difficult task. Usually, several layers of analysis are required in order for the end user to find the correct monitoring view or develop custom queries to deliver the needed information.

Also released in SAP HANA1 SPS12, SAP HANA workload analyzer offers deeper insights into current system workload by analyzing thread samples. These samples are taken continuously and offer a real-time look at what is going on in the customer’s system. This part of the application is called the sampling-based workload analyzer.

SAP HANA Tutorials and Materials, SAP HANA, SAP HANA Certifications, SAP HANA Guide

With SAP HANA2 SPS00 the instrumentation-based workload analyzer has been released. This part of the application focuses on analyzing the engine instrumentation of captured workloads instead of evaluating thread samples in a running system.

SAP HANA Tutorials and Materials, SAP HANA, SAP HANA Certifications, SAP HANA Guide

The tools are integrated into SAP HANA Cockpit as web-based UIs. For better analysis, several flexible, chart-based analysis options are included for analyzing current system workload, as well as timeline-based analysis option on application and statement hierarchy levels for both real-time and capture analysis.

The tools offer means for drill-down evaluation of possible root causes of performance issues either by analyzing real-time or historical thread samples or engine instrumentation of captured data. They allow administrators to view the current state and health of a system at a glance or take a closer look into workload that has been captured. Both support multi-dimensional performance analysis to evaluate existing dominant bottlenecks.

There are several new features available with SAP HANA2 SPS00:
  • Analysis based on source code instrumentation, provides details on individual processing steps
  • Provides analysis based on steps executed, from application to DB or within DB itself, based on application and statement level hierarchy
  • Enables user to evaluate anomalies in the timeline and match potentially problematic statements
  • Possibility to leverage captured workload for analysis

SAP HANA SQL analyzer


When analyzing performance on a system level is not enough, for example using the aforementioned SAP HANA workload analyzer, users are often forced to look into the actual query details to identify bottlenecks or issues. These steps all have been part of typical performance analysis in SAP HANA in the past and continue to do so today. With query-level analysis in most cases being the lowest level of depth in the process, it is also the most complex one. It requires deep knowledge into SAP HANA and plenty of experience with queries and data models.

Previously only available as the so-called “PlanViz” in SAP HANA Studio, SAP now offers the SAP HANA SQL analyzer as part of SAP HANA2 SPS00. The tools are both very similar in regard to their usecase: analyzing query-level performance KPIs. SAP HANA SQL analyzer is the first XSA-based tool from SAP for this purpose.

SAP HANA Tutorials and Materials, SAP HANA, SAP HANA Certifications, SAP HANA Guide

For the initial release, SAP HANA SQL analyzer only contains a subset of the features available in its SAP HANA Studio counterpart. The following features are available in SAP HANA2 SPS00:
  • Basic overview
    • New overview can be shown for executed SQL statements, accessible from expensive statements or from plan trace view
    • Shows overall KPIs regarding runtime, dominant operators, tables used, etc.
    • Similar to PlanViz overview in SAP HANA Studio
SAP HANA Tutorials and Materials, SAP HANA, SAP HANA Certifications, SAP HANA Guide

  • Operator List view
    • New operator list view shows operators of SQL statement execution
    • Includes details on execution time of operators as well as accessed objects and output rows
    • Useful to figure out expensive operators and what objects they handled


SAP HANA Tutorials and Materials, SAP HANA, SAP HANA Certifications, SAP HANA Guide

  • Tables Used view
    • New tables used view shows tables accessed during SQL statement execution
    • Includes details on location of table, partition (if applicable), number of accesses and entries processed
    • Useful to figure out filter pushdown, tables accesses as well as physical information of tables in one overview
SAP HANA Tutorials and Materials, SAP HANA, SAP HANA Certifications, SAP HANA Guide

  • Statement Statistics view
    • New statement statistics view shows information about SQL statements involved during procedure execution
    • Includes details on execution times, statement order and more
    • Useful to figure out which part of the procedure has taken up the most time during execution and could be a potential bottleneck
SAP HANA Tutorials and Materials, SAP HANA, SAP HANA Certifications, SAP HANA Guide

Migrating the SHINE Purchase Order Worklist Application from SAP HANA XS Classic to SAP HANA XS Advanced.

$
0
0

Prerequisites


To perform a migration you need to be aware of the files that are not supported by the migration assistant und migrate them manually in advance. How to do this manual step, is described in the official documentation.

Prepare the XS classic source system.

Scenario: You run an SPS 11 XS classic source system.
Your are good to go.

Scenario: You run an XS classic system older than SPS11 and  have an SPS11 development system available.

You need the SHINE application either from the SAP Software Download Center or an existing SAP HANA extended application services, classic model development system. Then import it into an SPS 11 system.

Scenario: You run an XS classic system older than SPS11 and use the XS advanced development system as parser.

You need to configure environment settings for external parsing.

set HANAEXT_HOST=<XSA hostname>
set HANAEXT_SQL_PORT=<HANA SQL port>
set HANAEXT_USER=<HANA username>
set HANAEXT_PASSWD=<HANA password>
set HANAEXT_CERTIFICATE=</path/to/HTTPS/certificate/file>

For a Linux system, use export instead of set.

Run migration and evaluate migration report


Run the migration assistant.

Before migrating your XS classic application to XS advanced using the XS Advanced Migration Assistant, bear in mind the following points:

  • You must already have converted manually any XS classic artifacts that cannot be migrated automatically by the XS Advanced Migration Assistant.
  • You must already have set up the source (XS classic) system for the migration
  • You have set up the required users on the SAP HANA systems and assigned them the required access permissions.
  • The XS Advanced Migration Assistant makes use of the SAP Java Virtual Machine (JVM), so make sure the correct C++ library is installed on Windows machines, for example, the x64 variant of the Microsoft C++ runtime. For more information, see Related Links.

Evaluate the migration report.

The migration report lists all items migrated for the complete SHINE application; the action items are grouped according to technical areas. In this example for our Purchase Order Worklist, action is required in the following areas:

  • Step 1: Migration of Security Concept Required
  • Step 4: XSJS JavaScript Migration Required
  • Step 5: Translation

Security related concept check


Check the authorization scope of the XS advanced user to ensure that all database calls are protected. The XS classic SHINE application contains two roles, “User” and “Admin“. These XS classic roles contain database privileges that cannot be migrated to XS advanced automatically; the XS Advanced Migration Assistant only considers the application privileges. It is essential to ensure that the XS advanced scopes are sufficient to distinguish users.

Create the required XS advanced services and feed values


To build, deploy and run the migrated SHINE application in XS advanced, it is necessary to create some XS advanced services manually.

The SAP Web IDE for SAP HANA automatically generates some XS advanced services. However, this automation does not include the User Account and Authorization (UAA) service or the synonym grantor service. You must create these services manually, for example, using the XS CLI (xs create-service command).

Adjust the generated template


You do not need to adapt anyting to the Purchase Order Worklist application. You might need to touch other parts of the SHINE application to get it started. In such a case check the xs-security.json file for references to FioriLaunchPad and delete these references. In a standard scenario these would be the references to remove:

{
  "name": "$XSAPPNAME.sap.hana.democontent.epm.ui.uis.FioriLaunchPad.WidgetAccess:FioriShineCatalog",
  "description": "Access FioriShineCatalog Widget"
},
{
  "name": "$XSAPPNAME.sap.hana.democontent.epm.ui.uis.FioriLaunchPad.AppSiteAccess:FioriShineLaunchPad",
   "description": "Access FioriShineLaunchPad AppSite"
},
{
  "name": "$XSAPPNAME.sap.hana.democontent.epm.ui.uis.FioriLaunchPad.AppSiteAccess:FioriLauncPadWithImage",
  "description": "Access FioriLauncPadWithImage AppSite"
},
{
  "name": "$XSAPPNAME.sap.hana.democontent.epm.ui.uis.FioriLaunchPad.AppSiteAccess:FioriShineLaunchPadWithTheme",
  "description": "Access FioriShineLaunchPadWithTheme AppSite"
}


"$XSAPPNAME.sap.hana.democontent.epm.ui.uis.FioriLaunchPad.AppSiteAccess:FioriShineLaunchPad",
"$XSAPPNAME.sap.hana.democontent.epm.ui.uis.FioriLaunchPad.AppSiteAccess:FioriShineLaunchPadWithTheme",
"$XSAPPNAME.sap.hana.democontent.epm.ui.uis.FioriLaunchPad.WidgetAccess:FioriShineCatalog"

Making required code updates


You need to make changes to the database container and the JavaScript container. For the Web container everything is migrated by the migration assistant.

The database (DB) container


The migrated SHINE application requires additional privileges for HDI objects in the XS advanced database (DB) container.

So you need to check the content of cfg/synonymconfig.hdbsynonymconfig and of src/synonyms.hdbsynonym and possibly add the configuration.

Sample Code

"TCURF": {
   "target": {
        "object": "sap.hana.democontent.epm.data::Conversions.TCURF"
   }
},
"TCURN": {
    "target": {
        "object": "sap.hana.democontent.epm.data::Conversions.TCURN"
    }
},
"TCURR": {
    "target": {
        "object": "sap.hana.democontent.epm.data::Conversions.TCURR"
    }
},
"TCURV": {
    "target": {
        "object": "sap.hana.democontent.epm.data::Conversions.TCURV"
    }
},
"TCURX": {
    "target": {
        "object": "sap.hana.democontent.epm.data::Conversions.TCURX"
    }
}
Check the contents of the synonyms definition file src/synonyms.hdbsynonym.

Sample Code

"TCURF": {}
"TCURN": {}
"TCURR": {}
"TCURV": {}
"TCURX": {}

The JavaScript (XSJS) container


The migrated SHINE application requires modifications to objects in the XS advanced database JavaScript container.

Since it is not possible to guarantee that the XS Advanced Migration Assistant detects all problems in the XS classic XS Javascript xsjs code scan, you must review all issues that are listed in the XSJS section of the migration report gererated by the XS Advanced Migration Assistant, as shown in the following list:

Translation-related artifacts


The XS Advanced Migration Assistant is not sure what to do with XS classic text bundles (.hdbtextbundle). It stores them in the todo/ folder. You must copy these text bundles (now .properties files) manually to the desired destination.

Deploy and run the migrated application


Deploy and run the migrated application.

Prerequisites


It is assumed that the UAA is configured as identity provider (not SAP HANA); this is the default setting in XS advanced.

You created the UAA service with xs-security.json as configuration file.

Procedure


1. Prepare and assign XS advanced role collections that enable access to the migrated XS advanced application.

  • Since the XS advanced application is protected by scopes defined in the application router configuration, the corresponding route configuration can be found in the application descriptor (xs-app.json), which is located in the web/ module of the XS advanced Multi-target application (MTA).
  • The xs-security.json file defines the scopes and assigns the scopes to role templates. In order to enable access to the XS advanced application, you must assign the template-based roles to one or more role collections, which you then assign to the users who need access to the application.

The assignment tasks can be performed using the XS Advanced Administration Tools UI.

2. Deploy and run the XS advanced application in the XS advanced run-time environment.

  • To deploy the migrated SHINE application from SAP Web IDE for SAP HANA, use the built-in tools to perform the following actions:
    • Build the db module
    • Run the xsjs and web modules.

Results


To access the application, use the link displayed in the SAP Web IDE for SAP HANA run console when running the web/ module. The link will open the launchpad of the SHINE application where you will find the Purchase Order Worklist tile that the previous sections of the documentation were focused on. With the described adaptations, only the Purchase Order Worklist application part will work properly. You will have to make further changes to run the other application parts as well.

Next Steps


If you want to hide the tiles not handled in this example, you can modify the file web/resources/sap/hana/democontent/epm/ui/launchpad/main.view.js and remove the respective tiles:
...
var items = [adminTile, poTile, soTile, sowTile,
            userTile, spatialGoldTile, salesMobileTile,
            fioriTile, xsdsTile,xsUnitTile, ui5SearchTile,
            jobSchedulingTile, eTagsTil
        ]
...

Migration of SAP Systems to SAP HANA

$
0
0

Introduction


This document provides a starting point for the planning of your migration procedure of SAP systems to SAP HANA in an on-premise landscape. Beginning with an overview of available migration path options, we provide a general recommendation and further aspects and guidance how to identify the best procedure for your requirements. Take these aspects into the discussion with your cross-functional teams and use them as basis for an individual assessment based on the boundary conditions you are facing.

Overview of Migration Path Options


ABAP-Based SAP Systems

For the migration of ABAP-based SAP systems to SAP HANA, several migration path options are offered:

SAP HANA Tutorials and Materials, SAP HANA Certification, SAP HANA Guide
  1. In case you want to change your existing solution landscape in the course of a migration project, there are several transformation offerings from SAP Landscape Transformation, where you install a new system for the transformation, such as performing a step-wise or partly migration of an SAP system or the consolidation of several systems into one system running on SAP HANA.
  2. The classical migration of SAP systems to SAP HANA (that is, the heterogeneous system copy using the classical migration tools software provisioning manager 1.0 and R3load) is using reliable and established procedures for exchanging the database of an existing system – it is constantly improved especially for the migration to SAP HANA.
  3. To further smooth the way to SAP HANA, SAP is providing a one-step procedure that combines system update and database migration for the migration to SAP HANA. This is provided with the database migration option (DMO) of Software Update Manager (SUM).

The options are outlined in an overview video. Spend 15 minutes to get a quick-start to the available migration options to SAP HANA for SAP ABAP systems:

How to Choose the Right Option for You?


1. See the Standard Recommendation from SAP

Use the following recommendations as starting point for an individual assessment – that is, take the recommendation and relevant aspects into the discussion with your cross-functional teams and use them as basis for an individual assessment based on the boundary conditions you are facing.

For ABAP-based SAP systems, the following recommendation applies:

SAP HANA Tutorials and Materials, SAP HANA Certification, SAP HANA Guide

  • The general recommedation is to use the database migration option of SUM, as it has become our standard procedure for migrations to SAP HANA – with it, you can profit from a simplified migration to SAP HANA, performed by one tool, with minimized overall project cost and only one downtime window.
  • As reasonable alternative to our standard recommendation, in case the database migration option of SUM does not fit your requirements, consider to use the classical migration procedure with software provisioning manager, which is also continuously improved especially for the migration to SAP HANA. Reasons might be that the database migration option of SUM does not support your source release or if you prefer a separation of concerns over a big bang approach as offered by DMO of SUM.
  • As possible exception, there are further migration procedures for special use cases, such as the consolidation of SAP systems in the course of the migration project or the step-wise migration to SAP HANA, as oultined above.

For Java-based SAP systems, use the classical migration approach (and skip step 2 below).

 2. Individually Assess Your Situation


Based on the standard recommendation from SAP, find the best option depending on your individual requirements and the boundary conditions you are facing. To support you in this process, SAP provides a decision matrix in the End-to-End Implementation Roadmap for SAP NetWeaver AS ABAP guide (SMP login required), which is intended to highlight important aspects for your decision on the right migration procedure, including these key considerations

SAP HANA Tutorials and Materials, SAP HANA Certification, SAP HANA Guide

  • What is the release and Support Package level of your existing SAP system? Is an update mandatory or desired as part of the migration procedure?
  • Is your existing SAP system already Unicode?
  • Do you plan any landscape changes – such as changing the SAPSID of your SAP system or the hardware of your application server – as part of the migration or do you rather prefer an in-place migration?
  • Do you plan the migration of your complete system or a partial migration?
  • Are your operating system and your database versions supported according to the Product Availability Matrix (PAM) of the target release or are corresponding updates required?
  • Do you expect a significant downtime due to a large database volume?

All these aspects are reflected in the matrix, which is intended as a starting point for your individual assessment as outlined above.

SAP HANA High Availability and Disaster Recovery Series

$
0
0
My purpose is to deep-dive into the entire SAP HANA high availability (HA), fault recovery (FR) and disaster recovery (DR) concept including the high-level overview of ALL available HA, FR and DR options, different configuration and setup methods and key benefits and trade-offs of each technology. I aim to provide deeper, clear and broader information in SAP HANA HA and DR technologies unlike the majority of confusing and contradictory information available on the internet. At the end of the day, you will be able to compare all available DR, FR and HA options, learn how to ensure your system’s operational continuity and decide the most suitable approach for your own data center readiness scenario to meet the business requirements.

This very first article is an introduction to the series and will mostly cover to the areas I am going to explain. Herewith some of the current SAP HANA capabilities from data center readiness point of view:

SAP HANA Guide, SAP HANA Certifications, SAP HANA Backup-Recovery

Before we start, we need to understand what our KPIs are when it comes to HA and DR from business continuity planning perspective, so we can make better-informed decisions. There are two main objectives:

Recovery Point Objective (RPO): Maximum tolerable period of time which operational data is lost without the ability to recover. This is your business continuity plan’s maximum allowable threshold for data loss. The RPO is expressed backwards in time (that is, into the past) from the point the failure occurs.

Recovery Time Objective (RTO): Maximum permissible time it takes to recover the system after a disaster (or disruption) for system operations to resume. This objective can include the time for trying to fix the problem without recovery options, the recovery itself and testing of services before handing over to the business users.

These two KPIs help system architects choose optimal high availability and disaster recovery technologies and procedures in SAP HANA platform.

SAP HANA Guide, SAP HANA Certifications, SAP HANA Backup-Recovery

Our target RPO for business-critical systems should be ZERO DATA LOSS and minimum possible RTO in all production environments. And the key requirement to achieve these is to apply the most effective data replication method in both HA and DR scenarios.

Agenda starting from the second article:
  • Single Points of Failure
  • High Availability Options
  • Fault Recovery Support
  • Disaster Recovery Support
  • Service Auto-Restart
  • Host Auto-Failover (with scale-out scenario, heartbeat and fencing capabilities)
  • Storage Replication (remote networked storage, both
  • System Replication (Covering all replication modes AND both operation modes in detail)
  • Backup and Recovery (filesystem, 3rd party backup tools, snapshots)
  • Near-Zero Downtime Maintenance
  • Comparison

If you liked this post, you might like these relevant posts:

HANA Backup and Recovery: Multi-streaming Data Backups with Third-Party Backup Tools

$
0
0
SAP HANA uses one channel for data backups, by default. With the introduction of SAP HANA SP11 we have new functionality available to make it possible to considerably speed up the backup time by distributing backup data in parallel to multiple devices by using third party back-up tools.

When multiple channels are used, SAP HANA distributes the data equally across the available channels. All the parts of a multi-streamed backup are approximately the same.

Need and Features for Multi-Streaming Backup Channels: For improved performance Backint can use multiple parallel streams for data backups. If parallel streams have been configured, the individual service backups are distributed across all available streams. Different services always use dedicated backup streams. Backups will only be distributed if they are bigger than 128 GB.
  1. To configure number of parallel streams, use the parallel_data_backup_backint_channels.
  2. This feature is available starting HANA  SP11.
  3. The maximum number of channels permitted is 32 for each service.
  4. Both full and delta backups are supported.
  5. No downtime required to implement backup multi-streaming.
In one of our scenarios we are using three streams for index server for faster database backup:

SAP HANA Guide, SAP HANA Materials, SAP HANA Certifications

The index server backup is distributed across three streams.

Name server and XS engine backups are not distributed among several streams because they have smaller than 128 GB backups size.

Procedure: Below are the steps to implement this functionality in your HANA Landscape:

• Backup Team to set parallelism for the system on the network side.
• DB/OPS team to change the Number of Channels for Multi-streaming in HANA Systems.

Steps performed by DB/OPS Team to change number of channels for multi-streaming:


1.In SAP HANA studio, go to the Configuration tab.

2.Expand  global.ini  and go to section [backup] .

3.Locate the parameter parallel_data_backup_backint_channels.

This parameter controls the number of channels used for multi-streaming.

4.Change the parameter value.

The default value of parallel_data_backup_backint_channels is 1.

SAP HANA Guide, SAP HANA Materials, SAP HANA Certifications

In our example we have used 3 streams for index server for multistrea

5.Set parameter  data_backup_buffer_size
global.ini -> section  [ backup] -> parameter  “data_backup_buffer_size” = <512 * Number of Channels>

Database Performance: Monitor next few backups and backup time to check performance improvement. You will notice backup time improvement by 30-40%.Ensure that increase in number of channels does not have a negative impact on memory consumption. As this activity can be performed online but make sure changes can be made in non-business hours to avoid performance degradation in some situations.

The AWS IoT Button and SAP HANA express edition

$
0
0
I’m a sucker for new toys and tech and when I can take something new and within a short period of playing around actually connect it to SAP I’m on top of the world.

SAP HANA Tutorials and Materials, SAP HANA Certifications, SAP HANA Guide
So that’s what I recently got, the AWS IoT Button. It’s their cloud programmable dash button, I have a dozen of those as well because I always forget to add things to my shopping list.

The AWS IoT Button is a programmable button based on the Amazon Dash Button hardware. This simple Wi-Fi device is easy to configure and designed for developers to get started with AWS IoT, AWS Lambda, Amazon DynamoDB, Amazon SNS, and many other Amazon Web Services without writing device-specific code.

When I got the button I was honestly not sure what I was going to do with it. It’s just a button after all. How much can it do, click it and it places and order… but wait there are 3 events to work with and it sends a basic payload that I can grab and work with.

The events are the SINGLE, DOUBLE and LONG and indicate the interaction with the button and the payload that it generates is quite simple.

{
    "serialNumber": "GXXXXXXXXXXXXXXXXX",
    "batteryVoltage": "mV",
    "clickType": "SINGLE | DOUBLE | LONG"
}

So what I needed to do now was create a Lambda function quite similar to what I did was the Amazon Echo (SAP Cloud Platform and ABAP) and parse the payload and decide what to do.  I also knew I wanted to interact with my SAP HANA express edition (HXE) system and to shake things up I decided I would use the one running in the Google Cloud Platform. At this point I was not sure what I wanted to do but I knew there was something there for me to do. I also checked out what others had done as well to start generating the ideas.

With the beginnings of an ideas I made sure that my Lambda function based off of their tutorial worked and I had a working email subscription so I knew when things were processed. That was so easy and I was able to add anything I wanted to it the content.

SAP HANA Tutorials and Materials, SAP HANA Certifications, SAP HANA Guide

Now though I needed what the email says to actually happen, and therefore in steps my HXE system.

So in my Lambda function I added the following code for the SINGLE click event of the button.

var body = JSON.stringify({
    "MATNR1": 12, 
    "REQUESTED_QTY1" : 5, 
    "MATNR2": 25, 
    "REQUESTED_QTY2" : 3
});
var request = new https.request({
        hostname: hxe_host,
        port: 4300,
        path: "/SmartThings/things.xsodata/createEntry",
        method: "POST",
        headers: {
            'Authorization': authStrHXE,
            'Content-Type': 'application/json; charset=utf-8',
            'Accept': '*/*'
        }
    });
    request.end( body );
    request.on('response', function (response) {
    console.log('STATUS: ' + response.statusCode);
    if( response.statusCode === 201 ){
        console.log("Successfully received response system");
        callback("Processed correctly");
    }
});

and that went right inside of the event handler.

exports.handler = (event, context, callback) => {
    console.log('Received event:', event.clickType);

    if(event.clickType === 'SINGLE' ){
      /** insert here **/
    }
};
It was so simple! I was utterly pleased at how quickly that went! Of course the other part was some simple stored procedures and xs odata on my HXE system to do some database table updates. I won’t dive into those.

Click the button though and not only do you get the mail but you can see in the logs what else is happening.

SAP HANA Tutorials and Materials, SAP HANA Certifications, SAP HANA Guide

In theory and practice I now have a “Dash button” that can generate a purchase order with a supplier system for a real ERP business just like if I wanted to order a household product. Now how cool would it be to have a button like this in my manufacturing plant or office complex that would enable employees to place orders without stopping to find the proper form?

Restore SingleDB on 122.08 to Multi Tenant DB on HANA 2.0 SPS01

$
0
0
Just tested recover a single Database to Multi Tenant Database without the need to convert them to MDC beforehand with below scenario and thought it is a good idea to share.

This enhancement only work on target >= HANA 2.0 SPS01 and is particularly useful where it keeps your source/ productive database intact and allows you to to perform a series of testing before converting them to MDC, especially if you plan to upgrade to HANA 2.0 SPS01 since MDC would be the standard and only operation mode.

Source:

HANA revision: 122.08 (HANA Platform Ed 1.0)

SID: NC2

Mode: SingleDB

Target:

HANA Revision: 2.00.010 (HANA 2.0 SPS01)

SID: NC1

Mode: MultiDB (MDC)

Scenario:

Restore the backup taken from NC2 (singleDB) to tenant NC2_MULTIDB@NC1

i. Backup source singleDB NC2 on HANA platform Ed 1 – SPS122.08

SAP HANA Guide, SAP HANA Materials, SAP HANA Certifications

3 HANA services were backup.

SAP HANA Guide, SAP HANA Materials, SAP HANA Certifications

ii. Once backup completed, in HANA 2.0 SPS01, you can either restore the backup taken directly to the available tenant or to a newly created tenant.

In below, the singleDB will restore to tenant NC2_MULTIDB on NC1 on HANA 2.0 SPS01

SAP HANA Guide, SAP HANA Materials, SAP HANA Certifications

Restore using the backup taken on SingleDB on SPS122.08

SAP HANA Guide, SAP HANA Materials, SAP HANA Certifications

If you noticed, only 2 services – indexserver and xsengine were restored

SAP HANA Guide, SAP HANA Materials, SAP HANA Certifications

iii. Once recovery completed, you’ll need to re-enter the NC2 SYSTEM user password into tenant NC2_MULTIDB@NC1 in HANA Studio as source password was overwritten from restore.

SAP HANA Guide, SAP HANA Materials, SAP HANA Certifications

And now your singleDB is restored to a tenant in MDC without the need to convert them to MDC beforehand.

SAP HANA Guide, SAP HANA Materials, SAP HANA Certifications

I’ve tested and it works perfectly on source revision 122.07 and 122.08 and assume it should work on SPS12. For revision <=SPS11, further testing will be needed.

Avoiding HANA Enterprise Cloud Headaches!

$
0
0
A source told me that one of the largest SAP customers in the (ANZ) region is moving from HANA Enterprise Cloud (HEC) back to an on-premise infrastructure model. Well, this was not surprising for me as I already knew some customers in Europe also moved from HEC to on-premise or other cloud offerings, due to unexpected and unforeseen issues with the HEC model.

I am aware that the majority of the businesses still can’t simply justify the business case for HEC, and it is disappointing to see that some existing customers don’t get the expected business benefits from this model.

SAP HANA Guide, SAP HANA Tutorials and Materials, SAP HANA Certifications

As a side note, a recent study showed that on average, project go-lives are delayed by around 25%, resulting in higher project costs and delayed benefits. SAP implementations have the largest gap between planned and actual delivery date. Also, only 21% of SAP projects achieve 50% or more of expected business benefits according to the same study. That means 79% of businesses do not get the VALUE they expected from their SAP investment.

With almost 10 years of hands-on experience in numerous end-to-end SAP implementations, upgrades and OS/DB migrations in both medium and large-scale landscapes I’ve experienced the same issues affecting businesses:

  1. Not having a clear strategic roadmap
  2. Poor project planning
  3. Insufficient or not clearly documented testing procedures
  4. Lack of expertise
  5. Wrong solution / technical architecture, which eventually causes delayed projects and therefore reduced ROI.
SAP HANA Guide, SAP HANA Tutorials and Materials, SAP HANA Certifications


I think while the context in any particular business may be unique, the issues that plague the projects are not.

HEC, on the other hand, certainly addresses some of the priorities of a business like continuous innovation, fast deployment, agility and elasticity with a (relatively) low risk.

However, HEC comes with its own particular points-to-consider as well.

For instance, based on the HEC support model; datacentre, infrastructure, operating system and database (HANA) maintenance is delivered as part of SAP’s standard responsibility with HEC. This is probably the main reason for most businesses to move to HEC but its maintenance policy requires the scheduled maintenance activities (including database and OS updates) quite frequently.

You might think it is good to keep your systems up-to-date whenever a new update is released (it usually is) however if you are running multiple projects in a large-scale landscape, you would need to test the projects over an extended period of time. That is why you need to carefully schedule your testing cycles so they don’t conflict with the HEC maintenance policy.

This is certainly a challenge to organise and there is a risk that you may not be able to test your projects in the same environment from underlying database and infrastructure point of view. I believe HEC should be offering more flexible maintenance policy for certain and especially large customers.

Another point you need to consider is change management. It is not unusual to have some lead time for any changes however when it comes to HEC, one of the most common complaints I hear is unreasonable lead times. We are in a new fast-changing business era and speed is a competitive and strategic weapon for businesses. Fast deployment and agility should be the main advantages of HEC, so having unreasonable lead times for every single change, causes delayed projects and therefore reduced ROI.

The offshore support model and resourcing issues could be the main reasons causing extended lead times and that is certainly something SAP can easily solve!

Monitoring and alerting are part of the standard HEC service and should be taken seriously when it comes to HEC. SAP is responsible for configuring and then monitoring and alerting, to meet your business requirements. However, in some cases monitoring objects and metrics might not be configured properly or with the correct monitoring metrics, which therefore leads to inadequate monitoring and missing alerts in the systems.

Therefore, if you are moving to HEC, I would strongly recommend to be actively involved in the initial monitoring configuration along with the HEC team and make sure that you have proper monitoring sets in place for every aspect of your landscape including application, database and host level.

If you have certain processes that need to be monitoring (e.g. BW process chains, disaster recovery configuration, specific jobs) you may also need to utilize certain business monitoring processes with correct metrics.

There are other points to consider like resource planning for HEC offshore support and communication between different support teams. Though these might be customer specific cases, it would be safer to make sure you have the same people working on the infrastructure and database changes through your landscape from Development to Production systems. At the very least, make sure your changes are documented and communicated properly between all support teams so they understand all the steps to perform the change successfully.

I believe all these issues can be solved by establishing a strong engagement model, led by SAP, to ensure optimal collaboration from all parties. When customers, vendors and subcontractors are aligned and focused to deliver value, project success is a natural consequence and HEC is no exception!

SAP HANA Guide, SAP HANA Tutorials and Materials, SAP HANA Certifications

SAP HANA Multitenant Database Containers (MDC) Features Chart

$
0
0
Starting from HANA 2.0 SPS01, Multitenant Database Containers (MDC) will be the standard and only operational mode for SAP HANA systems, and definitely one of the significant changes that will have greater influence, affect directly or indirectly on customers’ systems that are currently running on single container but plan to update to HANA 2.0 SPS01+ and above anytime soon or in near future.

Want to know the differences and the developed of MDC with more supported features and less limitations compare to years ago when it first introduced on HANA 1.0 SPS09+ ?

Look at the chart below and hopefully it’ll gives you a glance on current supported features and limitations and how MDC has grown along the path since it was born

SAP HANA Multitenant Database Containers (MDC), SAP HANA Tutorials and Materials

*+ current latest release

Watch and follow this article, i’ll constantly update the content of the chart for any new features, limitations, improvements introduced on every new release.

Sap HANA passing value from one input parameter to other for filtering table

$
0
0
I am going to explain how to pass value from one input parameter to other parameter and filter the underlying table without any process change in the view.

CV_xxx_BASE View before changes

Configuration of input parameter in current view was as under

Parameter Type : Direct

Semantic Type : Date

Data Type : Date

SAP HANA Studio, SAP HANA Materials, SAP HANA Certifications, SAP HANA Guide

Table is getting filter from input parameter IP_ASOFDATE

SAP HANA Studio, SAP HANA Materials, SAP HANA Certifications, SAP HANA Guide

Business Requirement 

Changes asked by business,
  1. Date description rather than date as input parameter i.e instead of 05/11/2017 business want to see ‘TODAY’.
  2. Date can be passed as free text  i.e 05/11/2017 OR 05.11.2017 etc any date format.
Issue
  1. To get dynamic Date with Description from system date without maintenance so that you can use input parameter.
  2. Date as Free Text check if date is valid or not.
  3. Converting Date Description back to date so that respective columns can be filtered on basis of Date.
  4. There should be no changes in the structure, process or flow of the view.
  5. No additional view can be created as there should not be any additional maintenance.
Solution

1. To get dynamic date with description from system date.

Create a Scripted calculation view CV_DATES_HELP with following code

SAP HANA Studio, SAP HANA Materials, SAP HANA Certifications, SAP HANA Guide

BEGIN
DD = SELECT 1 UID , 'TODAY' DAY_PICK , CURRENT_DATE DATES FROM DUMMY union
     SELECT 2 UID , 'Last Day Of Month' DAY_PICK , LAST_DAY(CURRENT_DATE) DATES FROM DUMMY union
     SELECT 3 UID, 'First Day Of Month' DAY_PICK , ADD_MONTHS(NEXT_DAY(LAST_DAY(CURRENT_DATE)),-1) DATES FROM DUMMY union
     SELECT 4 UID, 'Last Day Of Last Month' DAY_PICK , LAST_DAY(ADD_MONTHS( CURRENT_DATE,-1)) DATES FROM DUMMY union
     SELECT 8 UID, 'Last Day Of The Year' DAY_PICK , TO_DATE ((SUBSTRING(CURRENT_DATE,0,4))||'-12-31', 'YYYY-MM-DD') DATES FROM DUMMY union
     SELECT 9 UID, 'First Day Of The Year' DAY_PICK , TO_DATE ((SUBSTRING(CURRENT_DATE,0,4))||'-01-01', 'YYYY-MM-DD') DATES FROM DUMMY;
-- Can keep on adding Dynamic Date as per your project Need
var_out =  SELECT UID,DAY_PICK,DATES , (DAY_PICK || '' || DATES) DATEKEY FROM :DD;

END

CV_DATES_HELP will give DAY_PICK which business can use and Date which you can pass to other input parameter.

Result

SAP HANA Studio, SAP HANA Materials, SAP HANA Certifications, SAP HANA Guide

2.  To check whether a string is valid date or not I am using a ISDate function

3. Stored procedure to convert Day description back to Date code as under

CREATE PROCEDURE "SchemaName"."IP_ASOF" (IN  IP_ASOF NVARCHAR(100), out IP_ASOFDATE NVARCHAR(10)) 
LANGUAGE SQLSCRIPT 
AS 
--CALL "SchemaName"."IP_ASOF"('TODAY',?) ;
BEGIN 
DECLARE VCOUNT INT ;
DECLARE DT NVARCHAR(10);

SELECT COUNT(*) INTO VCOUNT  FROM "_SYS_BIC"."PackageName/CV_DATES_HELP"
where DAY_PICK = UPPER(:IP_ASOF); 

--IF INPUT PARAMETER IS ONE OF 74
IF :VCOUNT > 0 THEN

SELECT DISTINCT DATES INTO IP_ASOFDATE FROM "_SYS_BIC"."PackageName/CV_DATES_HELP"
WHERE DAY_PICK = UPPER(:IP_ASOF);

ELSE 

 SELECT DISTINCT "_SYS_BIC"."ISDATENEW"(:IP_ASOF) INTO IP_ASOFDATE from dummy;

END IF;

END;

4. Passing values from input parameter to other parameter (Parameter Mapping)

1. In below images will show the changes made to input parameter IP_ASOFDATE initially was Direct parameter with Date datatype now it is changed to column getting value from CV_DATES_HELP view.

SAP HANA Studio, SAP HANA Materials, SAP HANA Certifications, SAP HANA Guide

2.  One more input parameter IP_ASOF is added which is using stored procedure IP_ASOF

SAP HANA Studio, SAP HANA Materials, SAP HANA Certifications, SAP HANA Guide

3. Do Parameter Mapping IP_ASOFDATE to IP_ASOF

SAP HANA Studio, SAP HANA Materials, SAP HANA Certifications, SAP HANA Guide

4. Once you have mapped the parameter then you have to change the filter expression from input parameter IP_ASOFDATE to IP_ASOF because now IP_ASOFDATE is a varchar date description, whereas IP_ASOF is the parameter which will get proper date value which will filter the table.

SAP HANA Studio, SAP HANA Materials, SAP HANA Certifications, SAP HANA Guide

Then activate the view…
Result

This way now even when you pass Date description in data preview editor or from front end stored procedure will convert date description or date as free text to date and pass on to input parameter IP_ASOF which eventually filter the table.

You can filter view by Date Description or Date as free text..

1. Parameter with Date Description

SAP HANA Studio, SAP HANA Materials, SAP HANA Certifications, SAP HANA Guide

Result

SAP HANA Studio, SAP HANA Materials, SAP HANA Certifications, SAP HANA Guide

2. Date as free text

SAP HANA Studio, SAP HANA Materials, SAP HANA Certifications, SAP HANA Guide

Result

SAP HANA Studio, SAP HANA Materials, SAP HANA Certifications, SAP HANA Guide

HANA Deep Insert

$
0
0
I have been very impressed with HANA and the ease in which you can expose an OData service for your entities and views. Since starting work on the platform I have found the need to store my entities using a deep insert. I thought surely this was possible, but like many I have been disappointed to find that this is not supported.

Currently the solution to this problem is to place the creates into a batch in the front end. My main issue with this is the parent Id is not returned to me to place into the child objects. I am then forced to place the child create in the success handler of the parent object create, losing the transaction functionality.
I would like to share my current solution to this shortcoming. It is a work in progress but the pattern is in place and functional. I have created a dynamic xsjs service that behaves in a way that you would expect from xsodata. Specific conventions must be met, but these can easily be customized to suit your scenario.

To get started, I have setup some basic tables with a parent / child relationship

DeepInsert.hdbdd

namespace dev;
@Schema : 'DEMO'

context "DeepInsert"
{
    entity "Parent"
    {
        key Id:Integer not null;
        Description:String(50);
        Temperature:DecimalFloat;
        Timestamp:UTCTimestamp;
    }
    entity "Child"
    {
        key Id:Integer not null;
        ParentId:Integer not null;
        Description:String(50);
    }
}


As I am using integers for my Id values I now need some sequences to cater for them.

SequenceParent.hdbsequence

schema= "DEMO";
start_with=1;
nomaxvalue=true;
minvalue=1;
cycles=false;
increment_by=1;
depends_on_table="dev::DeepInsert.Parent";

SequenceChild.hdbsequence

schema= "DEMO";
start_with=1;
nomaxvalue=true;
minvalue=1;
cycles=false;
increment_by=1;
depends_on_table="dev::DeepInsert.Child";


We now have our tables and a mechanism to create our Id values. To put this all together I have written an xsjs file. It is dynamic, relying on naming conventions to get the job done. It will work for any table in your application so long as you adhere to the following:

  • Your Id column is an Integer with the name “Id”
  • Your child foreign key is an Integer and named as a concatenation of the parent table name and “Id”
  • The sequence name for each table must be a concatenation of “Sequence” and the Table name of the entity
  • Your payload is JSON using the following structure:

{
"Object":
{
   "Parent":{
       "Id":-1,
       "Description":"Deep Insert Parent Object",
       "Temperature":25.2,
       "Timestamp":20170511183353,
       "Child":[{
           "Id":-1,
           "ParentId":-1,
           "Description":"Deep Insert Child Object 1"
       },
       {
           "Id":-1,
           "ParentId":-1,
           "Description":"Deep Insert Child Object 2"
       }]
   }
}
}

  • The element “Object” is required as the root level
  • The entity name must match the Table name it is stored in
  • The child entity name in the parent object must also match the table name of the child record. This must also be an array, even when only one entity is present

This is where the magic happens. DeepInsert.xsjs. The service uses reflection, recursion and naming conventions to provide the deep insert functionality. This will work for children, grandchildren and further down the line if need be.

The service parses the payload, reading all properties preparing a list of objects to place in a batch create. The Id values are generated in the preparation phase with the help of the defined sequences. The objects are listed in order with all keys in place so that no foreign key violations will occur during insert. Finally the objects are written to the database via sql query.

DeepInsert.xsjs

/*---------------------------------------------------------------------*
* Procedure: DeepInsert
*----------------------------------------------------------------------*
* Author: Bradley Smith
*----------------------------------------------------------------------*
* Description: Deep Insert Pattern
*----------------------------------------------------------------------
Parameter: Object
Format:
{
"Object":
{
   "Parent":{
       "Id":-1,
       "Description":"Deep Insert Parent Object",
       "Temperature":25.2,
       "Timestamp":20170511183353,
       "Child":[{
           "Id":-1,
           "ParentId":-1,
           "Description":"Deep Insert Child Object 1"
       },
       {
           "Id":-1,
           "ParentId":-1,
           "Description":"Deep Insert Child Object 2"
       }]
   }
}
}
*/

var objectsToCreate = [];
var detail = '';
function processObject(objectName, objectInstance, parentIdFieldName, parentId)
{
    try
    {
        //copy the object to prepare it for batch create
        var objectToCreate = JSON.parse(JSON.stringify(objectInstance));
     
        //get the new Id from relevant sequence
        var recordId = -1;
        var queryStr = 'select "dev::Sequence' + objectName + '".NEXTVAL as Id from dummy;';
        var conn = $.db.getConnection();
        var pstmt = conn.prepareStatement(queryStr);
        var rs = pstmt.executeQuery();
        while (rs.next()) {
               recordId = rs.getInteger(1);
        }
        rs.close();
        pstmt.close();
        conn.close();
        objectToCreate.Id = recordId;
     
        //detect and update parent id field
        if(parentIdFieldName && parentId)
        {
            objectToCreate[parentIdFieldName] = parentId;
        }
     
        var childObjectNames = [];
        var objectProperties = Object.getOwnPropertyNames(objectInstance);
        for(var objectPropertyIndex = 0;objectPropertyIndex < objectProperties.length; objectPropertyIndex++)
        {
            var propertyName = objectProperties[objectPropertyIndex];
            var propertyType = typeof objectInstance[propertyName];

            if(propertyType === 'object')
            {
                if(Array.isArray(objectToCreate[propertyName]))
                {
                    //relationship 1..*
                    childObjectNames.push(propertyName);
                 
                    //remove from the new object as it will prevent odata insert
                    delete objectToCreate[propertyName];
                }
            }
        }

        //queue new object ready for batch create
        objectsToCreate.push({ "ObjectName": objectName, "Object": objectToCreate });
     
        //process child objects One To Many
        for(var childObjectNameIndex = 0; childObjectNameIndex < childObjectNames.length;childObjectNameIndex++)
        {
            var childObjectName = childObjectNames[childObjectNameIndex];
            var childObjectCollection =  objectInstance[childObjectName];
            for(var childObjectIndex = 0; childObjectIndex < childObjectCollection.length; childObjectIndex++)
            {
                var childObject = childObjectCollection[childObjectIndex];
                processObject(childObjectName, childObject, objectName + 'Id', objectToCreate.Id);
            }
        }
    }
    catch(e)
    {
        //catch all error condition
        $.response.status = $.net.http.INTERNAL_SERVER_ERROR;
        $.response.contentType = "application/json";
        $.response.setBody(e.toString());
    }
}

function createObjects()
{
    var conn = $.db.getConnection();
    try
    {
        var parentId = 0;
     
        for(var objIndex = 0;objIndex < objectsToCreate.length; objIndex++)
        {
            var fieldsStr = "";
            var valuesStr = "";
         
            var objectName = objectsToCreate[objIndex].ObjectName;
            var objectInstance = objectsToCreate[objIndex].Object;
            if(objIndex === 0)
            {
                parentId = objectInstance.Id;
            }

            var objectProperties = Object.getOwnPropertyNames(objectInstance);
            for(var objectPropertyIndex = 0;objectPropertyIndex < objectProperties.length;objectPropertyIndex++)
            {
                var propertyName = objectProperties[objectPropertyIndex];

                fieldsStr += '"' + propertyName + '"';
                valuesStr += '?';
             
                if(objectPropertyIndex < objectProperties.length - 1)
                {
                    fieldsStr += ',';
                    valuesStr += ',';
                }
            }
         
            var createQueryStr = 'INSERT INTO "dev::DeepInsert.';
            createQueryStr += objectName;
            createQueryStr += '" (';
            createQueryStr += fieldsStr;
            createQueryStr += ') values (';
            createQueryStr += valuesStr;
            createQueryStr += ');';
         
         
            var st = conn.prepareStatement(createQueryStr);
         
            //value loop to prevent sql injection
            for(objectPropertyIndex = 0;objectPropertyIndex < objectProperties.length;objectPropertyIndex++)
            {
                propertyName = objectProperties[objectPropertyIndex];
                var propertyValue = objectInstance[propertyName];
                var propertyType = typeof objectInstance[propertyName];
             
                if(propertyType === 'string')
                {
                    st.setString(objectPropertyIndex + 1, propertyValue);
                }
                else
                {
                    st.setString(objectPropertyIndex + 1, propertyValue.toString());
                }
            }
         
            st.execute();
        }
     
        conn.commit();
        conn.close();
     
        $.response.status = $.net.http.OK;
        $.response.contentType = "application/json";
        $.response.setBody(JSON.stringify({ "RESULT":"SUCCESS", "Id": parentId } ));
    }
    catch(e)
    {
        conn.rollback();
        conn.close();
     
        $.response.status = $.net.http.INTERNAL_SERVER_ERROR;
        $.response.contentType = "application/json";
        $.response.setBody(e.toString() + ' : ' + detail);
    }
}

try
{
    var reqParams = $.request.body.asString();
    reqParams = JSON.parse(reqParams);
    var object = reqParams.Object;

    //detect the parent object and begin processing
    var props = Object.getOwnPropertyNames(object);
    for(var i = 0;i < props.length;i++)
    {
        var parentObjectName = props[i];
        var parentObject = object[props[i]];
        var typeAttr = typeof object[props[i]];
        if(typeAttr === 'object')
        {
            //top level object detected. do not pass parent params as this is the top level
            processObject(parentObjectName, parentObject);
        }
    }

    createObjects();
}
catch(e)
{
     //catch all error condition
    $.response.status = $.net.http.INTERNAL_SERVER_ERROR;
    $.response.contentType = "application/json";
    $.response.setBody(e.toString());
}

Calling the service from UI5.

Instead of an OData create, we make a simple ajax call to the service. The authorization header is only required if calling from a remote system but included in the following example, also remember to handle your CORS appropriately

var sPayload = {
"Object":
{
   "Parent":{
       "Id":-1,
       "Description":"Deep Insert Parent Object",
       "Temperature":25.2,
       "Timestamp":20170511183353,
       "Child":[{
           "Id":-1,
           "ParentId":-1,
           "Description":"Deep Insert Child Object 1"
       },
       {
           "Id":-1,
           "ParentId":-1,
           "Description":"Deep Insert Child Object 2"
       }]
   }
}
};

var sUrl = 'https://acct.hanatrial.ondemand.com/dev/DeepInsert.xsjs';
$.ajax({
url:sUrl,
type:'POST',
data:JSON.stringify(sPayload),
dataType:'json',
contentType:'application/json',
headers: {
"Authorization": "Basic " + btoa('username:password')
 },
success: function(data) {
alert(data.Id);
},
error: function(error) {
alert(error.responseText ? error.responseText : error.statusText);
  }
});

We now have a dynamic deep insert that supports a single transaction. This can be easily customized to suit your own naming conventions and scenarios. For example using guids instead of Integers for Id fields.

It should be noted that Id values are generated whether the insert is successful or fails. These values may be wasted. Unfortunately this cannot be avoided with the current limitations.

Consuming SAP HANA Express Edition information models in Microsoft Power BI using live connection

$
0
0
Initially I created my account at https://powerbi.microsoft.com. I also subscribed for the Microsoft Power BI YouTube channel.

so, I decided to play around connecting Power BI with my SAP HXE instance. Generally speaking there are two ways of connecting and consuming SAP HANA information models in Power BI: Import and DirectQuery. For this post, I will be showing my SAP HANA live data connection with Power BI (DirectQuery).

Requirements needed for this tutorial:
  • SAP HANA 2.0,  Express Edition (my installation is based on Virtual Machine). more details here.
  • SAP HANA Studio
  • Microsoft Power BI Desktop
  • Microsoft Power BI On-premises data Gateway up and running
  • SAP HANA Interactive Education (SHINE), which is part of the SAP HANA express Edition
  • Power BI App from Itunes and/or Google Play store

My Private Network setup


Quick overview of my Network layout:

SAP HANA Tutorials and Materials, SAP HANA Certifications, SAP HANA Guide

Test case scenario


My test case consists in replicating one of the SHINE Dashboard into Power BI for learning proposes only. This scenario will use continuous connection with my SAP HANA database.

SAP HEX, SHINE (Interactive Education)


The following screenshot is from you SAP HEX installation: SHINE. Sales Dashboard:

SAP HANA Tutorials and Materials, SAP HANA Certifications, SAP HANA Guide

The following are the Calculation Views used as source for Sales Dashboard:

ChartCalculation View

1 & 2SALES_ORDER_RANKING
3        CUSTOMER_DISCOUNT_BY_RANKING_AND_REGION
4        SALESORDER_RANKING

The Calculation Views above belong to the SAP HANA Democontent package, EPM Models.

Power BI Desktop


now, down here is the same SHINE Sales Dashboard but this time built in Power BI Desktop

SAP HANA Tutorials and Materials, SAP HANA Certifications, SAP HANA Guide

Interpretation of the Charts as per Power BI Desktop:

Chart TypeTable (Information Model in SAP HANA)Fields 
 1Pie ChartSALES_ORDER_RANKINGRegion, NetAmount
 2Clustered Column ChartSALES_ORDER_RANKINGCountry, NetAmount
 3SlicerCUSTOMER_DISCOUNT_BY_RANKING_AND_REGIONRegion
 4Donut ChartCUSTOMER_DISCOUNT_BY_RANKING_AND_REGIONCompany Name, Discount
 5Scatter ChartSALESORDER_RANKINGCustomer_Name, Sales, Sales Rank, and Orders

it took me very little to build this report, considering my knowledge of Power BI: (roughly a month)

Power BI Desktop: Connection with SAP HEX database


When selecting the SAP HANA database connectivity, make sure to choose DirectQuery:

SAP HANA Tutorials and Materials, SAP HANA Certifications, SAP HANA Guide

Power BI On-premises Data Gateway


Considering the understanding of the previous steps, I would suggest the following sequence:
  1. Download the On-Premises Data Gateway from powerbi.microsoft.com
  2. Install it and make sure the installation as well as the connection are successful
  3. Go back to powerbi.microsoft.com and setup the datasource (connection) for the SAP HEX
  4. From Power BI Desktop client tool, publish your report into Power BI
For steps 1 and 2: The final results must be like this:

SAP HANA Tutorials and Materials, SAP HANA Certifications, SAP HANA Guide

For step 3: the Datasource (or connection) MUST be as same as the one used in the Power BI Desktop when connecting with the SAP HXE database:

SAP HANA Tutorials and Materials, SAP HANA Certifications, SAP HANA Guide

Tip: The Username and Password here is the one you created in step 2 when installing and setting up On-Premises Gateway. it has nothing to do with the SAP HANA database (from experience)

Step 3: Power BI Desktop: Finally publishing the report into Power BI by Choosing “Publish” from the extreme top-right corner. Choose the Workspace to be published to and hit Select:

SAP HANA Tutorials and Materials, SAP HANA Certifications, SAP HANA Guide

After the completion, the status will show up:

SAP HANA Tutorials and Materials, SAP HANA Certifications, SAP HANA Guide

done. pretty easy to setup.

Using Power BI Mobile App


Now I can just jump into my Power BI mobile App and interact with my Dashboard. Screenshot from my Iphone 7:

SAP HANA Tutorials and Materials, SAP HANA Certifications, SAP HANA Guide

SAP HANA Security: Granting Object Privileges with Repository Roles

$
0
0
This blog explains how to use the SAP HANA Web-Based Development Workbench to grant object privileges with repository roles in SAP HANA.

SAP HANA Web-Based Development Workbench

The SAP HANA Web-Based Development Workbench editor, hosted within the XS engine, provides an interface that you can use to build and test development artifacts. From a security perspective, we can use this interface to create and manage repository-based roles. This interface offers all the advantages of repository-based roles without the need to define those roles using scripts. The interface is not exclusive, meaning that you can edit repository-based roles created using scripts with the GUI interface, and you can edit a repository-based role’s scripts, those created using a GUI, in SAP HANA Studio. This flexibility allows the security administrator to manage the repository role using either interface.
You can access the SAP HANA Web-Based Development Workbench editor via a supported Internet browser. The following URLs can be customized to match the details of your environment:

http://sap-hana.myhost.com:8000/sap/hana/ide/editor

http://<sap_hana_host>:80<instance_number>/sap/hana/ide/editor

Replace <sap_hana_host> with the hostname of the SAP HANA system in your environment and <instance_number> with the two-digit instance number corresponding to your SAP HANA system.

For secure access, the following examples should help you construct the correct URL:

https://<sap_hana_host>:43<instance_number>/sap/hana/ide/editor

https://sap-hana.myhost.com:4300/sap/hana/ide/editor

To use the workbench and define a role, the user account first will need to be granted one of the roles listed below. Users only need one of the two roles to use the workbench.

SAP HANA Tutorials, SAP HANA Guide, SAP HANA Certifications

SAP HANA Tutorials, SAP HANA Guide, SAP HANA Certifications

SAP HANA Tutorials, SAP HANA Guide, SAP HANA Certifications

The SAP HANA Web-Based Development Workbench editor interface is very similar to the development areas within the Repositories tab of SAP HANA studio. The figure below shows the editor; on the left side, you’ll see a Content folder with the package hierarchy below it.

SAP HANA Tutorials, SAP HANA Guide, SAP HANA Certifications

As you expand the package hierarchy nodes, you’ll likely begin seeing development artifacts, depending on what’s available within your environment. To create a repository role, right-click the package where you want to store it and choose New > Role. A small window will appear asking for the Role Name. After entering the name, click OK and a new tab-based window will appear on the right. Click the Object Packages tab to manage object privileges. Select or add a catalog object to manage its privileges.

SAP HANA Tutorials, SAP HANA Guide, SAP HANA Certifications

To grant catalog object privileges, on the right side of the tab under the section labeled Privileges, select the checkbox next to each privilege name. Items that are checked will be granted; those unchecked won’t be granted. When finished, click the Save All icon to save and activate the repository role. Security administrators won’t be able to grant this repository role to other user or roles.

Users that want to avoid using SQL to grant catalog privileges or scripts to define catalog privileges in a repository role will find the workbench very useful. The GUI is very easy to use and decouples the security developer from the need to memorize SQL statements or script syntax. As you might know, there’s an option in SAP HANA Studio for granting standard roles and user privileges, but SAP HANA Web-Based Development Workbench offers options to define repository-based roles.

SAP HANA 2.0 SPS01 : What’s New for SAP HANA License Implemetation

$
0
0
Introduction: SAP HANA License keys are installed for uninterrupted usage of HANA database. You can install or delete HANA License keys using HANA studio, SAP HANA HDBSQL command line tool and HANA SQL Query Editor.

Types of License keys


SAP HANA system supports two types of License keys −
  • Temporary License Key − Temporary License keys are automatically installed when you install the HANA database. These keys are valid only for 90 days and you should request permanent license keys from SAP market place before expiry of this 90 days period after installation.
  • Permanent License Key − Permanent License keys are valid only till the predefine expiration date. License keys specify amount of memory licensed to target HANA installation. They can installed from SAP Market place under Keys and Requests tab. When a permanent License key is expired, a temporary license key is issued, which is valid for only 28 days. During this period, you have to install a permanent License key again.
There are two types of permanent License keys for HANA system −
  • Unenforced − If unenforced license key is installed and consumption of HANA system exceeds the license amount of memory, operation of SAP HANA is not affected in this case.
  • Enforced − If Enforced license key is installed and consumption of HANA system exceeds the license amount of memory, HANA system gets locked. If this situation occurs, HANA system has to be restarted or a new license key should be requested and installed.
Note: There is different License scenarios that can be used in HANA system depending on the landscape of the system (Standalone, HANA Cloud, BW on HANA, etc.) and not all of these models are based on memory of HANA system installation.

License Installation:
Earlier we have three different methods to install license in HANA Database. Here I am giving a brief explanation before moving ahead with new method introduced with HANA 2.0 SPS01.
1. Install License Using SAP HANA Studio: Login to SAP HANA Studio — Right Click SID and Click on Properties Tab. You can check license details or install new license key.


2. Install License using command line tool: Login SAP HANA Database OS level using      sidadm user. Execute the command as shown below:


3. Install License using SAP HANA SQL Query Editor: In SQL Editor to execute the command SET SYSTEM LICENSE <License File Location>


SAP HANA 2.0 SPS01 What’s New: With SAP HANA 2.0 SPS01 we are introduced with a new method for license installation more convenient(for end-user) using HANA Cockpit. 

Prerequisite: Below are the prerequisite for license installation using HANA Cockpit:
  • HANA release should be HANA 2.0 SPS01 and above.
  • Cockpit Navigation Basic understanding.
  • LICENSE ADMIN privilege user
Process: Below is the detailed explanation:

1.Login into HANA Cockpit and add HANA resources.Then click on Resources.


2. Scroll down to DB administration and click on Manage System License


It will take you to below screen. Here you can extract all details required for requesting license key directly from support.sap.com/licensekey or https://support.sap.com/en/my-support/keys.html


If you are requesting License key for newly installed system then first we need to provide system details(which are not already maintained on SMP). Hardware key can be extracted from HANA Studio as shown below:


3. Here you can enter details for newly installed system or directly request for License Key generation for existing systems.

sap hana tutorials and Materials, SAP HANA Certifications, SAP HANA Guide


4. After License is requested you will get License.txt file in your mailbox or you can download it from Service Market Place and install it in your system through HANA Cockpit by clicking in Add License Key (plus sign) on HANA Cockpit:

For New Installation

sap hana tutorials and Materials, SAP HANA Certifications, SAP HANA Guide

sap hana tutorials and Materials, SAP HANA Certifications, SAP HANA Guide

sap hana tutorials and Materials, SAP HANA Certifications, SAP HANA Guide

SAP HANA 2.0 SPS 00 What’s New: High Availability

$
0
0

Introduction


we will be posting new videos to the SAP HANA Academy to show new features and functionality introduced with SAP HANA 2.0 Support Package Stack (SPS) 00.

What’s New?

SAP HANA Cockpit


In the previous blog post about system administration, we have already discussed the new SAP HANA cockpit 2.0. For system replication, all the core administration activities can now be performed using this tool. This includes:
  • Registering primary and secondary systems
  • Sytem replication monitoring 
  • Take over and failback
  • Disabling

Active/Active (Read Enabled)


Another great new system replication feature is the new Log Replay – Read Access operation mode, which enables read-only access on the secondary system.


This means that the secondary system can now conveniently be used for reporting purposes. For more information.

SAP HANA Certifications, SAP HANA Guide, SAP HANA Tutorials and Materials

System PKI SSFS


With SAP HANA 2.0, system replication requires authentication for data and log shipping channels. For this, the certificates from the system PKI SSFS store are used. For the current release, automatic certificate copying is not yet integrated into the registration process for the secondary host and needs to be performed manually using file copy.


Using the secure copy command to copy the PKI SSFS store and key file from the primary to the secondary host:

# set the variables to match your environment
export RSECSSFS=/hana/shared/SHA/global/security/rsecssfs
export SIDADM=shaadm
export SECONDARY=mo-1caae8fcb.mo.sap.corp

# copy the system PKI SSFS store and key file from the primary to the secondary host
scp $RSECSSFS/data/SSFS_SHA.DAT $SIDADM@$SECONDARY:$RSECSSFS/data/
scp $RSECSSFS/key/SSFS_SHA.KEY $SIDADM@$SECONDARY:$RSECSSFS/key/

S/4 HANA Trial Balance CDS View

$
0
0
We were very excited when we discovered the standard SAP delivered CDS C_TRIALBALANCEQ0001 for displaying the Trial Balance as the calculation of opening and closing balances can be tricky and the Universal Journal ACDOCA table was new to us, as was S/4 HANA.

During our testing using the embedded BW we realised that the opening and closing balances it was returning was incorrect and upon consultation with SAP they confirmed that additional new Fiscal configuration is required on an S/4 HANA environment.
They guided us to Note 2458367 – Trial Balance: incorrect ending balance (created on 13.04.2017, two days after we opened the ticket) which led us to the configuration in SPRO below for doing an initial fill of the required Fiscal tables (we applied the SAP S/4 HANA on-premise section of the note). After we applied the note our opening and closing balances were 100% correct.

SAP HANA Tutorials, SAP HANA Materials and Guide, SAP S/4 HANA

I’ve detailed the steps on how we discovered the problem just to provide insight to anyone not familiar with embedded analytics and CDS Views, as well as the Embedded BW.

How we found the problem…


The Trial Balance ABAP managed CDS is comprised of a DDL source C_TRIALBALANCEQ0001 which generates a DDL SQL view CFITRIALBALQ0001.

If you look at the DDL source (I am using the ABAP perspective in HANA Studio) you will see the link to the name of the view that is generated. Take note that the VDM.viewType annotation is set to #CONSUMPTION.

SAP HANA Tutorials, SAP HANA Materials and Guide, SAP S/4 HANA

Here I am looking at the generated view using transaction SE11 via the SAP GUI:

SAP HANA Tutorials, SAP HANA Materials and Guide, SAP S/4 HANA

Scrolling down in the DDL source you will see from which view it selects its data from which is I_Glacctbalancecube.

SAP HANA Tutorials, SAP HANA Materials and Guide, SAP S/4 HANA

Opening DDL source I_Glacctbalancecube (again using the ABAP perspective in HANA Studio) shows us that it will generate a view called IFIGLBALCUBE. Take note that the VDM.viewType annotation is set to #COMPOSITE.

SAP HANA Tutorials, SAP HANA Materials and Guide, SAP S/4 HANA

This information shows us that we have two related views:
  1. Composite view called IFIGLBALCUBE – when activated it generates a transient provider for the Embedded BW with the naming convention 2C<SQLViewName> so in this case 2CIFIGLBALCUBE
  2. Consumption view called CFITRIALBALQ0001 – when activated it creates a transient query for the Embedded BW with the naming convention 2C<SQLViewName> so in this case 2CCFITRIALBALQ0001

We can now go to transaction RSRT on S/4 HANA to see the generated objects:

SAP HANA Tutorials, SAP HANA Materials and Guide, SAP S/4 HANA

We then executed the Trial Balance query with the appropriate parameters select the correct Fiscal Year and Leading Ledger:

SAP HANA Tutorials, SAP HANA Materials and Guide, SAP S/4 HANA

Making sure to also create a wide interval for the mandatory posting date variables:

SAP HANA Tutorials, SAP HANA Materials and Guide, SAP S/4 HANA

We sliced and diced the output to show the value for GL Account 22269600 for all available Fiscal periods. Note that it showed me an Starting Balance value of -166,974,00 ZAR and a Closing Balance value of 0,00 ZAR.

SAP HANA Tutorials, SAP HANA Materials and Guide, SAP S/4 HANA

We then went to transaction FAGLB03 to double-check the results:

SAP HANA Tutorials, SAP HANA Materials and Guide, SAP S/4 HANA

The results showed me that since Period 008 had no values, the Starting Balance should have been 0 and the closing balance should have been 166,974

SAP HANA Tutorials, SAP HANA Materials and Guide, SAP S/4 HANA

After applying the note all the results showed correctly.

Hana DR – Replication of INI parameters

$
0
0
Before Hana SPS12 we always have to manually setup the INI parameters on the secondary site after a change in the primary. It is not a tough thing to do nevertheless SPS12 introduced a feature to get a synchronization between the systems in a DR scenario also for INI parameter changes. One more step in the Hana synchronization and in my opinion it’s welcome.

I’ll not go into the replication configuration steps just describe my findings on the INI replication subject. Hope you get it useful.
Note: After installing SPS12 the parameter [inifile_checker]/enable = true

SAP HANA DR, SAP HANA Replication and Parameters

The parameters starting by fixed_exclusion are not documented in the SAP Note 2036111 and respective attach. They correspond to values we get after installing the system as SAP default and as such we cannot change them. If we try to change such a parameter we get the following message which I think is very clear on the usage of these parameters and the [inifile_checker]/exclusion*

SAP HANA DR, SAP HANA Replication and Parameters

Just for reference follows a screen shot of DR configuration I’ve setup to show this INI replication features:

SAP HANA DR, SAP HANA Replication and Parameters

After doing these configuration we get the parameter [inifile_checker]/replicate=true also in the global.ini file of secondary system as we could see “cating” the global.ini file:

SAP HANA DR, SAP HANA Replication and Parameters

I suggest to change the parameter parallel_data_backup_backint_channels from the default 1 to the value 2 and look that it immediately replicates to the secondary. Print screen of secondary above.

And what’s about the exceptions list? By default the ini parameters related to server names and others that are site specific belong to an exception enumeration we wouldn’t replicate.

Just to illustrate I suggest to change e.g. operation_mode:

SAP HANA DR, SAP HANA Replication and Parameters

Because this is in the exception enumeration it doesn’t replicate in the secondary system. In this case it makes sense to not replicate automatically because to have a such a change we have to follow a specific procedure with different steps to run on primary and others on secondary server before getting this parameter completely activated in the DR configuration.

How To Calculate Student Average Marks in SAP HANA Studio Using Calculation View

$
0
0
Scenario : In This Scenario I am going Explaining about Calculating Student Average Marks using Calculated Column in Calculation View.

Calculation Views are used to combine other Analytic, Attribute and other Calculation views and base column tables. These are used to perform complex calculations, which are not possible with other type of Views.
Characteristic of SAP HANA Calculation View as below –
  • Support Complex Calculation.
  • Support OLTP and OLAP models.
  • Support Client handling, language, currency conversion.
  • Support Union, Projection, Aggregation, Rank, etc.
SAP HANA Calculation View are of two types –
  1. SAP HANA Graphical Calculation View (Created by SAP HANA Studio Graphical editor).
  2. SAP HANA Script-based calculations Views (Created by SQL Scripts by SAP HANA Studio).

Graphical Calculation Views


  • Can consume other Analytical, Attribute, other Calculation Views & tables
  • Built-in Union, Join, Projection & Aggregation nodes
  • Provides additional features like Distinct, Count, Calculation, dynamic joins
  • No SQL or SQL Script knowledge required
In this Scenario I am going Explaining about Calculating Student Average Marks using Calculated Column in Calculation View.

Follow the Below Steps to Find Student Average Marks.

Step 1: Create a Table “STUDENT_DETAILS” with following structure

SAP HANA Calculation, SAP HANA Studio, SAP HANA Guide

Execute the table

SAP HANA Calculation, SAP HANA Studio, SAP HANA Guide

Open the SQL console and insert the following data

SAP HANA Calculation, SAP HANA Studio, SAP HANA Guide

Executed it and see the table data

SAP HANA Calculation, SAP HANA Studio, SAP HANA Guide

Step 2 : Create the Calculation View

Go to Schema–>select New–>select Calculation View

SAP HANA Calculation, SAP HANA Studio, SAP HANA Guide

Create the Calculation View with the name of “STUDENT_AVERAGE_CALCULATION”.

SAP HANA Calculation, SAP HANA Studio, SAP HANA Guide

Select “Finish” Button Then appear the next screen.

SAP HANA Calculation, SAP HANA Studio, SAP HANA Guide

Here take one Projection_1

SAP HANA Calculation, SAP HANA Studio, SAP HANA Guide

Here select the “+” Symbol to select the Table “STUDENT_DETAILS”

SAP HANA Calculation, SAP HANA Studio, SAP HANA Guide

Select the Add all to output

SAP HANA Calculation, SAP HANA Studio, SAP HANA Guide

Here create the one Calculated Columns

Click on Calculated Columns –> select New


SAP HANA Calculation, SAP HANA Studio, SAP HANA Guide

Create Calculated Column Name ” AVERAGE_OF_STUDENT”

In  Expression Editor give the Syntax like below to find avarage of  the marks

(Total Marks) / (number of subjects)

(“SUBJECT_1″+”SUBJECT_2″+”SUBJECT_3″+”SUBJECT_4”)/4

SAP HANA Calculation, SAP HANA Studio, SAP HANA Guide

Now Calculated Column is created

SAP HANA Calculation, SAP HANA Studio, SAP HANA Guide

Add “AVERAGE_OF_STUDENT” calculated column to output

SAP HANA Calculation, SAP HANA Studio, SAP HANA Guide

Save and Activate the view.

And see the Data Preview.

OUTPUT :

SAP HANA Calculation, SAP HANA Studio, SAP HANA Guide

In output we can see “AVERAGE_OF_STUDENT” Calculated Column.
Viewing all 711 articles
Browse latest View live


<script src="https://jsc.adskeeper.com/r/s/rssing.com.1596347.js" async> </script>